

This guide will provide step-by-step instructions on changing the RJ-45 port roles, changing interface IP subnet schemes and creating DHCP reservations (static DHCP) on the ZyWALL USG routers.
Overview
The “Port Roles” option on the ZyWALL router gives you the ability to group ports together to create a network which is separate from the other physical ports. This allows you to have multiple networks configured on the router without the use of VLANs to separate the network traffic.
Supported Devices
ZyWALL USG 20
ZyWALL USG 20W
ZyWALL USG 50
ZyWALL USG 100
ZyWALL USG 200
ZyWALL USG 300
ZyWALL USG 1000
ZyWALL USG 2000
ZyWALL 110
USG 40
USG 40W
USG 60
USG 60W
USG 110
USG 210
Setting Port Roles/Groups
The ZyWALL routers have multiple internal interfaces configured out of the box. Each interface uses a different IP subnet. By default the LAN1 interface is configured with an IP subnet of 192.168.1.0/24, LAN2 is configured with a subnet of 192.168.2.0/24 and the DMZ is configured with a subnet of 192.168.3.0/24. The higher end ZyWALL may have an ExtWLAN interface, an OPT interface or every port is individual (USG300 and higher). Each interface has specific ports attached to it; LAN1 for instance is usually assigned to ports P2 & P3 depending on the ZyWALL model, LAN2 is assigned to P4 and the DMZ on P5. If you want to re-assign the ports to different interfaces or all the ports to one interface if you are not planning on using the other network interfaces, this can be done on the Port Role menu (Configuration → Network → Interface → Port Role).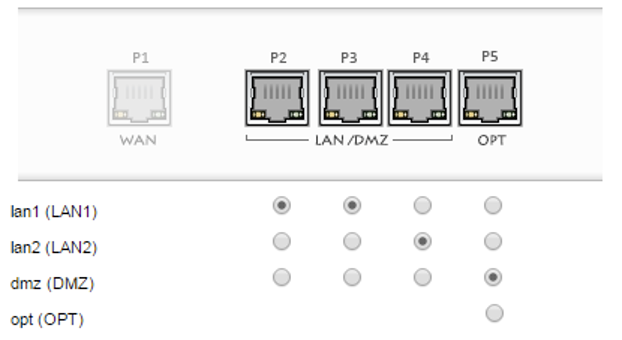
To set the port to a specific interface group, click the radio to make the port member of that group/interface. The screenshot below shows all ports grouped together as part of the LAN1 interface.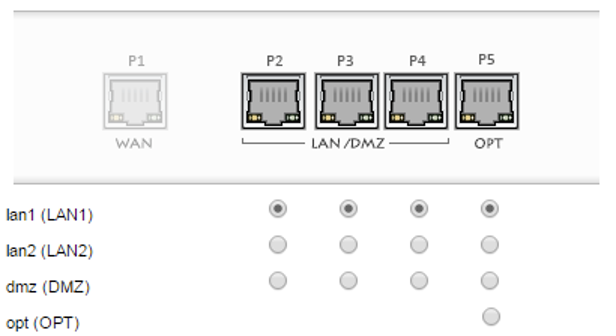
On the ZyWALL USG 300/1000/2000 the ports are grouped by color scheme. To change the role of the port you would just click on the physical port icon and drag it to the color you want to group the port on.
IP Subnet/Scheme Setup
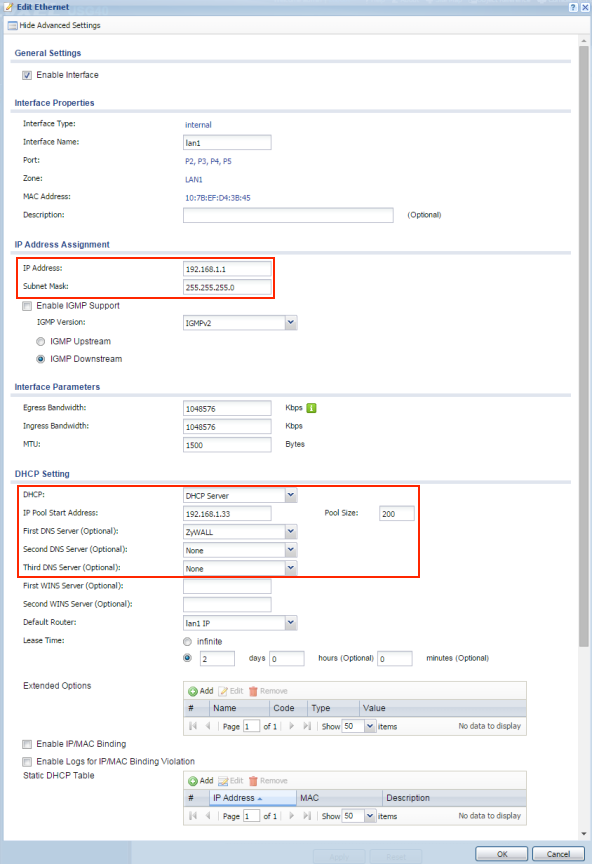
To change the internal interface IP scheme to something else, go to Configuration → Network → Interface → Ethernet. You will find all the interfaces in this menu, both external (WAN) and internal (LAN1, LAN2….) interfaces. Changing the IP scheme is helpful if you plan on using any of the VPN features. The default IP schemes are the most commonly used by most router manufactures, changing the IP scheme will help minimize IP conflicts if you are planning to use VPN. If there are no plans on using any VPN functionality or the IP schemes being used by the ZyWALL are not conflicting with any other network equipment you can leave them as they are.
- To make the IP change, double-click the interface you wish to edit.
- Click the “Show Advanced Settings” option on the top left to see all the setting features.
- Scroll down to the “IP Address Assignment” portion and type in the new IP scheme settings you wish to use.
- Scroll down to the “DHCP Setting” and set the DHCP server start IP to match the new IP scheme and set the pool size. You can also disable the DHCP server by selecting NONE from the dropdown if you have a different device that will be handling DHCP on the network.
- Configure the DNS server settings the DHCP server will provide to clients.
- Click OK to save and apply the settings.
DHCP Reservation (Static DHCP)
If you wish to configure DHCP reservations or static DHCP, you can accomplish this two different ways. You can manually type in the MAC Address and reserved IP address OR you can open the DHCP table (DHCP client) list and check the box to reserve the IP address for the computer(s).
DHCP Table
To reserve the computer's IP address using the DHCP client list, go to the status screen (Dashboard) menu. In the status screen (Dashboard) there are multiple boxes or widgets with information. Look for the “System Status” box/widget. Here you will find the option to open/view the DHCP Table, click on the number link to the right of the DHCP Table option to open/view the DHCP client list.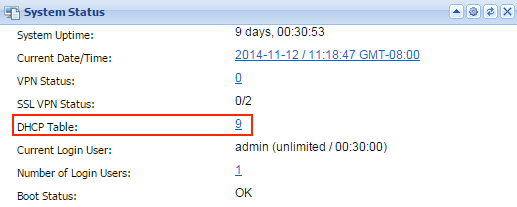
Once in the DHCP client table, lookup the computer you wish to add the reservation for and check the “Reserve” box.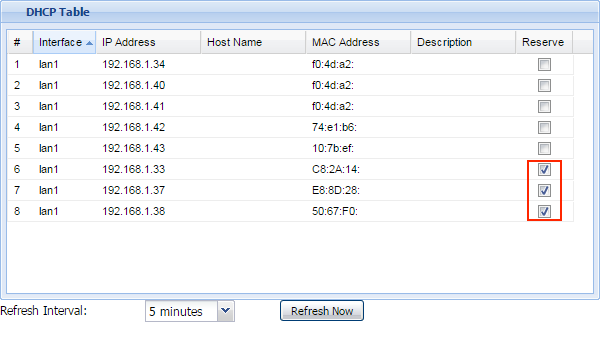
Manual DHCP Reservation Setup
To manually add reservations go to Configuration → Network → Interface → Ethernet and edit the interface you will to add the manual reservation to. Click the option on the top left to “Show Advance Setting” and scroll down to the “DHCP Setting” section. The Static DHCP Table should be the last option for the DHCP Setting section.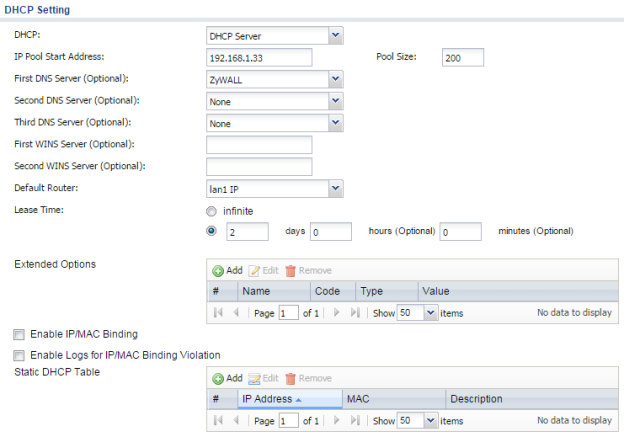
- Click the Add button to insert a reservation entry.
- Type in the IP address you wish to reserve.
- Type in the MAC address of the computer you are reserving the IP address for.
- Provide a description of the device. (ex: My-PC, IP-Cam, etc…)

- Repeat the process to add all your reservation entries.
Comments
0 comments
Please sign in to leave a comment.