

This guide is designed to provide an example on setting up load balancing, or failover, on your router for the best possible performance out of your internet connections.
Overview
Load balancing divides traffic loads between multiple WAN interfaces. This allows you to improve the quality of service and maximize bandwidth utilization for multiple ISP links.
Supported Devices
ZyWALL USG 50
ZyWALL USG 100
ZyWALL USG 200
ZyWALL USG 300
ZyWALL USG 1000
ZyWALL USG 2000
ZyWALL 110
ZyWALL 310
ZyWALL 1100
USG40*
USG40W*
USG60
USG60W
USG110
USG210
USG1100
USG1900
USG20-VPN**
USG20W-VPN**
USG2200-VPN
*OPT port can be configured as WAN
**SFP can be configured as WAN
Step A – WAN Port Setup
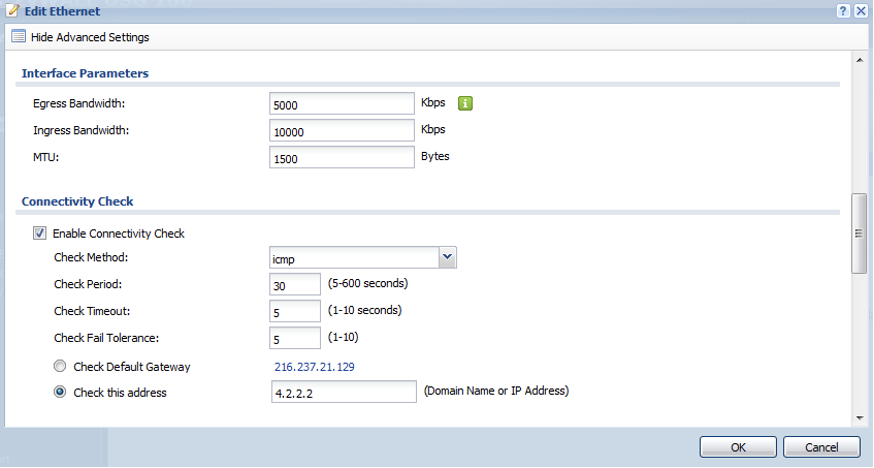
Let’s begin by accessing the ZyWALL web configuration screen. To do this, connect your computer directly (via Ethernet) to the ZyWALL routers LAN1. Open an internet browser (Internet Explorer, Firefox, Chrome, etc.) and on the address bar type, http://192.168.1.1. Once logged in to the web configurator go to, Configuration → Network → Interface → Ethernet. Edit the WAN connection(s) and enable the “Connectivity Check” feature, this will allow the ZyWALL to send an ICMP (PING) test to a desired server (or test against a TCP port) to verify the connection is up and running. When editing the WAN connection please be sure to click the option on the top left to “Show Advanced Settings”, once all settings are being displayed scroll down on the screen to find the Interface Parameters.
- Specify what the connection upload speed (Egress) is.
- Specify what the connection download speed (Ingress) is.
- Check the box to “Enable Connectivity Check”.
- Select a Check Method (ICMP or TCP)
- Specify a Check Period between 5-600 seconds. (This is the interval between connection check attempts)
- Specify a Check Timeout period between 1-10 seconds. (This is the time period the ZyWALL will wait for a response before the attempt is a failure)
- Specify a Fail Check Tolerance, between 1-10. (This is the number of consecutive failures to the connectivity check before the ZyWALL stops routing through this WAN connection)
- Specify what domain name or IP address the ZyWALL will run its connectivity checks against. By default the ZyWALL will test against the default gateway for the WAN connection. We recommend testing against a stable and reliable server. The gateway address provided by the ISP isn’t always set to respond to a PING request. This will cause the connectivity check to fail and the ZyWALL will not route traffic through the internet connection.
Note: If you selected the Check Method to use TCP you will need to specify the TCP port to test/check against.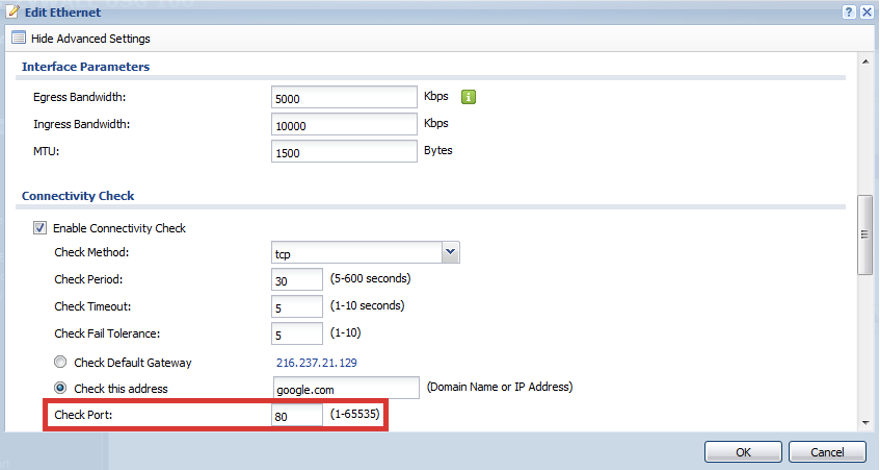
Step B – Trunk Setup
The load balancing algorithms supported by the ZyWALL routers are:
- Weighted Round Robin -- balance the traffic load between interfaces based on their respective weights. An interface with a larger weight gets more chances to transmit traffic than an interface with a smaller weight. For example, if the weight ratio of wan1 and wan2 interfaces is 2:1, the ZyWALL chooses wan1 for 2 sessions’ traffic and wan2 for 1 session’s traffic in each round of 3 new sessions.
- Least Load First -- send new session traffic through the least utilized trunk member.
- Spillover -- send network traffic through the first interface in the group member list until there is enough traffic that the second interface needs to be used (and so on).
- Failover –- send all traffic through primary internet connection, second connection is used as backup it case primary connection fails.
The ZyWALL uses the Least Load First load balancing algorithm out of the box. In you wish to use a different algorithm you will need to create a new TRUNK connection. To setup the new TRUNK go to Configuration → Network → Interface → Trunk. In the trunk menu there is an option for “User Configuration”, click the Add button to insert a rule.
Provide a name for the trunk entry
Select the desired load balancing algorithm
Add WAN connections to the trunk member list
If using Weighted Round Robin, specify weight ratios for each WAN connection from 1-10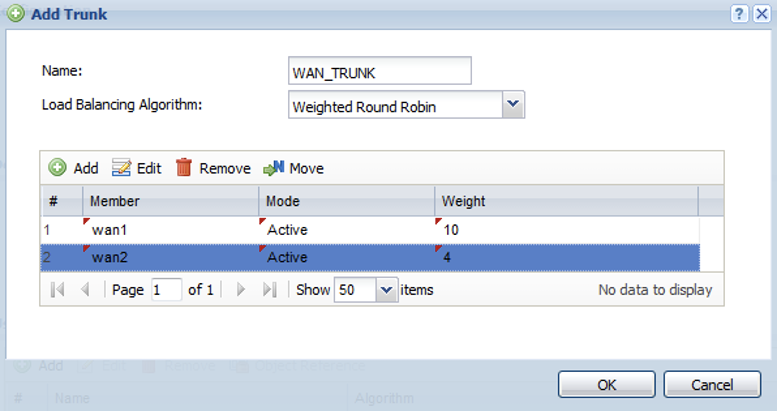
If using Spillover algorithm specify what the traffic limit (spillover) is before ZyWALL starts using second internet connection.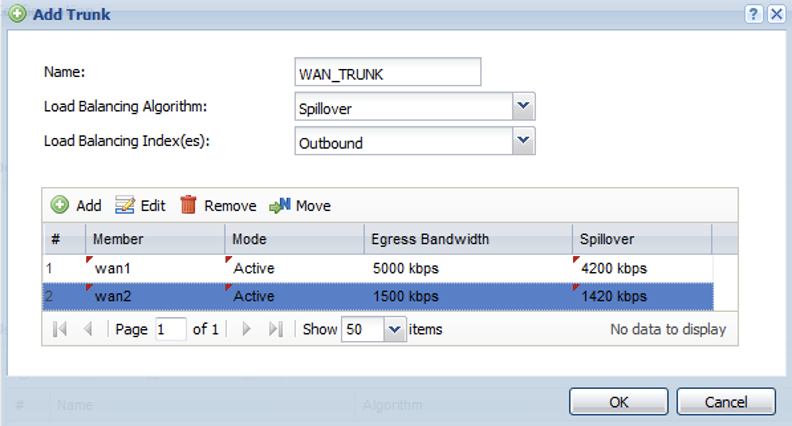
When configuring a Failover connection the selected load balancing algorithm does not matter since only one connection will be active. Change the mode for the backup internet connection to “Passive”, this will put the connection on standby. Internet traffic will only go out using the “Active” connection (primary). If the connectivity check fails on the active (primary) connection the ZyWALL will activate the secondary connection from standby and begin routing traffic through this connection. The ZyWALL will continue to run the connectivity check based on the specified check period interval. Once the primary connection is back up and running the ZyWALL will place the secondary WAN connection (Passive) back on standby.
Step C – Activating new WAN Trunk
Once you have added your “User Configuration” trunk entry change the Default WAN Trunk selection to use your User Configured WAN Trunk instead of the SYSTEM_DEFAULT_WAN_TRUNK.
Note: if using failover you will also need to check the box to “Disconnect Connections Before Falling Back”. This option terminates existing connections on an interface which is set to passive mode when any interface set to active mode in the same trunk comes back up.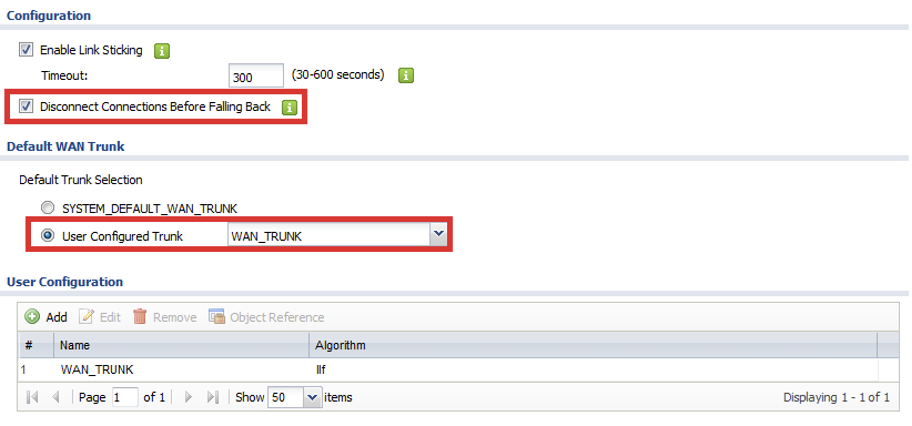
Tips:
When using dual WAN connections it is recommended that you use public DNS servers to resolve your domain name queries. Most DNS servers provided by ISPs can only be used through their internet service. This would cause a problem if your computer is attempting to use WAN1 DNS servers, for example, to try and query domain names through the WAN2 connection. Public DNS servers work through just about any service provider. Some ISPs will block DNS traffic to servers other than their own, this is mainly due to government policies. You can use Google’s public DNS servers or go to a website like http://public-dns.tk/ to view a list of public DNS servers based on country.
Configuring DNS server entries on the ZyWALL can be done in two places. First place is the system DNS server entries, this is where you can configure the DNS server the ZyWALL will use. To configure this go to Configuration → System → DNS and under the “Domain Zone Forwarder” click the Add button to insert a DNS server entry.
For a Domain Zone name add an asterisk (*)
Select the Public DNS Server option and enter the DNS server IP address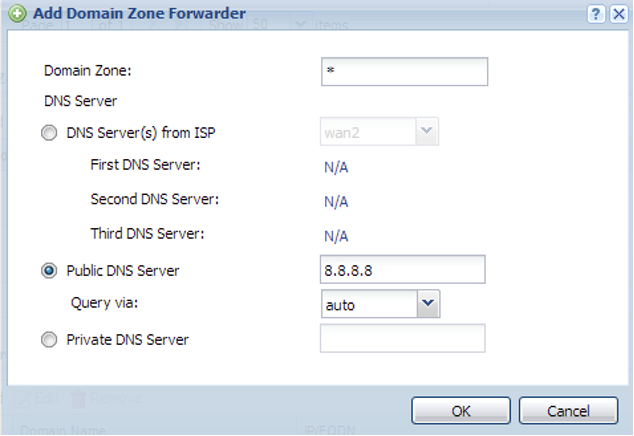
Second place DNS can be configured is the DHCP server. Go to Configuration > Network > Interface and click the Ethernet tab. On this menu you will see all the interfaces, WAN1, WAN2, LAN1, LAN2 or GE ports depending on the ZyWALL model. Edit the internal interface you are using (LAN1, LAN2, GE#) and scroll down the menu to the DHCP Setting. Set the DNS server(s) option to “custom defined” and enter the DNS server IP(s).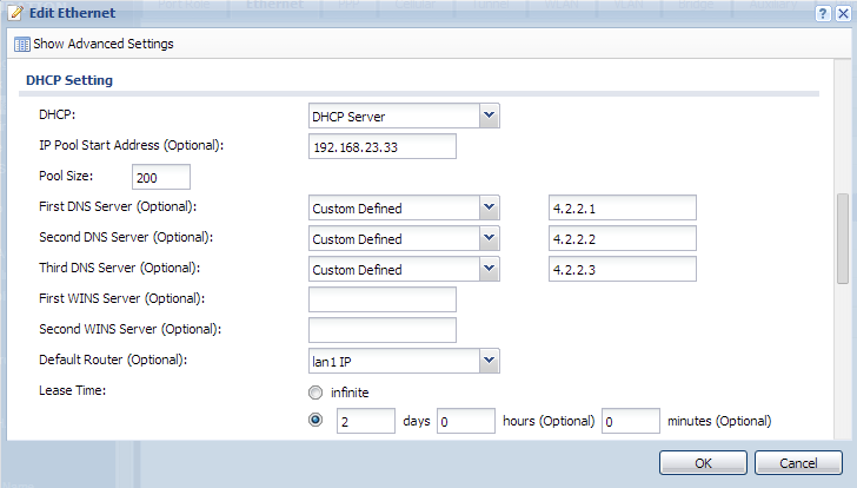
Comments
0 comments
Please sign in to leave a comment.