This guide goes through the setup process of the GS22XX series switches. This walkthrough covers initial IP setup of the switch, VLAN setup and firmware updates.
Overview
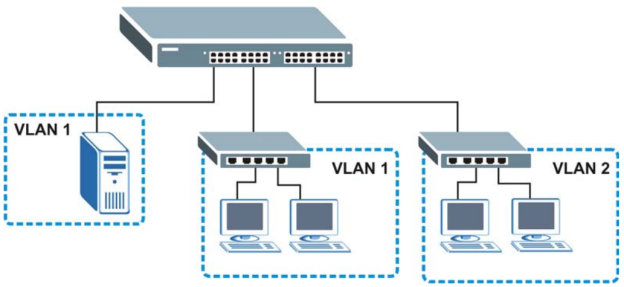
A VLAN (Virtual Local Area Network) allows a physical network to be partitioned into multiple logical networks. Stations on logical networks belong to one or more groups. With VLANs, a station cannot directly "talk to" or "hear from" stations that are not in the same group(s) unless such traffic first goes through a router.
Supported Devices
GS2200-8
GS2200-8HP
GS2200-24
GS2200-24P
GS2200-48
GS2210-8
GS2210-8HP
GS2210-24
GS2210-24HP
GS2210-48
GS2210-48HP
Scenario
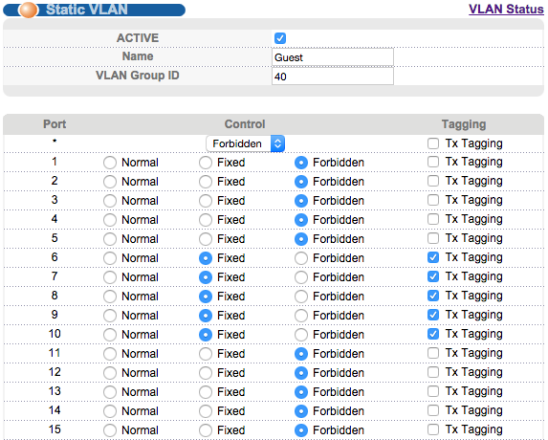
For this VLAN setup example we will be configuring two VLANs (VLAN 40 and VLAN 50) on a GS2200-24P switch. Port 24 will be used as the uplink port to the router which is VLAN aware. Port 6-10 will be configured as members of VLAN 40. Port 11-15 will be configured as members of VLAN 50. Port 24 will be used as the uplink port to the internet gateway so it will be a member of both VLAN 40 & VLAN 50 (tagged).
Step A – Connecting the switch to the network
Before you connect the switch into the network you will need to change the IP address of the device. By default the switch is configured with a 192.168.1.1 address. This address may conflict with your gateways IP address since 192.168.1.1 is the most commonly used IP setup. To change the IP address via the Web GUI you will first need to connect a computer directly to the switch (any port). Once you have the computer connected you will need to manually assign your computer with an IP address in the 192.168.1.x subnet. Below you can find instructions to change the IP address settings on your computer.
How to manually configure an IP address on Windows OS
How to manually configure an IP address on Apple macOS
Set your computer IP address settings back to default settings (DHCP) when finished.
You can also change the IP address of the switch using the console connection. Below are the commands needed to manually set an IP address on the switch or set it to automatically obtain an IP address from your DHCP server, all via console.
Manually Set an IP Address via Console
Connect a computer via console and set the following COM settings to communicate with the switch: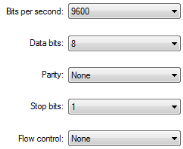
You will be prompted for user credentials to access the CLI management screen. Default username is ‘admin' and the password is ‘1234'.
GS2200#GS2200# configure
GS2200(config)# vlan 1
GS2200(config-vlan)# ip address default-management <ip address> <subnet mask>
GS2200(config-vlan)# ip address default-gateway <ip address>
GS2200(config-vlan)# exit
GS2200(config)# exit
GS2200# write memory
GS200# exit

Set Switch for DHCP via Console
Connect a computer via console and set the following COM settings to communicate with the switch:
You will be prompted for user credentials to access the CLI management screen. Default username is ‘admin' and the password is ‘1234'.
GS2200#GS2200# configure
GS2200(config)# vlan 1
GS2200(config-vlan)# ip address default-management dhcp-bootp
GS2200(config-vlan)# exit
GS2200(config)# exit
GS2200# write memory

To see what address the DHCP server assigned to the switch you can use the following command:
GS2200# show ipSet IP via Web GUI
To access the Web GUI of the device, open a web browser and type in the switches IP address on the address bar, the default address is 192.168.1.1. To manually change the IP address or set the switch for DHCP via the Web GUI, go to Basic Setting → IP Setup and click the radio to set the device for DHCP Client or manually type in a new Static IP Address for the switch. Click Apply to save the change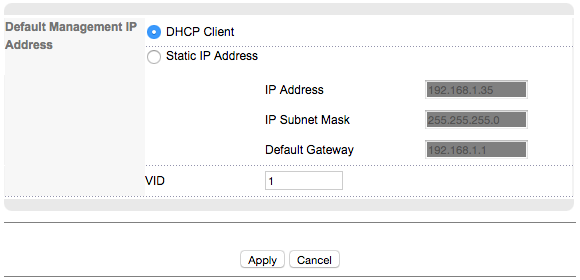
Step B – 802.1q VLAN Setup
To setup VLANs on the GS22XX switch go to menu, Advanced → VLAN and click the Static VLAN option on the top right of the VLAN menu window.
- Check the box to "ACTIVATE" the VLAN entry.
- Give the VLAN a name
- Provide a VLAN ID
- Set the ports that will be a member of the configured VLAN as "Fixed"
- Ports that will not be members of the VLAN should be set to "Forbidden"
- Set the tagging on the port, check the "Tx Tagging" box to tag traffic
- Scroll to the bottom of the window and click the Apply button to add the entry
- Repeat the steps to add any other VLAN entries (VLAN 50) and click the SAVE button on the top right to write changes to the configuration file
If you will be connecting equipment that is not VLAN aware, you may need to set the PVID to set the traffic going through a port as a member of the VLAN. In the VLAN menu (Advanced → VLAN) click on the "VLAN Port Setting" option for a list of all ports and assigned PVID. By default all ports are set with a PVID of "1", this means that any device connected to the port which is not VLAN aware will be treated as VLAN 1 traffic. Setting port 8 for example to a PVID of 40 will treat all traffic (not VLAN aware) as VLAN 40 traffic.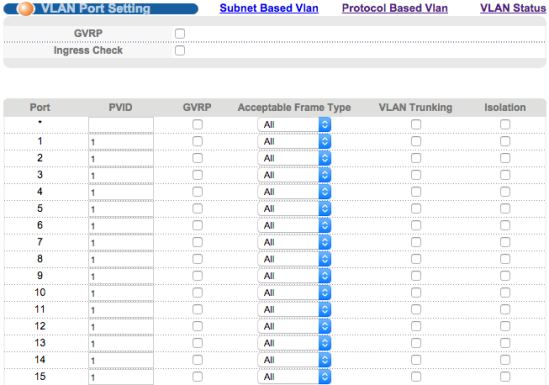
Step C – Switch VLAN IP
To configure an IP address for the switch on a specific VLAN, go to Basic Setting → IP Setup. From the "Management IP addresses" option you can give the switch an IP address for every configured VLAN. This will allow users on the VLAN to access the switch for any management purpose.
- Assign an IP Address for the switch
- Set the IP Subnet Mask
- The VLAN ID for this IP
- Default Gateway of this VLANs network

Once you have added your entries you can see a list of all the configured IP addresses and their binding VLAN network.
If you do not wish to allow access to the switch from any of the other VLANs, leave this option blank.
Step D – Save changes to configuration
Clicking the Apply button on every menu after changes are made only applies the change to cached memory, if a reboot is performed on the switch all the settings revert back to their previous state. Click the SAVE button on the top right to write changes to the configuration file this will permanently store all changes made to the switch.
Upgrading Firmware
To download firmware patches for Zyxel products you can visit any of the options below.
Website – http://www.zyxel.com/us/en/support/download_library.shtml
FTP site – ftp://ftp.us.zyxel.com
Once you have downloaded the correct firmware patch, extract the BIN file from the compressed folder. Firmware can be uploaded to the switch via console or Web GUI. This guide will go over the Web GUI process of updating firmware.
Login to the Web GUI and go to menu, Management → Maintenance, click the Firmware Upgrade option to redirect to the firmware upgrade menu.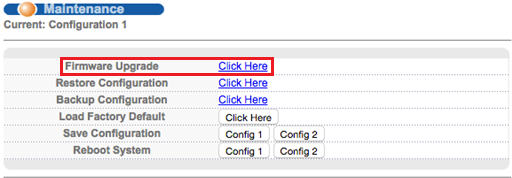
From the firmware upgrade menu click the button to "Choose File" and browse to computer directory you extracted the BIN file to. Select the BIN file and click the "UPGRADE" button to start the upgrade process (process takes about 5 minutes to complete).
Testing and Troubleshooting
VLAN
VLAN not working (no traffic):
- Verify that the computer or device has an IP address within the VLAN IP scheme
- If computer or device is not VLAN aware, set the PVID settings accordingly
- Make sure the gateway router has a route allowing VLAN networks internet access
- Try pinging the VLAN networks default gateway, if successful, try pinging an external IP address such as Google's DNS server (8.8.8.8 and/or 8.8.4.4), if successful, check DNS settings
- Contact Zyxel Technical support for additional support. Support is available Monday through Friday from 8AM to 5PM PT @ 800-255-4101 option 5. You can also get email support by completing the "Support Request Form" here.
Firmware Upgrade
Receive an error trying to upgrade the firmware:
- Try using a different browser to rule out compatibility (Safari is not recommended)
- Make sure you have downloaded the firmware patch for the switch model
- Firmware may not take if you are skipping to many patches, don't skip more than two patches at a time
- Attempt flashing firmware via console
- Contact Zyxel Technical support for additional support. Support is available Monday through Friday from 8AM to 5PM PT @ 800-255-4101 option 5. You can also get email support by completing the "Support Request Form" here.
Comments
0 comments
Please sign in to leave a comment.