

This guide will provide instructions on setting up the captive portal (Web Authentication) capability of the ATP/VPN appliances.
Overview
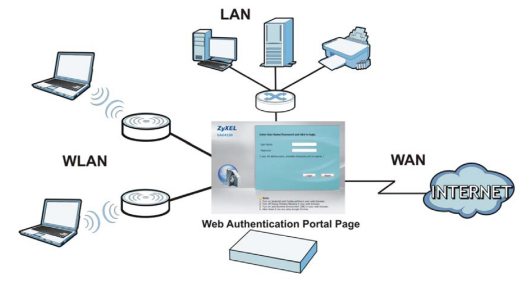
Web Authentication can intercept network traffic, according to the authentication policies, until the user authenticates or accepts usage terms the connection via the captive portal page (login screen). This means that all web page requests can be initially redirected to a special web page that would require the user to input a username/password authentication credentials or accept terms of use to begin an internet session. This feature can be used for environments that provide internet access to guests/customers.
Supported Devices
ATP200
ATP500
ATP800
VPN50
VPN100
VPN300
Download Agreement Sample
To obtain the code for the custom user agreement portal page, please go to Configuration → Web Authentication and click on the Custom User Agreement File tab. Download the "default_ua.zip" file to customize the user agreement page appearance.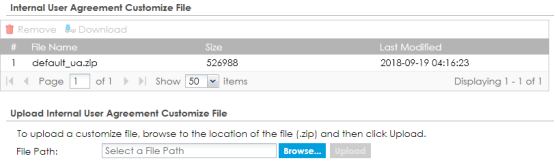
Default Agreement Page
Below is a screenshot of what the default agreement page looks like as well as tips on what changes can be made to the page.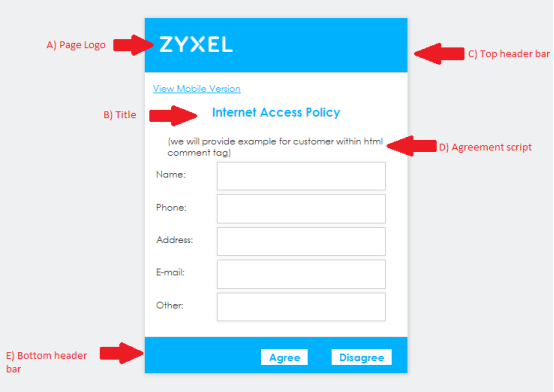
- Within the default_ua.zip file that was downloaded is an "images" folder, this is the directory containing the page logo image. Image name is "h_logo.png", it is a 97x29 pixel size. You may replace the image but maintain the naming format.
- The title "Internet Access Policy" can be changed from the "ua_agree.html" file. Use Notepad, Notepad++, or any other html editor software to open the file and scroll down to like 94. Change the test "Internet Access Policy" to whatever you wish. Text color can be changed on the "ua.css" file, line 7.
- The top header bar is an image file called "h_login_top.jpg" in the images folder. You may edit/replace the image but keep the file name.
- You can specify your terms of use in this field. This script can be edited from the "ua_agree.html" file line 97. Remove the default text and add your terms of use script.
- The bottom header bar is an image file called "h_login_bottom.jpg" in the images folder. You may edit/replace the image but keep the file name.
Default Welcome Page
Below is a screenshot of what the default welcome page looks like as well as tips on what changes can be made to the page.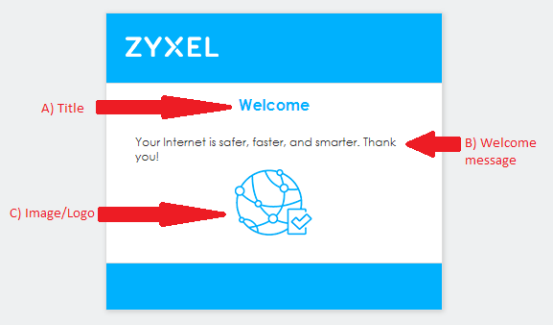
- The page title can be changed on the "ua_welcome.html" file, line 49.
- The welcome message script can be edited on the "ua_welcome.html" file, line 51.
- The pages center image is located in the "images" directory, the file name is "Hconnection.png". This is an 83x83 pixel size and may be replace, but the image file must maintain the naming format.
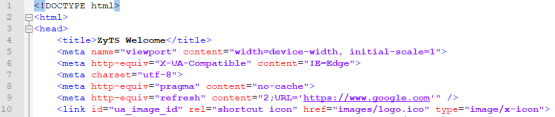
Additionally, a redirect command can be added so that after a few seconds the welcome screen will disappear and redirect to a specified website. Below is the sample redirect code, please change the time (in seconds) and redirect URL.
<meta http-equiv="refresh" content="0;URL='http://new-website.com'" />
The code can be inserted on the "ua_welcome.html" file after line 5.
Image Before Code

Image After Code

Based on the image above, the welcome page will redirect traffic to google.com after 2 seconds.
Upload Custom Agreement
Once you have made all the necessary changes to the "default_ua.zip" code re-compress all the files using ZIP. To upload your custom agreement ZIP file, go to Configuration → Web Authentication and click on the Custom User Agreement File tab.
- Click the Browse button to select your custom ZIP file.
- Click the Upload button to transfer the file over to the ATP/VPN appliance.
Once the custom ZIP is uploaded to the appliance go to the Authentication Type tab. Click the Add button to add a custom configuration that will make use of the custom agreement file you just uploaded.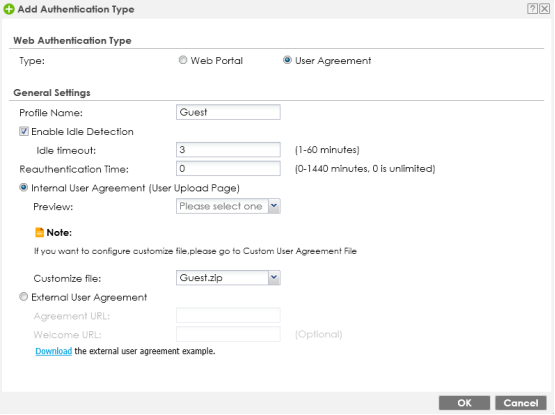
- Type – Set this option to "User Agreement".
- Profile Name – Provide a name.
- Enable Idle Detection – This is optional.
- Internal User Agreement (User Uploaded Page) – Make sure this option is selected.
- Customize File – Click the dropdown and select the custom user agreement file you uploaded.
- Click OK to save the profile settings.
Web Authentication
To enable the web authentication feature, go to Configuration → Web Authentication and check the box to "Enable Web Authentication" feature on the General tab. Press the Apply button at the bottom of the screen to save the settings.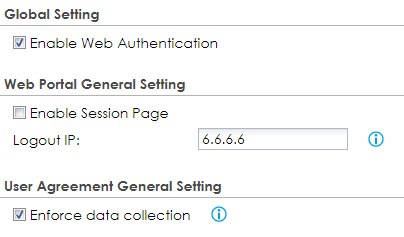
Click the Add button under "Web Authentication Policy Summary" to create an authentication policy. Provide the following info:
- Enable Policy – Check the box to activate the policy.
- Incoming Interface – Select the interface the guest network is on.
- Source Address – Select the address object for the guest network IP scheme.
- Destination Address – Leave that set to "any".
- Schedule – Optional schedule feature.
- Authentication – Click the dropdown and select "required".
- Single Sign-on – Leave this option unchecked.
- Force User Authentication – Check this option to force all traffic on the selected incoming interface to be forced through the web authentication module.
- Authentication Type – Select the custom authentication type profile created a step ago, this should be the profile created to use the custom agreement form.
- Click OK to save the policy.
Customize Mobile Agreement
Below is a screenshot of the mobile agreement page and tips on what and how to change settings.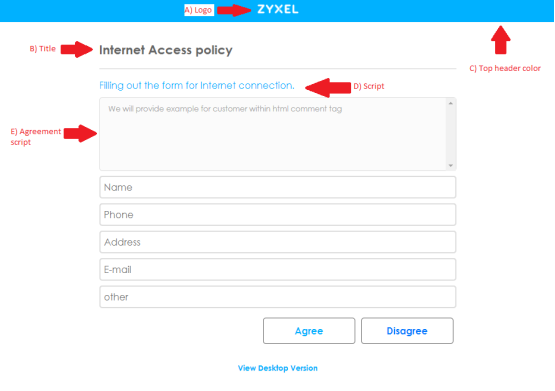
- The logo can be edited/replaced from the "images_m" folder. The image name is "logo_70X20_white.png", it is a 70x20 pixel image. You may swap the image but keep the name.
- The title text can be changed on the "ua_agree_m.html" file, line 75.
- The header color can be changed from the CSS file on the "css_m" folder. Edit the "style.css" file line 35 to change the bar color using hex based color codes.
- The "Filling out the form for Internet connection" text can be edited from the "ua_agree_m.html" file, line 78.
- The user agreement script can be edited on the "ua_agree_m.html" file, line 81.
Below is a screenshot of the mobile welcome page and tips on what and how to change settings.
- The welcome script can be edited from the "ua_welcome_m.html" file, line 48.
- The center image can be changed from the "images_m" folder. The image name is "icon_welcome1.png", additionally the "ua_welcome_m.html" file line 50 will need to be edited. Remove "width="310" height="136.76"" from the line string.
- The welcome message can be edited on the "ua_welcome_m.html" file, line 52.
Additionally, a redirect command can be added so that after a few seconds the welcome screen will disappear and redirect to a specified website. Below is the sample redirect code, please change the time (in seconds) and redirect URL.
<meta http-equiv="refresh" content="0;URL='http://new-website.com'" />
The code can be inserted on the "ua_welcome_m.html" file after line 8.
Image Before Code

Image After Code
Based on the image above, the welcome page will redirect traffic to google.com after 2 seconds.
Testing and Troubleshooting
- Once you have setup the Web Authentication, connect a computer to the guest network and attempt to access the internet. Attempting to access the internet on your browser should redirect you to the user agreement page.

If you are not getting the agreement screen: - Make sure the Zyxel router has internet access. If the router does not have an active internet connection it will not redirect users to the web authentication page.
- Check your devices IP address to confirm that is getting an IP address from the guest network.
- Verify that "Web Authentication Policy Summary" is configured to force guest devices to authenticate, under Configuration → Web Authentication.

- Make sure the browser is programmed to open an online homepage. If the browser is programmed to start with a blank page or an internal webpage the redirect will never work. In this case you can type in a website URL on the address bar (like https://www.google.com) to attempt to access it, this should then trigger the redirect.
- Contact Tech Support for further assistance calling 800-255-4101 (option 5) or submit a support request form here.
- Getting a certificate error on the browser before opening the agreement page.
- This error is common when using the built-in self-signed certificate. In order for the browser to verify the certificate and not show an error, a signed certificate by a certificate authority will need to be obtained and uploaded/imported to the Zyxel appliance under the Configuration → Object → Certificates → My Certificates menu.
- Make the uploaded cert the default certificate used by the ZLD appliance. Go to Configuration → Service → WWW and change the "Server Certificate".
- Signed certificates are created based on FQDN, by default the web authentication feature will redirect traffic back to an IP address. To have the traffic forwarded to a domain name rather than IP address you will need to SSH/Telnet/Console into the Zyxel device and issue the following command. (Note: Substitute "example.domain.com" with your domain. The domain used must be part of the signed certificate CN or Subject Alternative Name/SAN.)

- Create an Address/PTR Record entry under Configuration → System → DNS to point the domain traffic to the guest network IP address programmed on the Zyxel router.
- Make sure the guest network DHCP server provides the Zyxel router address as the primary DNS server.
- Contact Tech Support for further assistance calling 800-255-4101 (option 5) or submit a support request form here.
- Agreement page will not display at all.
- Make sure you downloaded the correct sample file, "default_ua.zip" not "external_user_agreement_example.zip".
- Test using different browser to rule out possible browser related issues.
- Too much code on the HTML files or CSS files may have been changed, causing the page not to be loaded properly by the Zyxel appliance. Try using the default_ua.zip on the profile and see if pages load up correctly with default code.
- Contact Tech Support for further assistance calling 800-255-4101 (option 5) or submit a support request form here.
Comments
0 comments
Please sign in to leave a comment.