This guide provides step-by-step instructions on setting up DNS for system and/or LAN.
Overview
Domain Name Servers (DNS) function as a form of phone directory for the internet. They contain a directory of name (domain names) and IP addresses attached to these names. Networking devices, whether it be a computer, smartphone, tablet, router, etc., all communicate with each other using IP addresses. A domain name is much easier for a person to remember, therefore DNS was created, to resolve the domain name to its corresponding IP address, allowing the user access to the data contained by the server hosting the domain.
Supported Devices
ZyWALL 110
ZyWALL 310
ZyWALL 1100
USG40
USG40W
USG60
USG60W
USG110
USG210
USG310
USG1100
USG1900
USG20-VPN
USG20W-VPN
USG2200-VPN
UAG2100
UAG4100
UAG5100
System DNS Setup
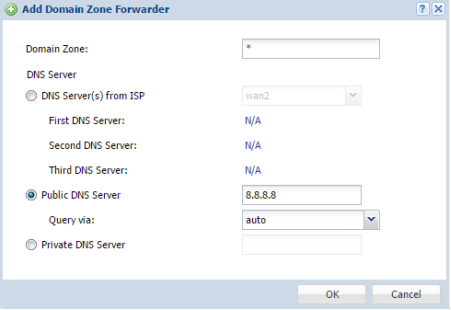
To configure the DNS servers the system (ZLD Appliance) will use to resolve domain names go to, Configuration → System → DNS. From the DNS menu look for the "Domain Zone Forwarder" list. The default entry on the list will populate the DNS field based on the addresses it pulled via DHCP. If your internet connection is not via DHCP, or, you wish to use different DNS servers, click the Add button to insert manual entries.
When adding a DNS entry:
- Enter an asterisk (*) for the "Domain Zone" field. This means the specified DNS server will be used to resolve all domain queries.
- Select the type of DNS server configuration. By default 'DNS Server(s) from ISP' is selected, this will pull the DNS entries from the ISP's DHCP server. Select 'Public DNS Server' to enter DNS server entries for cloud based (internet) DNS servers. Select 'Private DNS Server' if you host your own DNS server in the network.
- Depending on the selection you made for step 2, enter the IP address of the DNS server you wish to use. If a public DNS server was selected, you can specify which Internet connection the ZLD appliance will use the specified server for. Set the query to "auto" to use on any internet connection available.
- Click OK to save the settings.

LAN DNS Setup
To configure the DNS server entries the LAN clients will receive from the ZLD appliances internal DHCP server, go to Configuration → Network → Interface and click the Ethernet tab. A list of all available interfaces, both external (WAN) and internal (LAN) will be presented. Select the desired internal (LAN) interface you wish to configure and click the Edit button.
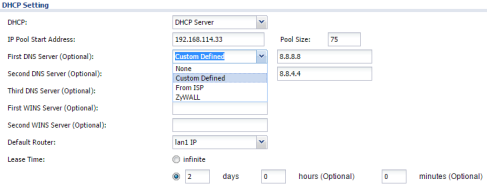
From the interface editor scroll down to the "DHCP Setting" options:
- Find the DNS server options, there are three optional DNS server entries.
- There are four (4) selectable options for each DNS server entry.
- None – "Disable DNS server entry"
- Custom Defined – "Manual entry"
- From ISP – "Use a DNS server provided by the ISP's DHCP server."
- ZyWALL – "This option uses the ZLD appliance LAN IP as a DNS relay."
- Click OK to save the settings.

Comments
0 comments
Please sign in to leave a comment.