
This guide will help setup the "Authenticate Client Certificates" option for the ZyWALL/USG web configuration.
Overview
Authenticate Client Certificates requires the SSL client to authenticate itself to the ZyXEL device by sending a certificate. To do that the SSL client must have a CA-signed certificate from a CA that has been imported as a trusted CA on the ZyXEL device. This guide covers the creation of a root certificate authority and client certificates. This feature allows network administrators to protect the ZyXEL appliance from unauthorized login attempts.
Supported Devices
ZyWALL 110
ZyWALL 210
ZyWALL 310
USG40/40W
USG60/60W
USG110
USG210
USG310
USG1100
USG1900
USG20-VPN
USG20W-VPN
USG2200-VPN
Prerequisites
Add the following to the RootCA directory.
- Certs folder
- Keys folder
- CSR folder
- index.txt file
- openssl.cnf file with the following info (update "dir" setting)
[ ca ]
default_ca = CA_default
[ CA_default ]
dir = C:\\RootCA
certs = $dir\\Certs
new_certs_dir = $dir\\Certs
database = $dir\\index.txt
serial = $dir\\serial
private_key = $dir\\Keys\\ca.key
certificate = $dir\\Certs\\ca.crt
default_md = sha512
name_opt = ca_default
cert_opt = ca_default
default_days = 730
preserve = no
policy = policy_strict
[ policy_strict ]
countryName = match
stateOrProvinceName = match
organizationName = match
organizationalUnitName = optional
commonName = supplied
emailAddress = optional
[ policy_loose ]
countryName = optional
stateOrProvinceName = optional
localityName = optional
organizationName = optional
organizationalUnitName = optional
commonName = supplied
emailAddress = optional
[ req ]
default_bits = 2048
distinguished_name = req_distinguished_name
string_mask = utf8only
default_md = sha512
x509_extensions = v3_ca
[ req_distinguished_name ]
countryName = Country Name (2 letter code)
stateOrProvinceName = State or Province Name
localityName = Locality Name
0.organizationName = Organization Name
organizationalUnitName = Organizational Unit Name
commonName = Common Name
emailAddress = Email Address
countryName_default = US
stateOrProvinceName_default = California
localityName_default = Anaheim
0.organizationName_default = ZyXEL Communications
organizationalUnitName_default = Tech Support
emailAddress_default =
[ v3_ca ]
subjectKeyIdentifier = hash
authorityKeyIdentifier = keyid:always,issuer
basicConstraints = critical, CA:true
keyUsage = critical, digitalSignature, cRLSign, keyCertSign
[ usr_cert ]
basicConstraints = CA:FALSE
nsCertType = client, email
nsComment = "OpenSSL Generated Client Certificate"
subjectKeyIdentifier = hash
authorityKeyIdentifier = keyid,issuer
keyUsage = critical, nonRepudiation, digitalSignature, keyEncipherment
extendedKeyUsage = clientAuth, emailProtection
[ server_cert ]
basicConstraints = CA:FALSE
nsCertType = server
nsComment = "OpenSSL Generated Server Certificate"
subjectKeyIdentifier = hash
authorityKeyIdentifier = keyid,issuer:always
keyUsage = critical, digitalSignature, keyEncipherment
extendedKeyUsage = serverAuth
Create the CA
For this document we will be using OpenSSL to create our certificates.
Open a command prompt window (Windows) or terminal window (Linux/macOS) and 'cd' into the RootCA directory. Type the following command (without quotes):
"echo 1000 > serial"
The 1000 refers to the serial number that will be given to client certificates, you can specify whatever number you wish to start at, for this example we will start at 1000.
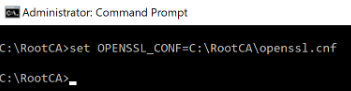
To begin the setup there are a few things we need to do on a Windows machine. First, we must tell the machine where the OpenSSL configuration file (openssl.cnf) is located. To do this type the following command into the Windows Command Prompt (without quotes).
"set OPENSSL_CONF=C:\RootCA\openssl.cnf"

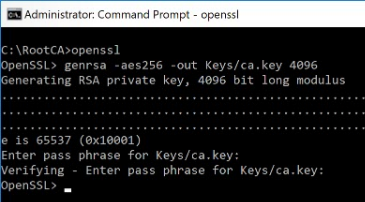
Second, we must enter the OpenSSL prompt to begin creating the CA and user/client certificates. Use the following command to enter the OpenSSL prompt (without quotes).
"openssl"
Type the command below to generate a certificate key (without quotes):
"openssl genrsa -aes256 -out Keys/ca.key 4096" (on Linux/macOS)
-or-
"genrsa -aes256 -out Keys/ca.key 4096" (on Windows)

Now that the key has been generated we can create our CA with the following command (without quotes)
"openssl req -config openssl.cnf -extensions v3_ca -new -x509 -sha512 -days 1825 -key Keys/ca.key -out Certs/ca.crt" (on Linux/macOS)
-or-
"req -config openssl.cnf -extensions v3_ca -new -x509 -sha512 -days 1825 -key Keys/ca.key -out Certs/ca.crt" (on Windows)

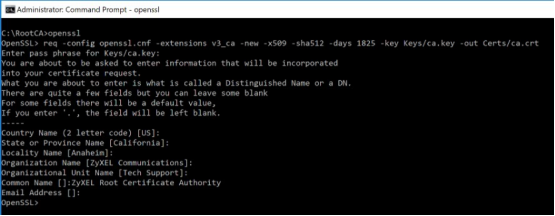
This command will generate a CA with a 5-year expiration date.
Create User/Client Certificate
Now that the CA has been created we can issue user/client certificates and sign them with our CA. Begin by creating a key for the user/client, type the command below (without quotes):
"openssl genrsa -aes256 -out Keys/user1.key 2048" (on Linux/macOS)
-or-
"genrsa -aes256 -out Keys/user1.key 2048" (on Windows)


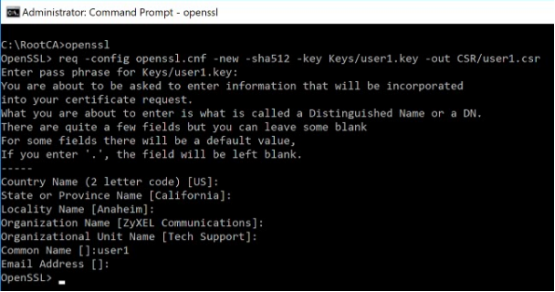
Create a CSR (Certificate Signing Request) for the user/client certificate with the following command (without quotes):
"openssl req -config openssl.cnf -new -sha512 -key Keys/user1.key -out Certs/user1.csr" (on Linux/macOS)
-or-
"req -config openssl.cnf -new -sha512 -key Keys/user1.key -out Certs/user1.csr" (on Windows)

Now sign the CSR with the CA to create the user certificate. Use the following command to do this (without quotes):
"openssl ca -config openssl.cnf -extensions usr_cert -days 365 -notext -md sha512 -in CSR/user1.csr -out Certs/user1.crt" (on Linux/macOS)
-or-
"ca -config openssl.cnf -extensions usr_cert -days 365 -notext -md sha512 -in CSR/user1.csr -out Certs/user1.crt" (on Windows)

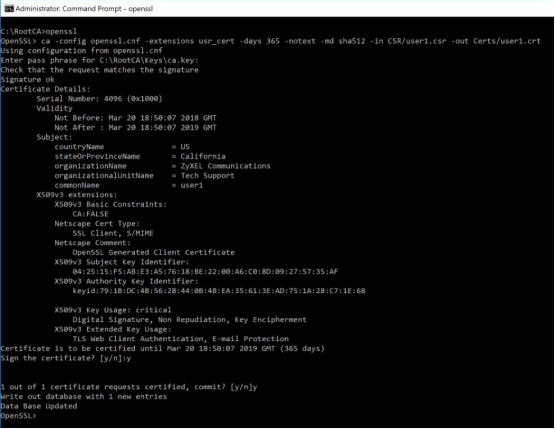
The command will generate a certificate good for 1-year (365 days).
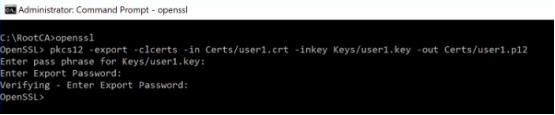
Convert the certificate file user1.crt to user1.p12 for compatibility with different systems. Use the command below to convert the certificate (without quotes):
"openssl pkcs12 -export -clcerts -in Certs/user1.crt -inkey Keys/user1.key -out Certs/user1.p12" (on Linux/macOS)
-or-
"pkcs12 -export -clcerts -in Certs/user1.crt -inkey Keys/user1.key -out Certs/user1.p12" (on Windows)

Repeat the process to create additional user/client certificates.
To view a list of all the certificates you have created open the "index.txt" file. This file stores the info for certificates created using this method.
ZyWALL/USG WebUI Setup
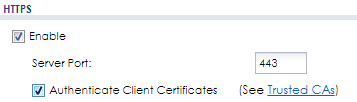
To secure the web configurator so that it can only be accessed by someone with a user/client certificate please do the following:
Login to the WebUI and go to menu, Configuration → Object → Certificate. Click the Trusted Certificates tab and import the ca.crt file. Once the CA has been imported go to menu, Configuration → System → WWW. Check the box to enable "Authenticate Client Certificates" and Apply the settings.

Importing Certificates
Import the user/client certificate to your computer or browser certificate manager. The user/client certificate needs to be added to the personal certificates (your certificates).
Once the certificate is uploaded restart the browser and access the ZyWALL/USG web configuration page.
Comments
0 comments
Please sign in to leave a comment.