DISCLAIMER: This white paper is for informational purposes only and offers no guarantee of a solution. Due to unforeseeable changes to PCI DSS standards, the information provided may have typographical and technical inaccuracies. The content is provided as is, without expressed or implied guaranties of any kind. Please check the warranty terms of your Zyxel product on our website www.zyxel.com for more detailed warranty information.
If port forwarding rules have been created on the router, please be sure to check the host server to make sure it is secure. During the PCI DSS port scan test the host server will be tested for the same security compliance guidelines. If the host server is not secure PCI DSS compliance test may fail. It is recommended that you contact the host server administrator to verify security measures.
NOTE: Please make sure your ZyWALL/USG router is on the latest firmware/software patch.
Strengthen Ciphers
In order to change the ciphers being used by the ZyWALL/USG, please open a console session with the gateway.
Once launched, run the following commands which will remove the use of any weak ciphers (ciphers with a key length less than 128 bits).
Before enabling only strong ciphers:
Running the below command will show the currently used ciphers on the USG.
Router# configure terminal
Router(config)# show ip http server secure cipher-list
Current available cipher suites:
Cipher-Tag Protocol Key Ex. Auth. Enc. MAC Type
================================================================================
DHE-RSA-AES256-SHA SSLv3 Kx=DH Au=RSA Enc=AES(256) Mac=SHA1DHE-DSS-AES256-SHA SSLv3 Kx=DH Au=DSS Enc=AES(256) Mac=SHA1
DHE-RSA-AES128-SHA SSLv3 Kx=DH Au=RSA Enc=AES(128) Mac=SHA1
DHE-DSS-AES128-SHA SSLv3 Kx=DH Au=DSS Enc=AES(128) Mac=SHA1
EDH-RSA-DES-CBC3-SHA SSLv3 Kx=DH Au=RSA Enc=3DES(168) Mac=SHA1
EDH-DSS-DES-CBC3-SHA SSLv3 Kx=DH Au=DSS Enc=3DES(168) Mac=SHA1
AES256-SHA SSLv3 Kx=RSA Au=RSA Enc=AES(256) Mac=SHA1
AES128-SHA SSLv3 Kx=RSA Au=RSA Enc=AES(128) Mac=SHA1
DES-CBC3-SHA SSLv3 Kx=RSA Au=RSA Enc=3DES(168) Mac=SHA1
EXP-EDH-RSA-DES-CBC-SHA SSLv3 Kx=DH(512) Au=RSA Enc=DES(40) Mac=SHA1 export
EXP-EDH-DSS-DES-CBC-SHA SSLv3 Kx=DH(512) Au=DSS Enc=DES(40) Mac=SHA1 export
EXP-DES-CBC-SHA SSLv3 Kx=RSA(512) Au=RSA Enc=DES(40) Mac=SHA1 export
================================================================================
Enabling only strong ciphers:
Router#configure terminal
Router(config)# ip http secure-server strong-cipher
WARNING: This command will only activate strong cipher suites.
Router(config)# show ip http server secure cipher-list
Current available cipher suites:
Cipher-Tag Protocol Key Ex. Auth. Enc. MAC Type
================================================================================
DHE-RSA-AES256-SHA SSLv3 Kx=DH Au=RSA Enc=AES(256) Mac=SHA1DHE-DSS-AES256-SHA SSLv3 Kx=DH Au=DSS Enc=AES(256) Mac=SHA1
DHE-RSA-AES128-SHA SSLv3 Kx=DH Au=RSA Enc=AES(128) Mac=SHA1
DHE-DSS-AES128-SHA SSLv3 Kx=DH Au=DSS Enc=AES(128) Mac=SHA1
EDH-RSA-DES-CBC3-SHA SSLv3 Kx=DH Au=RSA Enc=3DES(168) Mac=SHA1
EDH-DSS-DES-CBC3-SHA SSLv3 Kx=DH Au=DSS Enc=3DES(168) Mac=SHA1
AES256-SHA SSLv3 Kx=RSA Au=RSA Enc=AES(256) Mac=SHA1
AES128-SHA SSLv3 Kx=RSA Au=RSA Enc=AES(128) Mac=SHA1
DES-CBC3-SHA SSLv3 Kx=RSA Au=RSA Enc=3DES(168) Mac=SHA1
================================================================================
You can see some red parts have disappeared since key length less than 128.
Disable Vulnerable Ciphers
Remove "BEAST" Ciphers and other weak ciphers:
Applying the following CLI command will remove "BEAST" vulnerable ciphers.
Router#configure terminal
Router(config)# ip http secure-server beast-attack
Remove "RC4" and other ciphers:
To remove the use of RC4, DES and 3DES ciphers run the following commands:
(Note: useful if PCI scanner checks for Sweet32 vulnerability. For stronger block ciphers use AES)
Router#configure terminal
Router(config)# no ip http secure-server cipher-suite rc4
Router(config)# no ip http secure-server cipher-suite des
Router(config)# no ip http secure-server cipher-suite 3des
Router(config)# show ip http server secure status
active : yes
port : 443
certificate : default
force redirect : yes
authentication client : no
anti beast attack : yes
strong cipher suite : yes
cipher suite : aes
admin service control :
…
Remove "SSLv3" Support:
To verify SSLv3 support, please run the following command first.
Router> show ip http server secure status
active : yes
port : 443
certificate : NewCert
force redirect : yes
authentication client: no
strong cipher suite : yes
cipher suite : aes
sslv3 support : no
admin service control:
Use the following command to disable SSLv3 support (if sslv3 support = yes)
Router> configure terminal
Router(config)# no ip http secure-server sslv3
Add/Remove "TLS" Support:
To verify the SSL protocol being used by the system please use the CLI command below:
Router>show ip http server secure status
active : yes
port : 443
certificate : default
force redirect : no
authentication client: no
strong cipher suite : yes
cipher suite : aes
ssl protocol : tls1.2 tls1.1
admin service control:
To remove a TLS version issue the following command:
Router(config)# no ip http secure-server tlsv11
This will remove TLSv1.1 from the SSL protocol support. You can verify this by running "show ip http server secure status" command again.
active : yes
port : 443
certificate : default
force redirect : no
authentication client: no
strong cipher suite : yes
cipher suite : aes
ssl protocol : tls1.2
admin service control:
To add a TLS version issue the following command:
Router(config)# ip http secure-server tlsv11
This will add TLSv1.1 to the SSL protocol support. You can verify this by running "show ip http server secure status" command again.
active : yes
port : 443
certificate : default
force redirect : no
authentication client: no
strong cipher suite : yes
cipher suite : aes
ssl protocol : tls1.2 tls1.1
admin service control:
Stronger Certificate
Create a SHA2 certificate with 2048-bit encryption:
Step 1:
To create a new self-signed SHA2 certificate go to, Configuration → Object → Certificate → My Certificates.
Select "Add" to create a new self-signed certificate.
From the "Add" certificate menu, create a name for the cert.
Select "Host Domain Name" and type the name of the firewall.
Key Type: Select "RSA-SHA256"
Key Length: Select "2048"
Select "Create Self-Signed Certificate"
Click "Ok" to create the certificate.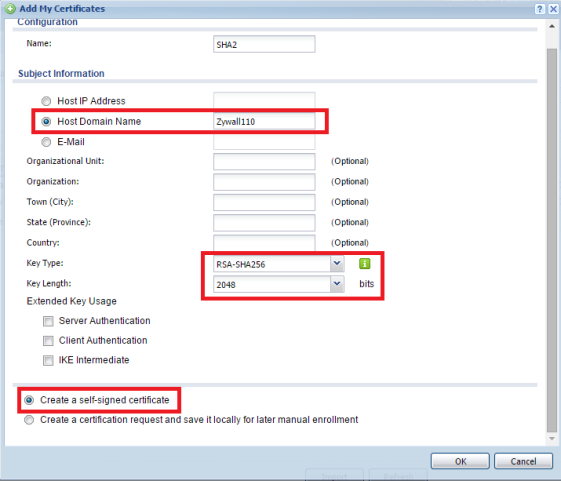
Step 2:
Go to Configuration → System → WWW → Service Control.
For "server certificate" select the new SHA2 certificate created in the previous step.
Select "Apply" at the bottom of the page to save the changes.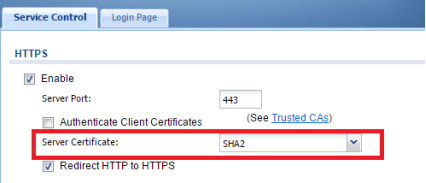
*Please note, depending on the PCI Compliance Auditor, a self-signed certificate may not be sufficient to pass and a signed certificate may be required to be imported to the ZyWALL/USG. If this is the case, a certificate for enrollment must be created.
You may refer to the following steps on creating a certificate for enrollment.
Step 3:
To create a certificate signing request (CSR) to submit to a certificate authority, please go to Configuration → Object → Certificate → My Certificates.
Select "Add" to create a new self-signed certificate.
From the "Add" certificate menu, create a name for the cert.
Enter the desired subject information.
Key Type: Select the desired key type, options include RSA-SHA256, RSA-SHA512 and DSA-SHA256.
Key Length: Select the desired key length, options include 1024, 1536 and 2048 bit.
Select "Create a certification request and save it locally for later manual enrollment"
Click "Ok" to create the certificate.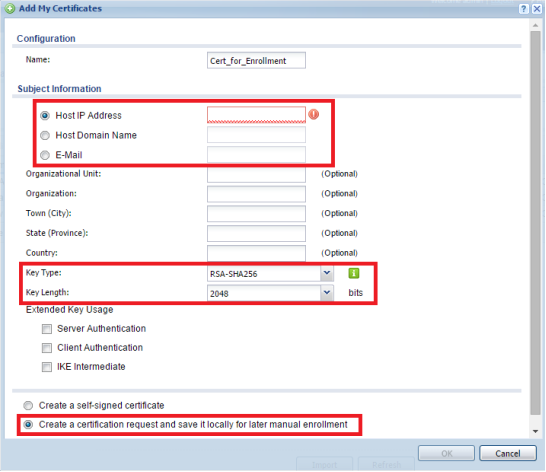
If the certificate was configured for manual enrollment, open the certificate request to copy the PEM encode to provide to the CA.
Once the signed certificate has been issued, click the IMPORT button found at the bottom of the "My Certificates" tab. (Configuration → Object → Certificate → My Certificates)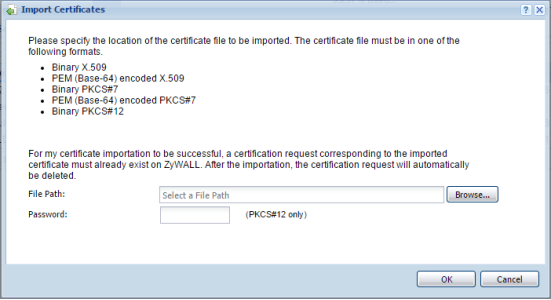
With the signed certificate imported we can now set the cert to be the default system certificate. To set this option go to, Configuration → System → WWW. Click the drop down for "Server Certificate" and select the new signed cert. Click the Apply button at the bottom of the menu to save the changes.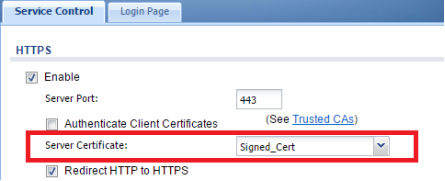
Comments
0 comments
Please sign in to leave a comment.