

Overview
The Zyxel appliance can use certificates (also known as digital ID) to authenticate users. Certificates are based on public-private key pairs. A certificate contains the certificate owner's identity and public key. Certificates provide a way to exchange public keys for use in authentication.
Use the My Certificates screen to generate and export self-signed certificates or certification requests and import the CA-signed certificates.
Use the Trusted Certificates screen to save CA certificates and trusted remote host certificates to the Zyxel appliance. The appliance trusts any valid certificate that you have imported as a trusted certificate. It also trusts any valid certificate signed by any of the certificates that you have imported as a trusted certificate.
Below you will find instructions on how to get rid of this error by using a self-signed certificate, creating a CSR to acquire a CA signed certificate and/or using a signed certificate obtained from other sources (such as directly from CA, without Zyxel CSR).
Supported Devices
ZyWALL 110
ZyWALL 310
ZyWALL 1100
USG40
USG40W
USG60
USG60W
USG110
USG210
USG310
USG1100
USG1900
USG20-VPN
USG20W-VPN
USG2200-VPN
UAG2100
UAG4100
UAG5100
NXC2500
NXC5500
Using a self-signed certificate
Self-Signed certificates are used to secure communications between the client and Zyxel appliance while accessing the web configuration screen. The certificate encrypts the communication between devices to minimize man in the middle attacks. Network administrators can create certificates on the Zyxel appliance to secure and authenticate VPN users, secure communication between clients and Zyxel appliance or used with the transparent web proxy for the content filtering service.
Creating a New Certificate
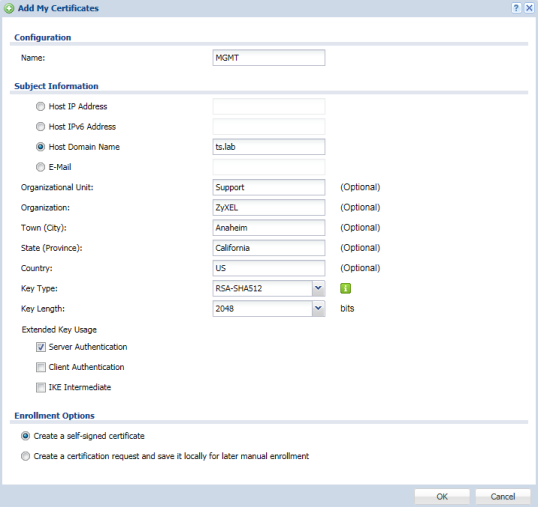
To create a new self-signed certificate using the Zyxel appliance please login to the web configuration screen and access menu, Configuration(![]() ) → Object → Certificate. For this example we will be creating a new (more secure) certificate to be used by the Zyxel appliance for the web configuration screen. Begin by clicking the Add button in the My Certificates tab under "My Certificates Setting".
) → Object → Certificate. For this example we will be creating a new (more secure) certificate to be used by the Zyxel appliance for the web configuration screen. Begin by clicking the Add button in the My Certificates tab under "My Certificates Setting".
- Name – Provide a name for the certificate.
- Common Name – Select one of the option radios and fill in the information. The common name for the certificate can be an IPv4 address, IPv6 address (if IPv6 support is enabled), Domain Name or E-mail address. (For this example we are selecting "Host Domain Name")
- Organizational Unit – This is an optional entry, it can be left blank. An example for an organizational unit would be department within the company (ex: IT, Sales, etc.).
- Organization – This is an optional entry, it can be left blank. An example for an organization would be the company name.
- Town (City) – This is an optional entry, it can be left blank.
- State (Province) – This is an optional entry, it can be left blank.
- Country – This is an optional entry, it can be left blank.
- Key Type – Options for the key type are RSA-SHA256, RSA-SHA512 and DSA-SHA256. (For this example we will be using RSA-SHA512).
- Key Length – Options for key length are 1024, 1536 and 2048. (For this example we will be using 2048).
- Extended Key Usage – Indicates the purpose of the generated certificate. Certificates generated by the Zyxel appliance can be used for Server Authentication, Client Authentication and/or IKE. (Because this certificate example is to generate a new certificate to be used to access the Zyxel appliance web configuration screen and SSH, the certificate extended key usage will be set to "Server Authentication")
- Enrollment Options – Select "Create a self-signed certificate".
- Click OK to generate the new certificate.
Exporting Certificate(s)
Once the new self-signed certificate is created, double-click on the certificate to open it. Scroll to the bottom of the window and client the button to Export Certificate Only. Save this certificate on your computer.
Changing Default Certificate
To change the certificate the Zyxel appliance uses to encrypt communication for WWW access, go to Configuration(![]() ) → System → WWW.
) → System → WWW.
To change the WWW default certificate click the "Server Certificate" dropdown and select the new certificate to use for server authentication. Once the certificate has been selected click the Apply button at the bottom of the screen.
Certificate Import
Importing the self-signed certificate as a CA on your computer will help authenticate the connection to the Zyxel appliance preventing browser errors regarding the self-signed certificate. This is an additional step that does not need to be completed. The only purpose for this additional step is to clear the browser certificate warning(s). Follow the steps below (for Windows, macOS and/or Mozilla Firefox) to trust the self-signed certificate as a CA.
Windows
To access the trusted certificates console and import the certificate, open the RUN dialog box. You can access this by pressing the Windows + R keys on the keyboard.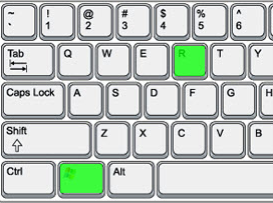
On the RUN box type "mmc" and click OK or hit the Enter key.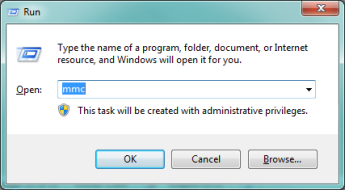
In the mmc console, click on File → Add/Remove Snap-in…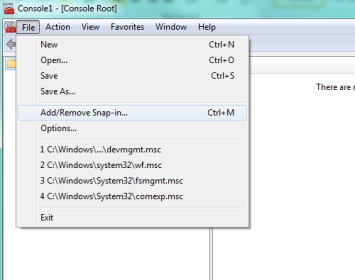
Under "Available snap-ins:" select Certificates and Add > it to the "Selected snap-ins:" list.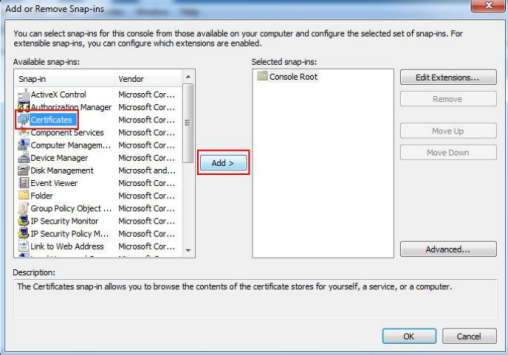
Select "Computer account" and hit Next >.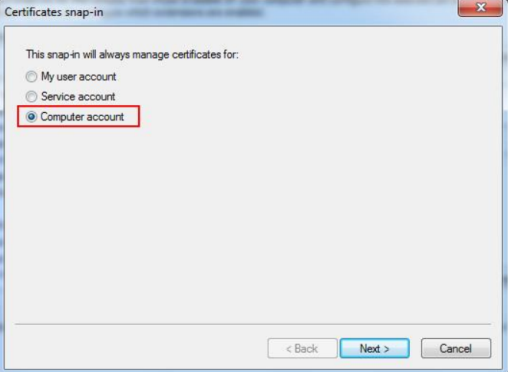
Select "Local computer: (the computer this console is running on)" and hit Finish.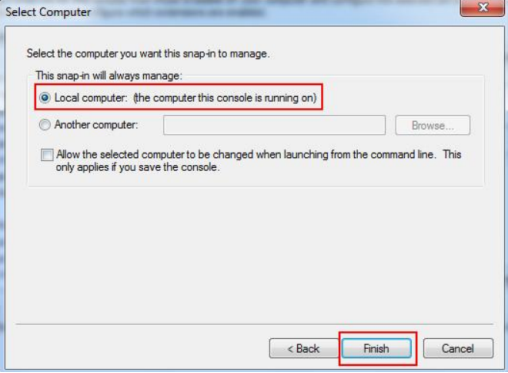
Click OK to save the settings.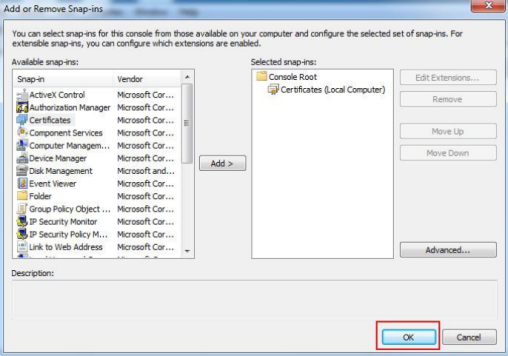
Open Certificates (Local Computer) → Trusted Root Certification Authorities and right-click on Certificate → All Tasks → Import.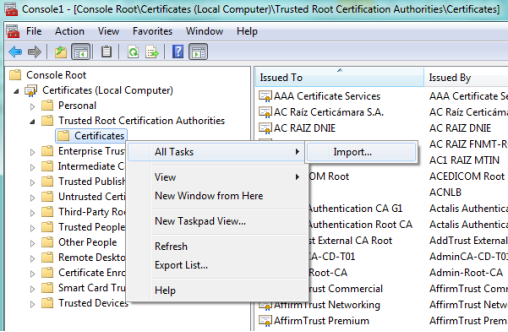
Run through the certificate import wizard to open the certificate previously created and exported from the Zyxel appliance. [MGMT]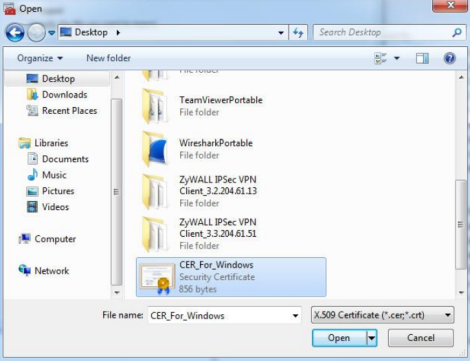
macOS
To import the certificate on macOS open the Keychain Access app under Applications → Utilities. Double-click the certificate or drag it over to the Keychain Access app to import.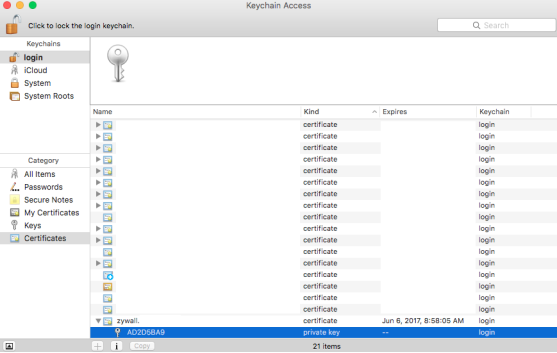
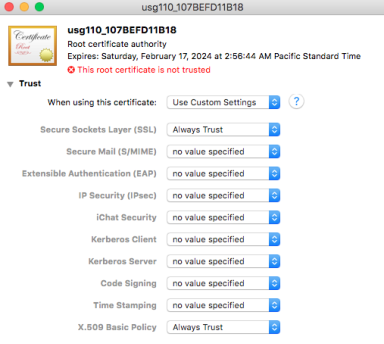
Once the cert is imported to the Certificate list double-click to change privilege.
- Secure Sockets Layer (SSL) – Always Trust
- X.509 Basic Policy – Always Trust
Mozilla Firefox
To import the certificate into Mozilla Firefox, open the browser and access the Options menu. This will be different depending on computer operating system version and Firefox browser version. The menu can also be accessed by typing 'about:preferences' in the address bar. Click the "Privacy & Security" menu option and scroll down to Certificates. Click the View Certificates button to open the browsers cert manager.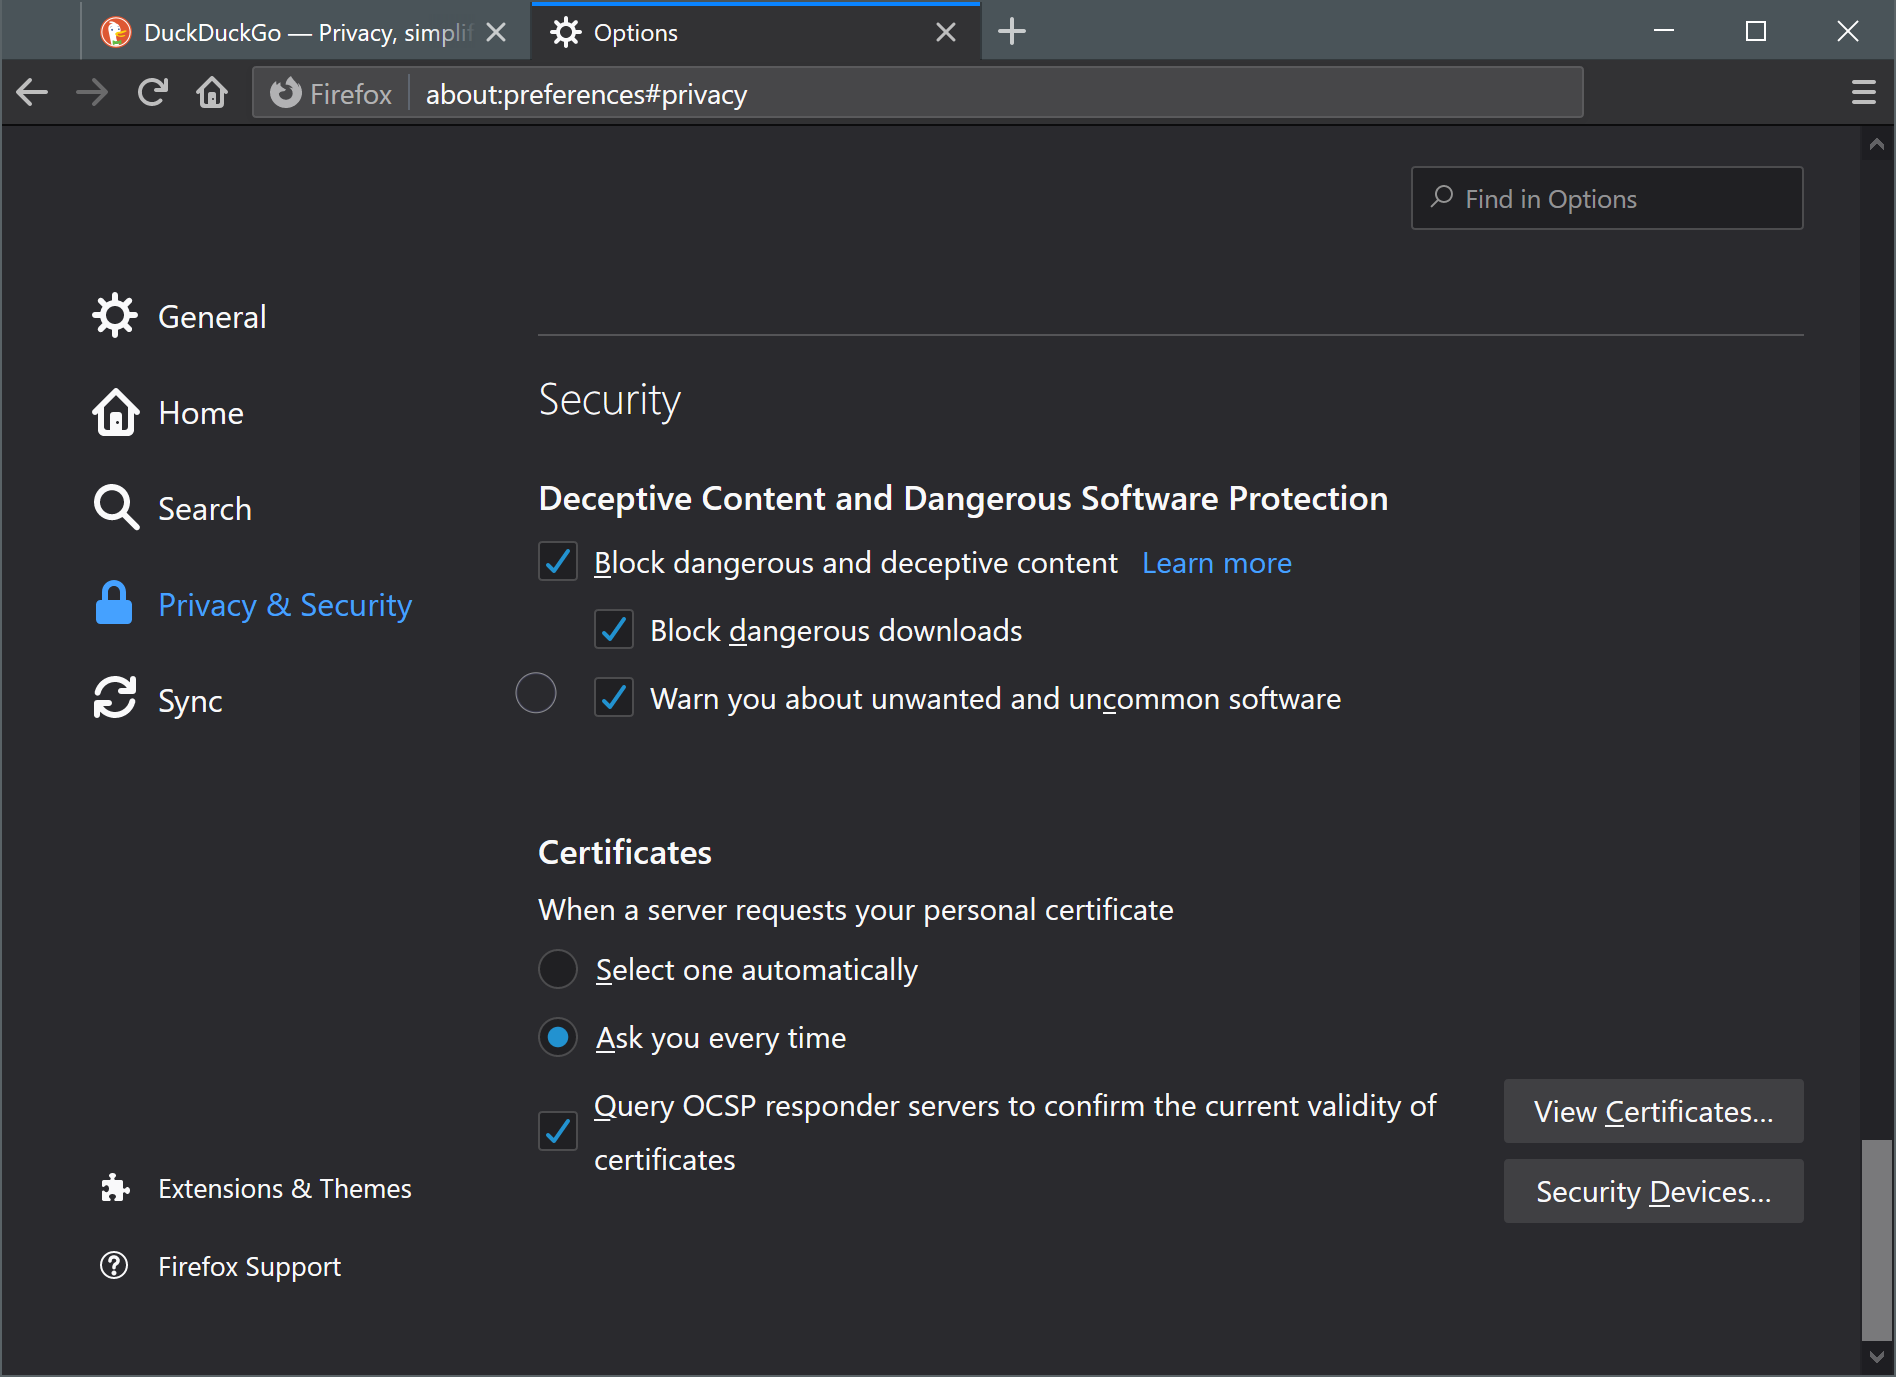
On the Certificate Manager window click the Authorities tab to import the trusted CA.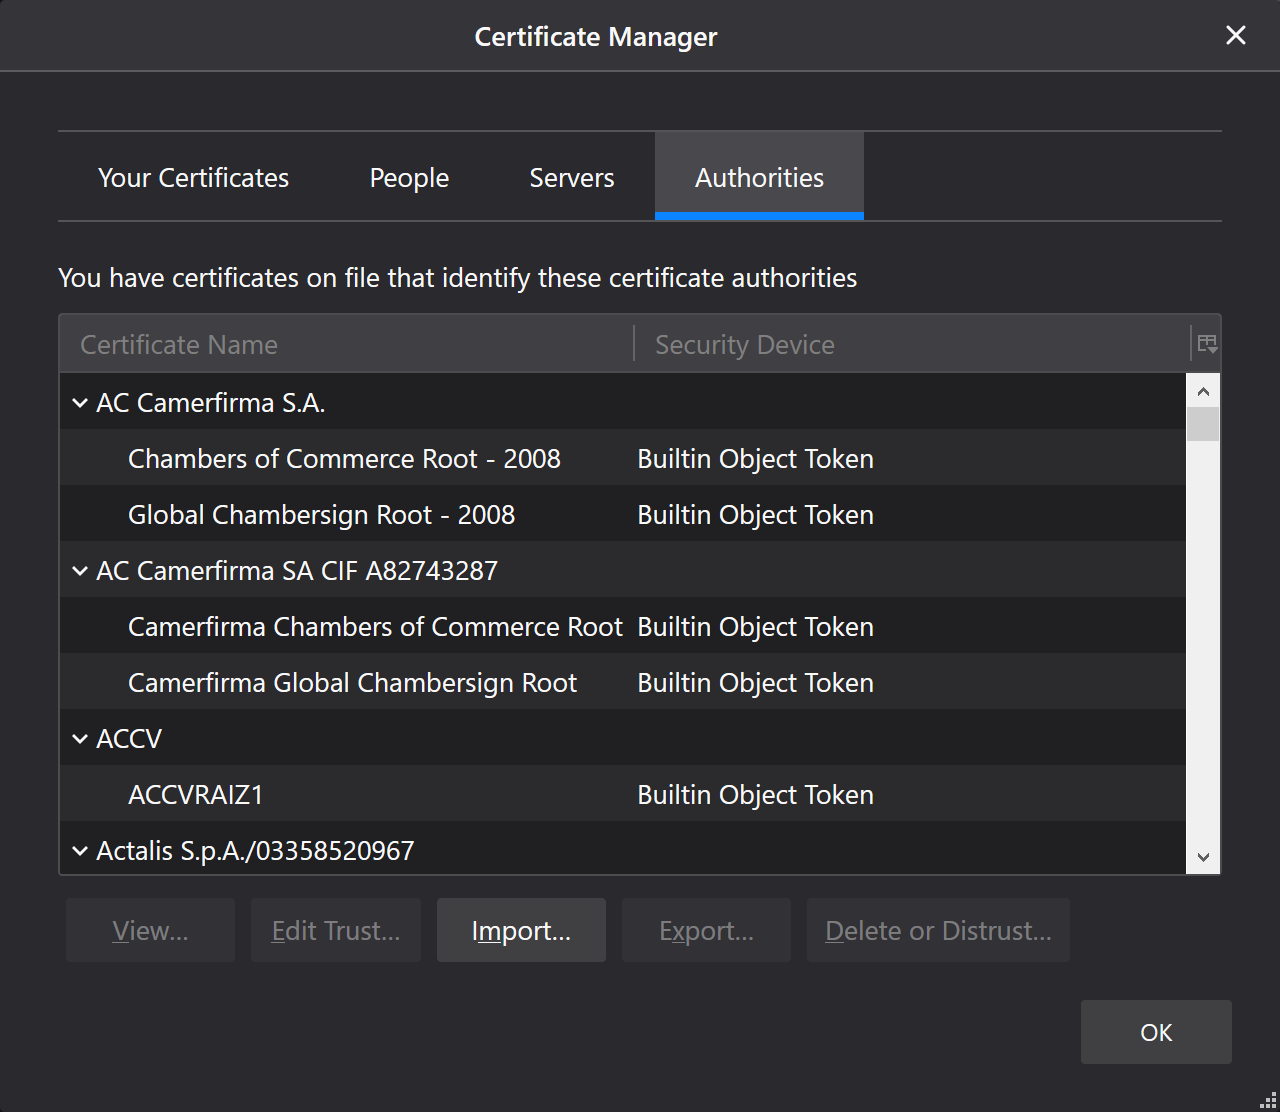
- Click the Import… button to browse the computer for the certificate exported from the Zyxel appliance.
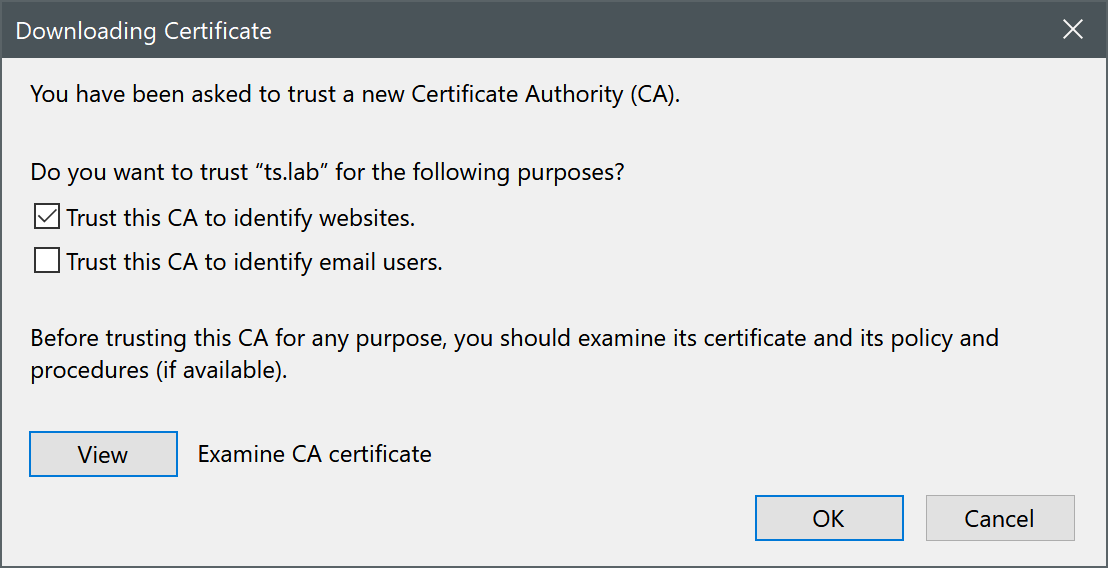
- Select the Zyxel certificate and open it. [MGMT]
- Select "Trust this CA to identify websites" when prompted.
- Click OK to accept and import the certificate.
Verify the certificate is in the "Authorities" list and click OK to save, restart the browser to complete installation.
Name Resolution
This is an additional step to help resolve the domain name (hostname) created on the self-signed certificate. Based on the self-signed certificate example above, we created the certificate based on ts.lab domain name. In order for computers on the network to resolve this name, we can edit the computers host file to add the entry or set an "Address/PTR Record" on the Zyxel appliance. To set the Address/PTR record access the Zyxel appliance web configuration screen and go to menu Configuration(![]() ) → System → DNS. Click the Add button to insert a record entry.
) → System → DNS. Click the Add button to insert a record entry.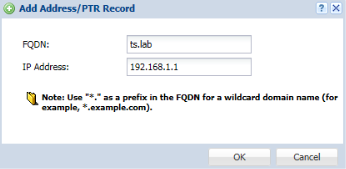
This will allow the Zyxel appliance to redirect traffic destined for ts.lab to 192.168.1.1 when attempting to access this hostname from the internal network.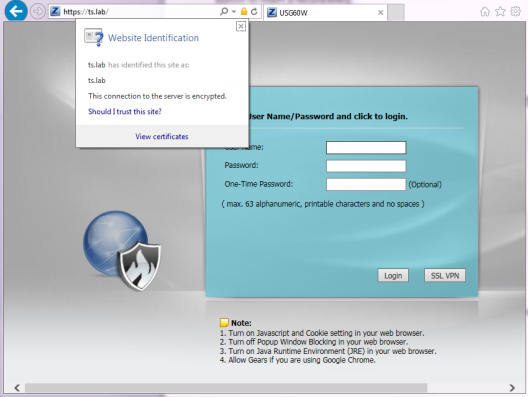
Using Certificate Signing Request (CSR) to obtain signed certificate
This section of the walkthrough explains how to create a CSR on the Zyxel appliances. The CSR is used by a Certificate Authority (such as Verisign, GoDaddy, DigiCert, Comodo, etc.) to issue a signed and verified certificate. For this example we will be using SSL for Free (which provides Lets Encrypt certificates) service to sign and issue a trusted certificate. To obtain an official signed certificate you must have a fully qualified domain name registered.
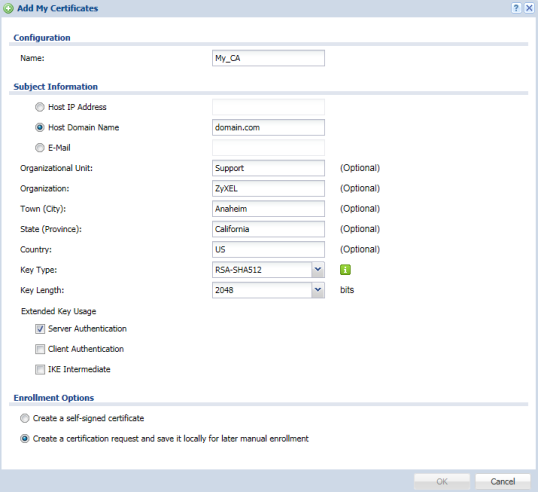
Begin by accessing the Zyxel appliance web configuration screen and go to menu, Configuration(![]() ) → Object → Certificate. Click the Add button in the My Certificates tab under "My Certificates Setting".
) → Object → Certificate. Click the Add button in the My Certificates tab under "My Certificates Setting".
- Name – Provide a name for the certificate.
- Common Name – Select one of the option radios and fill in the information. The common name for the certificate can be an IPv4 address, IPv6 address (if IPv6 support is enabled), Domain Name or E-mail address. (For this example we are selecting "Host Domain Name")
- Organizational Unit – This is an optional entry, it can be left blank. An example for an organizational unit would be department within the company (ex: IT, Sales, etc.).
- Organization – This is an optional entry, it can be left blank. An example for an organization would be the company name.
- Town (City) – This is an optional entry, it can be left blank.
- State (Province) – This is an optional entry, it can be left blank.
- Country – This is an optional entry, it can be left blank.
- Key Type – Options for the key type are RSA-SHA256, RSA-SHA512 and DSA-SHA256. (For this example we will be using RSA-SHA512).
- Key Length – Options for key length are 1024, 1536 and 2048. (For this example we will be using 2048).
- Extended Key Usage – Indicates the purpose of the generated certificate. Certificates generated by the Zyxel appliance can be used for Server Authentication, Client Authentication and/or IKE. (Because this certificate example is to generate a new certificate to be used to access the Zyxel appliance web configuration screen and SSH, the certificate extended key usage will be set to "Server Authentication")
- Enrollment Options – Select "Create a certification request and save it locally for later manual enrollment".
- Click OK to generate the new certificate.
Now that the CSR has been created, double-click on it to open the request. Scroll down the window and copy the content of the "Certificate in PEM (Base-64) Encoded Format" box. This will be needed by the Certificate Authority.
Access your certificate authority account to generate a certificate based on the CSR code like shown on the example below.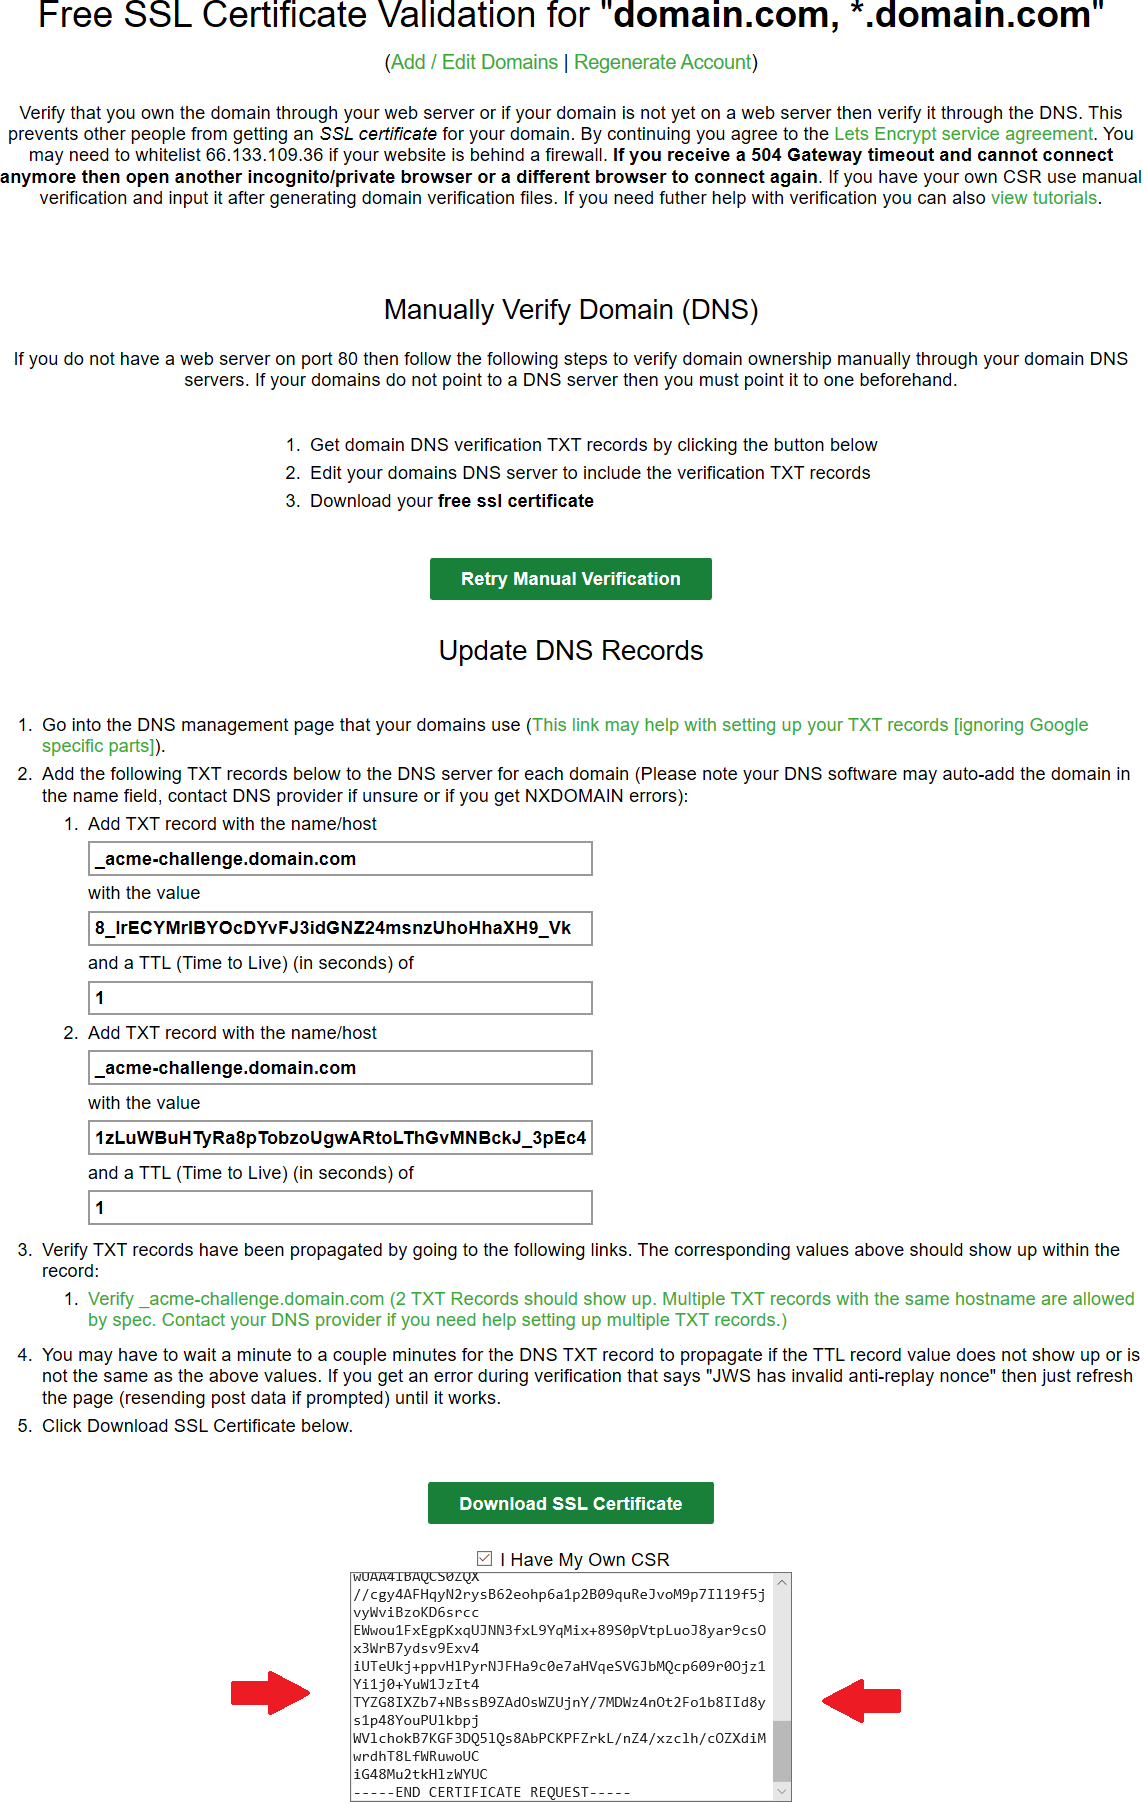
Once the certificate has been generated by the certificate authority please download the signed certificate using one of the formats mentioned on the below screenshot.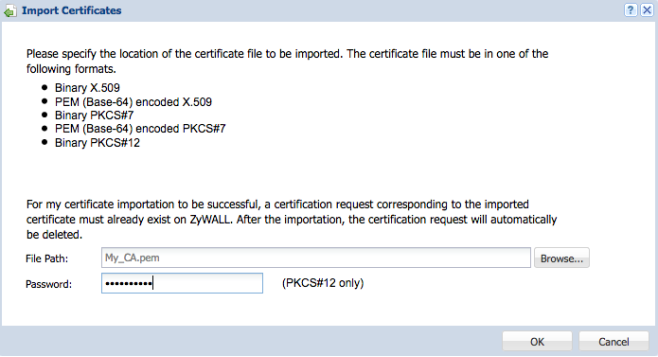
Once the certificate has been imported to the Zyxel appliance go to Configuration(![]() ) → System → WWW to use the signed certificate for the web configuration screen authentication.
) → System → WWW to use the signed certificate for the web configuration screen authentication.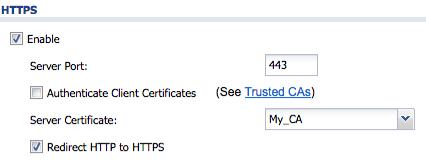
Signed certificate obtained from other sources
If you have a certificate that was created on a different machine, Linux, Windows Server, online cert authority, etc. and you wish to import the certificate to the ZLD appliance, you can do so by creating a PKCS12 (*.p12) certificate file. This cert type encompasses the certificate + key into the file. To import the PKCS12 certificate go to menu, Configuration(![]() ) → Object → Certificate and from the My Certificate tab click the import button. Select the path of the "*.p12" file and provide the certificate password to import.
) → Object → Certificate and from the My Certificate tab click the import button. Select the path of the "*.p12" file and provide the certificate password to import.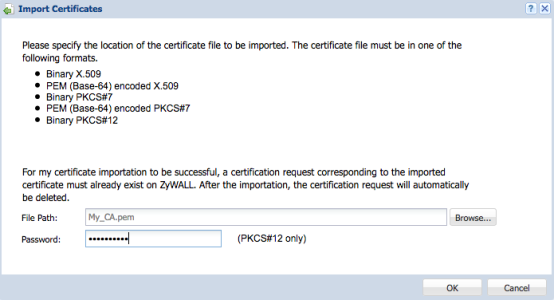
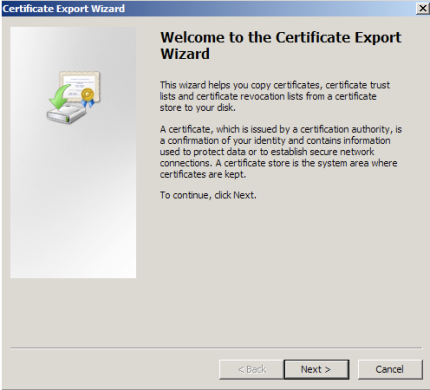
To export the certificate as a PKCS12 file you can use Microsoft Management Console on Windows or OpenSSL.
Microsoft Management Console
- In MMC Double click on Certificates (Local Computer) in the center window.
- Double click on the Personal folder, and then on Certificates.
- Right Click on the Certificate you would like to backup and choose > ALL TASKS > Export
- Follow the Certificate Export Wizard to backup your certificate to a *.pfx file.
- Choose to 'Yes, export the private key'

- Choose to "Include all certificates in certificate path if possible." (do NOT select the delete Private Key option)
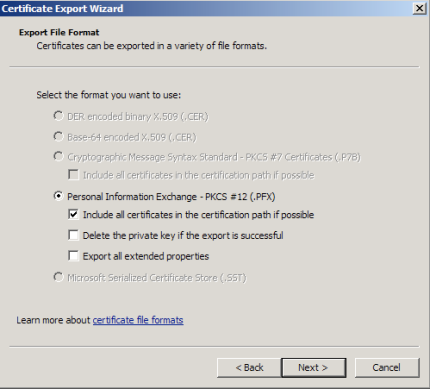
- Enter a password you will remember.
- Choose to save file on a set location.
- Click Finish.
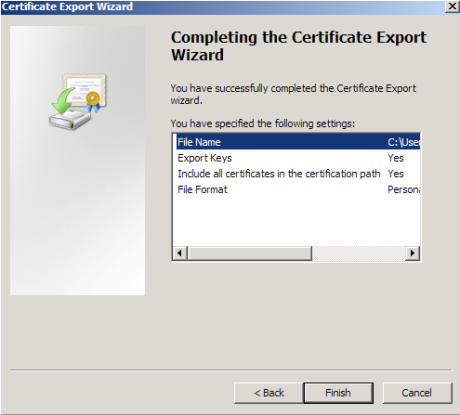
- You will receive a message, "The export was successful", click OK. The *.pfx file backup is now saved in the location you selected and is ready to be moved or stored for your safekeeping.
- Change the extension for the *.pfx file to *.p12 before importing to ZLD appliance.
OpenSSL
From a Terminal/CLI/PowerShell window type the following command to create the PKCS12 file.
openssl pkcs12 -export -out cert.p12 -inkey private.key -in certificate.crt
(Note: certfile is optional, use this if a root or ca-bundle cert was included by CA)
Comments
0 comments
Please sign in to leave a comment.