
This document provides step-by-step instructions on how to configure the 4th LAN port as an Ethernet WAN connection.
Overview
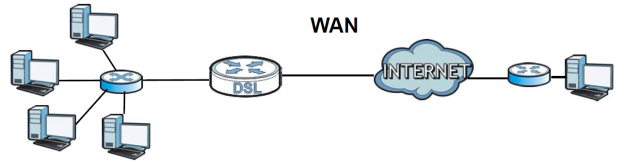
A WAN (Wide Area Network) connection is an outside connection to another network or the Internet. It connects your private networks, such as a LAN (Local Area Network) and other networks, so that a computer in one location can communicate with computers in other locations.
Accessing the WebUI
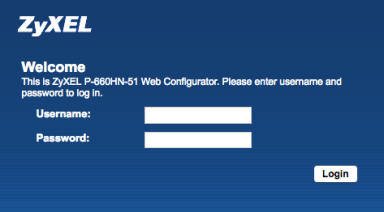
To access the P660HN-51's web interface for configuration, please open an internet browser and type 'http://192.168.1.1' on the address bar. This will open the device WebUI and prompt for user authentication to gain access to configuration settings. Enter 'admin' for the username and '1234' for the password fields. Click the Login button to enter the configuration page.
From the WebUI status screen you will find the five menu options at the bottom of the screen.

Ethernet WAN Setup
To configure the 4th LAN port on the P660HN-51 modem/router to be a member of the WAN interfaces please go to menu, Network Settings → Home Networking → 4th Ethernet Port. Change the state of the port to be a "WAN Port" then click the Apply button to save the settings.

Now that the 4th LAN port is a member of the WAN interfaces we can configure this port to establish an internet connection with Cable, DSL or Fiber service providers. Go to Network Settings → Broadband and click the Add New WAN Interface button to configure the Ethernet WAN port.
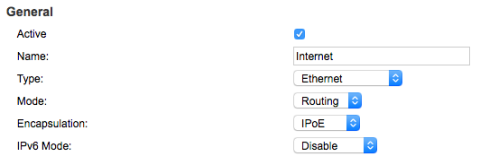
Make the following changes on the "General" settings for the WAN interface:
- Active – Check the box to enable the connection.
- Name – Provide a name for the broadband connection.
- Type – Select Ethernet from the dropdown options.
- Mode – Select Routing from the dropdown for normal setup.
- Encapsulation – Select the connection method used by the ISP to establish an internet connection. Most often DSL providers require a PPPoE connection which uses a username and password authentication to establish internet access. Cable and Fiber connections generally use IPoE (IP over Ethernet) connection method. Verify the connection method with your service provider.
- IPv6 Mode – Check with your service provider to see if the internet connection being offered to you is IPv6. If not make sure the IPv6 Mode is set to disable.
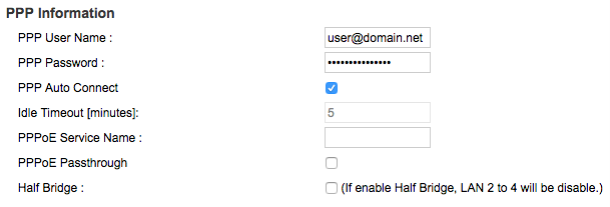
If PPPoE was selected for the "Encapsulation" type, you will need to enter the ISP PPPoE credentials on the device. A section called PPP Information will appear.
- PPP User Name – Type in the username provided by the ISP.
- PPP Password – Type in the password for the PPPoE account provided by the ISP.
- PPP Auto Connect – Check the box for an always ON internet connection. Leaving this unchecked makes the connection and ON DEMAND internet connection.
- Idle Timeout – Leave this setting as is.
- PPPoE Service Name – Leave blank unless it's required by the ISP.
- PPPoE Passthrough – Leave unchecked.
- Half Bridge - Leave unchecked.
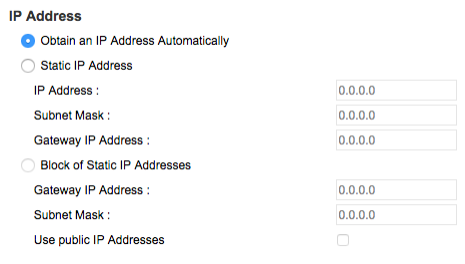
For the IP Address section select whether the device should "Obtain an IP Address Automatically" from the internet provider, or, if a "Static IP Address" has been given by the ISP, type the info into the necessary fields. This information is directly from the internet provider, if you are unsure of the IP Address setup you should use, please consult with them. A misconfiguration of the IP setup may prevent internet access.
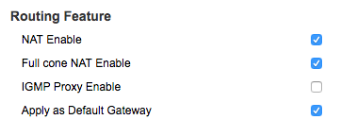
For the Routing Feature section make sure the following options are enabled (checked):
- NAT Enabled – This option should be checked.
- Full cone NAT Enable – This option should be checked.
- IGMP Proxy Enabled – Should be disabled unless the ISP is using IGMP protocol to establish membership in a multicast group.
- Apply as Default Gateway – Select this option to have the Zyxel device use the WAN interface of this connection as the system default gateway.
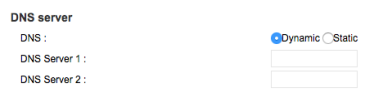
If NAT has been enabled under the "Routing Feature", DNS will need to be configured to resolve domain names.
- Dynamic – Use this DNS setting to have the P660HN automatically retrieve DNS server settings from the ISP. This works only if the ISP is providing DHCP to subscribers.
- Static – Use this DNS setting if the ISP has provided you with specific DNS servers to use, usually if you are subscribed to a static/manual IP address. Or, if you wish to use public DNS server (such as Google DNS server, OpenDNS, etc.) rather than the ISP's.
Click the Apply button on the bottom left portion of the window to save the settings. At this point you can connect the internet service to the LAN4 port on the back of the P660HN appliance. Allow about a minute for the P660HN to sense and establish the connection, or, reboot the appliance to force the connection to establish.
Comments
0 comments
Please sign in to leave a comment.