

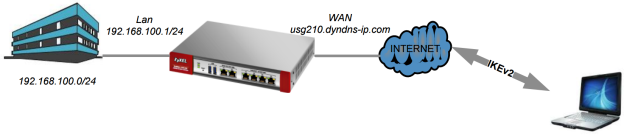
Computers running Windows 7 or later support IPSec IKEv2 with certificate authentication, this guide will provide instructions on setting up an IKEv2 tunnel on the ZyWALL/USG Next-Gen firewalls to establish a client-to-site VPN connection between Windows 7 and newer operating system.
Overview
A virtual private network (VPN) provides secure communication between sites. A secure VPN is a combination of tunneling, encryption, authentication access control and auditing. It is used to transport traffic over the Internet or any insecure network that uses TCP/IP for communications. The IKEv2 capability of the Next-Gen ZyWALL/USG routers allows the ability for a Windows 7 or later computer to establish a dynamic IPSec IKEv2 tunnel using the built-in VPN client, no third-party IPSec software needed.
Supported Devices
ZyWALL 110
ZyWALL 310
ZyWALL 1100
USG40
USG40W
USG60
USG60W
USG110
USG210
USG310
USG1100
USG1900
USG20-VPN
USG20W-VPN
USG2200-VPN
Table of Contents
Accessing the WebGUI
Creating Address Objects
Create User Object
VPN Certificate
IPSec VPN Setup
Policy Route
Windows Certificate Import
Windows IKEv2 Client Setup
Troubleshooting
Accessing the WebGUI
To access the ZyWALL/USG web configuration page please open a web browser on your computer (Internet Explorer, Mozilla Firefox, Google Chrome, etc.). On the address bar type, http://192.168.1.1 and press ENTER/RETURN to access the WebGUI.

When prompted for user credentials, type in admin for the "User Name" and 1234 for the "Password". Click the Login button to enter the WebGUI.

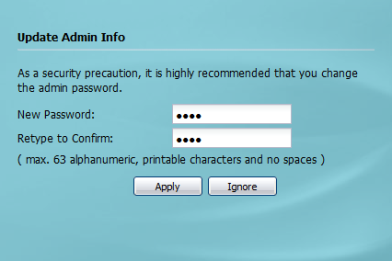
The following screen will prompt to update the administrator password. Enter a new administrative password and click the "Apply" button to save the change.
Click "Ignore" to keep the default password (1234) and continue with the setup.
Creating Address Objects
Address objects can represent a single IP address or a range or IP addresses. Address objects are used in dynamic routes, security policies, application patrol, content filtering and VPN connection policies. This walkthrough goes over a VPN setup for IKEv2 traffic, thus two address objects will need to be created. The first address object will be for the "IKEv2 address pool", this will be the IP addresses that Windows clients will receive upon a successful VPN connection. The second address object will reflect the IP traffic that will be allowed through the tunnel, in this case "all traffic".
To begin creating the address objects go to menu Configuration(![]() ) → Object → Address.
) → Object → Address.
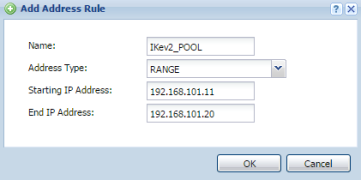
IKEv2 Address Pool
Click the Add button to insert the new address object.
- Provide a name for the object – "IKEv2_POOL" for example
- Select RANGE from the "Address Type" drop down box
- Enter a starting IP address and ending IP address – for the example we are using 192.168.101.11~192.168.101.20
- Click the OK button to save the settings
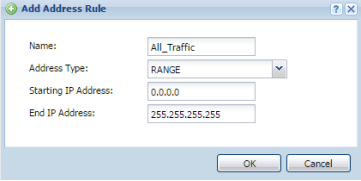
All Traffic Address Object
Click the Add button to insert the second object.
- Provide a name for the object – "All-Traffic" for example
- Select RANGE from the "Address Type" drop down box
- Enter a starting IP address and ending IP address – for all traffic the staring IP should be 0.0.0.0 and ending IP of 255.255.255.255
- Click the OK button to save the settings
Create User Object
A user account defines the privileges of a user logged into the USG. User accounts are used in security policies and application patrol, in addition to controlling access to configuration and services in the USG. The IKEv2 client support built into Windows (Win7 or later) requires a user to authenticate with a username and password to the VPN server.
User Account Object
To add user accounts for users which will be allowed to authenticate to the IKEv2 VPN go to, Configuration(![]() ) → Object → User/Group. Click the Add button to insert a new user account.
) → Object → User/Group. Click the Add button to insert a new user account.
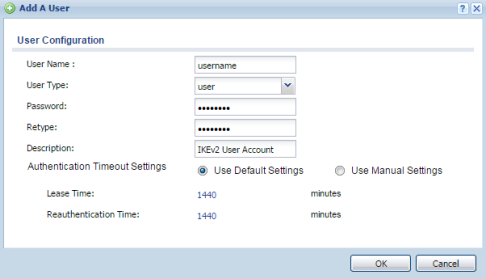
- Provide an account "User Name"
- This account will be used primarily for VPN authentication, set the "User Type" to user
- Create a "Password" for the user account and "Retype" to confirm
- Provide a description for the account (optional)
- Click the OK button to save the settings
User Account Group
If multiple user accounts have been created, they will need to be grouped together so all users can be applied to the IKEv2 VPN rule for authentication. To add user groups click on the "Group" tab under the Configuration(![]() ) → Object → User/Group menu. Click the Add button to insert a group entry.
) → Object → User/Group menu. Click the Add button to insert a group entry.
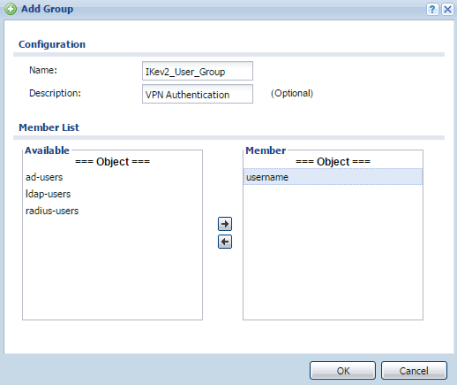
- Provide a name for the group – "IKEv2_User_Group" for example
- Give a description for the group object (optional)
- Select the user accounts from the "Available" list and move the accounts over to the "Member" list
- Click the OK button to save the settings
VPN Certificate
The USG can use certificates (also called digital ID's) to authenticate users. Certificates are based on public-private key pairs. A certificate contains the owner's identity and public key. Certificates provide a way to exchange public keys for use in authentication.
Because Windows (Win7 or later) supports IKEv2 with certificate for authentication, a certificate will need to be created to allow users VPN authentication. Go to Configuration → Object → Certificate and click the Add button under the "My Certificates" tab to create a new certificate for the IKEv2 VPN authentication.
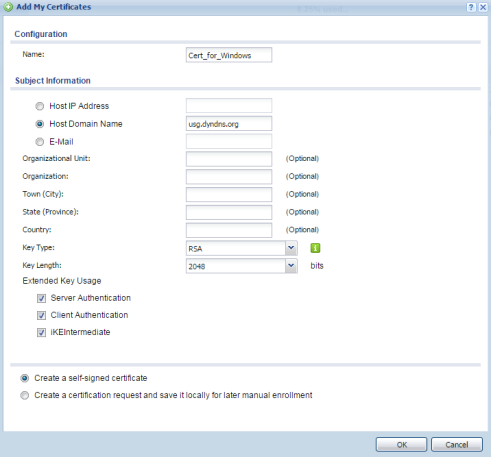
- Provide a name for the certificate – "Cert_For_Windows" for example
- An FQDN or dynamic DNS account is needed to fill in the certificate criteria, select the "Host Domain Name" radio and fill in the FQDN/DDNS
- Set the "Key Length" to use a 2048-bit certificate key
- Check the boxes to use the certificate for "Server Authentication", "Client Authentication" and "IKEIntermediate"
- Leave all other settings/option alone
- Click OK to create the new certificate
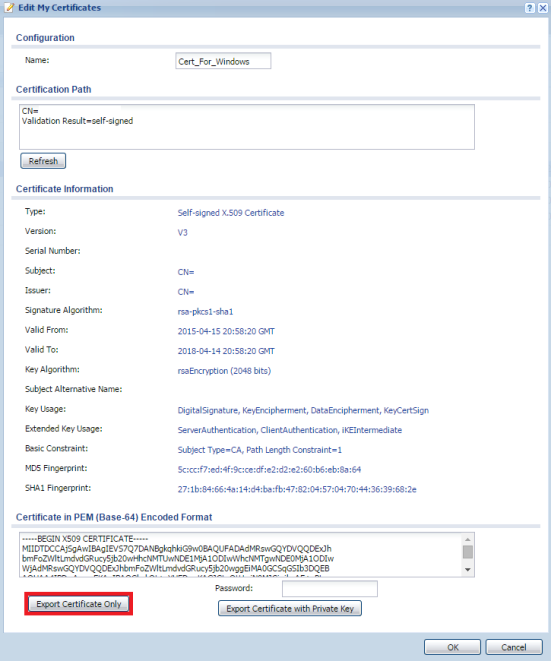
Once the certificate has been created double-click on it to edit. Click on Export Certificate Only button to export the certificate to your machine. This certificate will be applied to the Windows OS for IKEv2 authentication later on this guide.
IPSec VPN Setup
IPSec VPN consists of two phases: Phase1 (also known as IKE) and Phase2 (also known as IPSec). Phase 1's purpose is to establish a secure authenticated communication channel by using Diffie-Hellman (DH) keys exchange algorithm to generate a shared secret key to encrypt IKE communications. This negotiation results in one single by-directional ISAKMP Security Association (SA). The authentication can be performed using a pre-shared key (shared secret) or certificate. During Phase 2, the remote IPSec client use the secure channel established in Phase 1 to negotiate Security Associations for IPSec. The negotiation results in a minimum of two unidirectional security associations, one inbound and one outbound.
Create VPN Gateway Policy (Phase1)
To create a Phase 1 VPN policy, go to Configuration(![]() ) → VPN → IPSec VPN and click on the "VPN Gateway" tab. Click the Add button to insert a new VPN rule.
) → VPN → IPSec VPN and click on the "VPN Gateway" tab. Click the Add button to insert a new VPN rule.
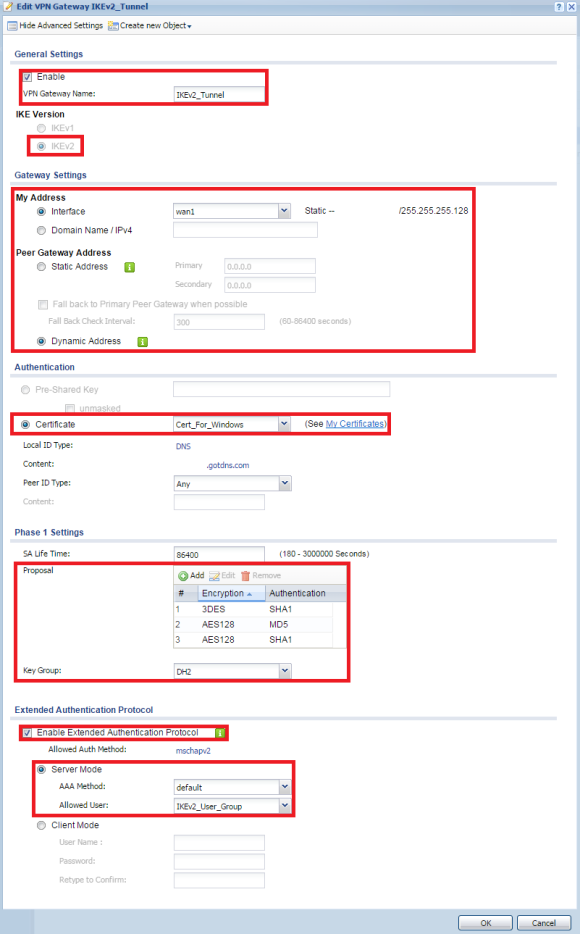
- Select the "Show Advanced Settings" option on the top left and make sure the enable box is checked
- Provide a name for the VPN Gateway – IKEv2_Tunnel for example
- Select IKEv2 under "IKE Version"
- Set the "Gateway Settings", both "My Address" [Interface or Domain Name] and "Peer Gateway Address" [Dynamic Address]
- Set the "Authentication" to use "Certificate", click on the drop down and select the appropriate certificate [Cert_For_Windows]
- Add the following proposals to the "Phase1 Settings"
⚬ 3DES / SHA1
⚬ AES128 / MD5
⚬ AES128 / SHA1 - Set the "Key Group" to use Diffie-Hellman 2 (DH2) key
- Check the box to "Enable Extended Authentication Protocol", Server Mode and Allowed Users to the user group previously created [IKEv2_User_Group]
- Click OK to save the settings
Create VPN Connection Policy (Phase2)
To create a Phase 2 VPN policy, click the "VPN Connection" tab from the Configuration(![]() ) → VPN → IPSec VPN menu. Click the Add button to insert a new VPN rule.
) → VPN → IPSec VPN menu. Click the Add button to insert a new VPN rule.
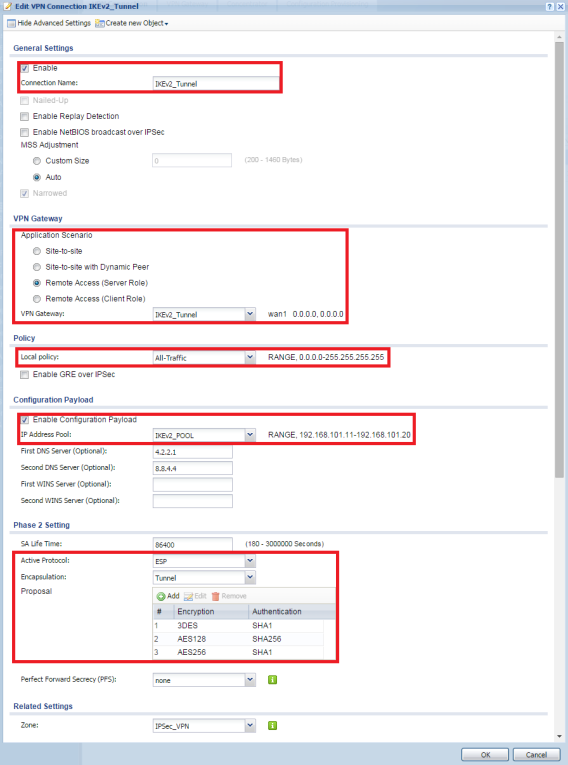
- Select the "Show Advanced Settings" option on the top left and make sure the enable box is checked
- Provide a name for the VPN Connection – IKEv2_Tunnel for example
- Set the "VPN Gateway" option to use the Remote Access (Server Role) application scenario
- Click on the drop down box for the "VPN Gateway" option and select the Phase1 policy previously created [IKEv2_Tunnel]
- Set the "Local Policy" option to use the address object created for all traffic [All-Traffic], if only access to the local network will be allowed select LAN1_SUBNET. Please note that when the Windows IKEv2 client establishes a VPN tunnel it will attempt to send all traffic through the connection. If all traffic is not allowed by the Local Policy option internet access will be lost while the VPN connection is established. Policy routes would need to be added to the Windows OS routing table to work around this limitation. (Zyxel does not support creation of routes on computer operating systems)
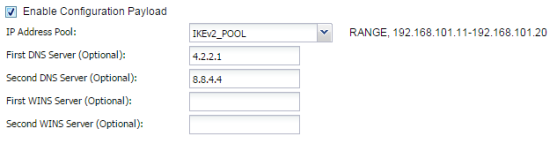
- Check the box to "Enable Configuration Payload" option
- Set the "IP Address Pool" [IKEv2_POOL]
- Set optional DNS and/or WINS server addresses
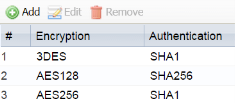
- Add the following proposals to the "Phase1 Settings"
⚬ 3DES / SHA1
⚬ AES128 / SHA256
⚬ AES256 / SHA1 - Click OK to save the settings
Policy Route
Traditional routing is based on a destination address only and the USG takes the shortest path to forward a packet. IP Policy Routing provides a mechanism to override the default routing behavior and alter the packets forwarding based on the policy defined by the network administrator. Policy-based routing is applied to incoming packets on a per interface bases, prior to the normal routing.
A policy route will need to be added to the USG to allow the IKEv2 clients internet access through the router once a VPN connection has been established. If only access to the local network will be allowed skip this step. Please note that when the Windows IKEv2 client establishes a VPN tunnel it will attempt to send all traffic through the connection, this will cause internet traffic and possibly even local network traffic to stop working while the VPN tunnel is established. Policy routes would need to be added to the Windows OS routing table to work around this limitation. (Zyxel does not support creation of routes on computer operating systems)
To add the policy route allowing IKEv2 users internet access, go to Configuration(![]() ) → Network → Routing and click on the Policy Route tab. Click the Add button to insert a route entry.
) → Network → Routing and click on the Policy Route tab. Click the Add button to insert a route entry.
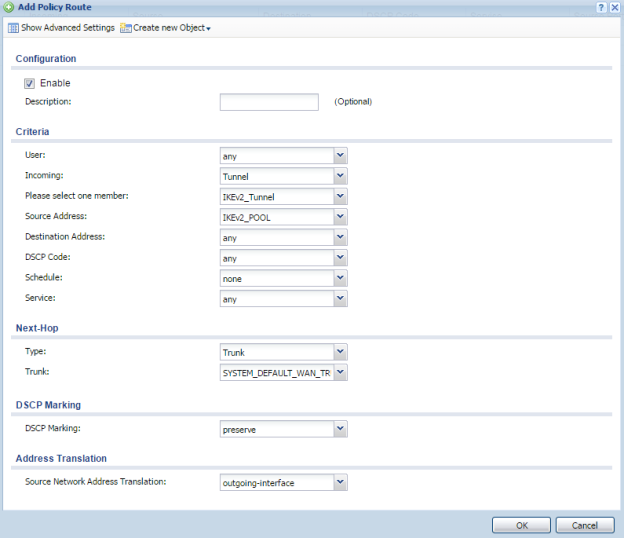
- Enable the route entry
- Set Incoming: Tunnel
- Set member: IKEv2_Tunnel
- Set Source Address: IKEv2_POOL
- Set Next-Hop Type: Trunk
- Set Trunk: SYSTEM_DEFAULT_WAN_TRUNK
- Leave all other setting as they are
- Click OK to save the settings
Windows Certificate Import
To configure the IKEv2 client on the Windows machine (Win7 or later) the certificate must be imported into the trusted certificates console. To access the console and import the certificate, open the RUN dialog box. You can access this by pressing the Windows + R keys on the keyboard.

On the RUN box type "mmc" and click OK or hit the Enter/Return key.

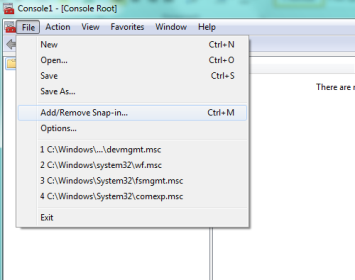
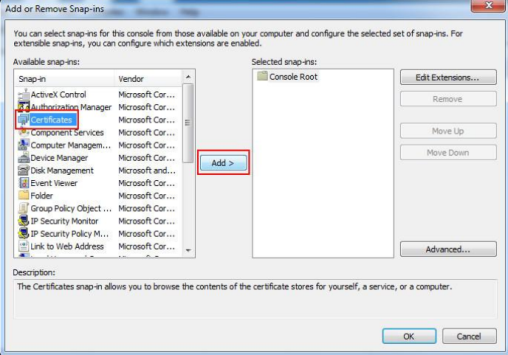
In the mmc console, click on File → Add/Remove Snap-in…
Under "Available snap-ins:" select Certificates and Add > it to the "Selected snap-ins:" list.
Select "Computer account" and hit Next >.

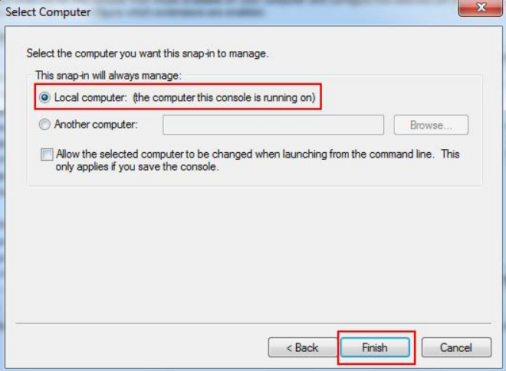
Select "Local computer: (the computer this console is running on)" and hit Finish.
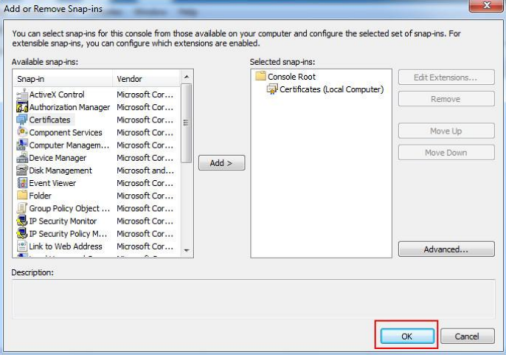
Click OK to save the settings.
Open Certificates (Local Computer) → Trusted Root Certification Authorities and right-click on Certificate → All Tasks → Import.
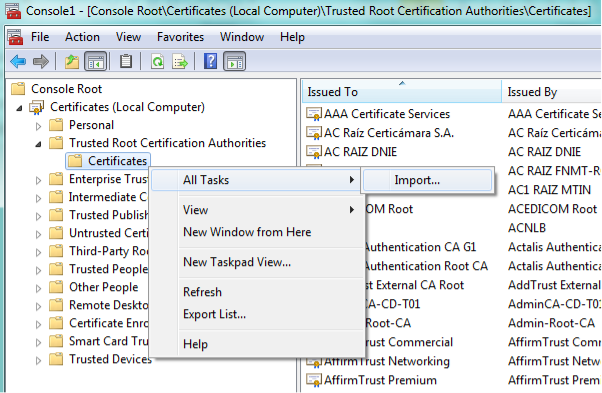
Run through the certificate import wizard to open the certificate previously created and exported from the USG. [Cert_For_Windows]

Windows IKEv2 Client Setup
Open "Network and Sharing Center" on the Windows computer and select the option to "Set up a new connection or network"
RUN command shortcut to open network and sharing center "control.exe /name Microsoft.NetworkandSharingCenter"
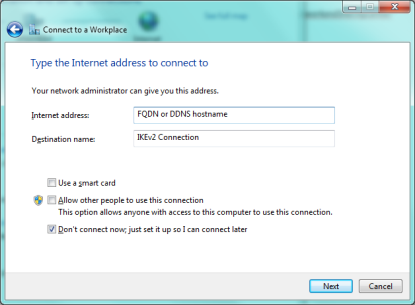
Set the new connection to "Connect to a workplace" and hit Next.

Enter the "Internet address:" info and check the box "Don't connect now; just set it up so I can connect later", hit Next.
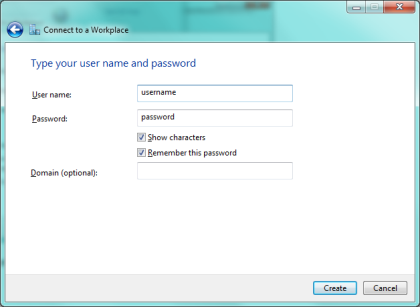
Enter the user account credentials and press Create to add the VPN connection dialer.
Open the "Network Connection" window.

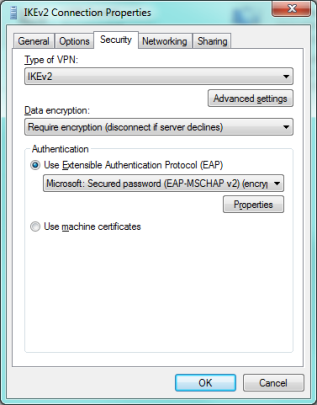
Edit the VPN dialer that was created [IKEv2 Connection] by right-clicking on the dialer and going to the properties option. Go to the Security tab and set the following:
- Type of VPN: IKEv2
- Data encryption: Require encryption (disconnect if server declines)
- Authentication: Use Extensible Authentication Protocol (EAP)
- Set the drop down to: Microsoft: Secured password (EAP-MSCHAP v2) (encryption enabled)
Click on the Networking tab and disable the Internet Protocol Version 6 (TCP/IPv6) option.
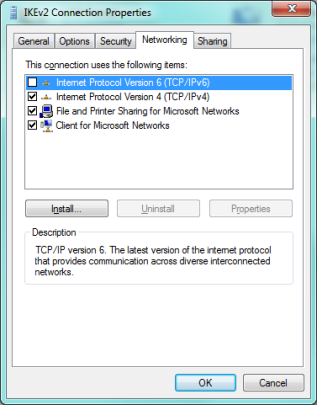
Click OK to save the settings.
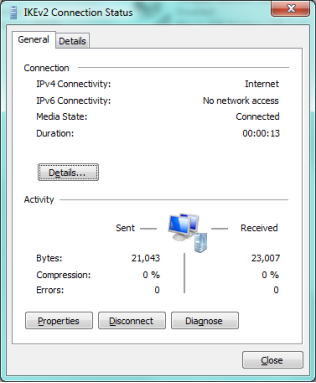
Double-click the VPN dialer or right-click and select connect to open the dialer. Click the Connect button to start dialing the connection.

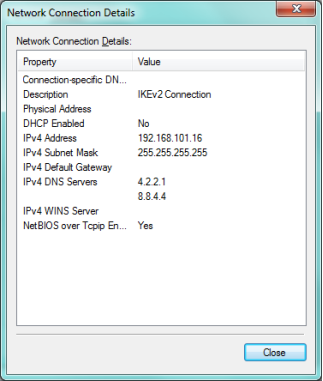
Once the connection is established the VPN client will receive an IP address from the USG within the range assigned by the "IKEv2_POOL" address object.
Troubleshooting
Windows Client will not connect:
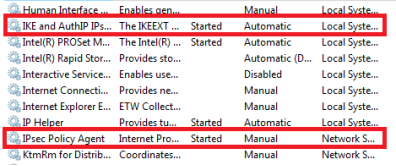
- Does the client have any other VPN clients installed? Only one application can use the IKE/IPSec services at a time, if there is another VPN client installed on the computer (and running) such as Cisco IPSec client, TheGreenBow, ShrewSoft, etc., you will need to close the application completely and restart the IKE/IPSec services so that the "IKEv2 Connection" can use them.
To restart the services on your computer open a RUN dialog box. You can access this by pressing the Windows + R keys on the keyboard.
Type "services.msc" and click OK or hit the Enter/Return key.

Scroll down the list to find the 'IKE and AuthIP IPsec Keying Modules' and 'IPsec Policy Agent' to restart these services.
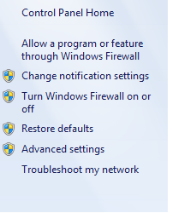
- Disable your computer's firewall to make sure it is not blocking the VPN connection attempt.
To disable the Windows firewall, open a RUN dialog box. You can access this by pressing the Windows + R keys on the keyboard.
Type "firewall.cpl" and click OK or hit the Enter/Return key.

Select the option to "Turn Windows Firewall on or off" on the left. Disable the firewall by selecting the "Turn off Windows Firewall" and click the OK button to save the settings.
Note: If you're using a third party software firewall, Trend Micro, Norton, McAfee, etc., please open the softwares control panel and disable the firewall feature. - Verify the IPSec policy created on the USG to make sure it has the following algorithms configured for Phase1 and Phase2 settings.
Phase 1 Phase 2 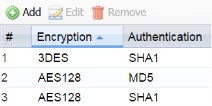
- If the tunnel is still not connecting please double-check the IPSec VPN Setup.
- Verify the firmware is up to date and contact tech support for further assistance. To check the current version of firmware on the USG go to Maintenance(
 ) → File Manager → Firmware Package

VPN Tunnel is established but computer has no internet:
- By default the Windows IKEv2 VPN client will try to send all traffic through the tunnel, internet traffic will seize while the VPN connection is active. A routing policy (Policy Route) needs to be added to the USG to allow the IKEv2 VPN traffic to access the WAN connection for internet traffic.
- Make sure DNS entries were added for the VPN users. To check this go to Configuration(
 ) → VPN → IPSec VPN on the USG. On the "VPN Connection" tab edit the IKEv2 rule and check the "Configuration Payload" setup.
- Verify the firmware is up to date and contact tech support for further assistance. To check the current version of firmware on the USG go to Maintenance() → File Manager → Firmware Package
Comments
0 comments
Please sign in to leave a comment.