
Overview
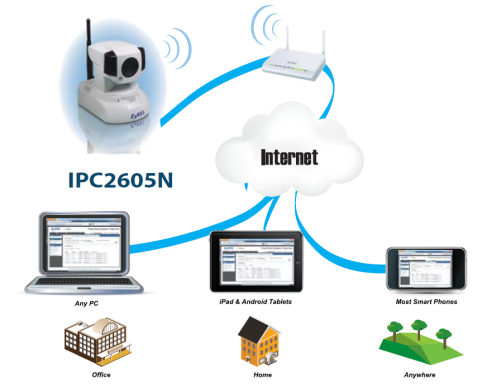
The Zyxel IPC network cameras are consumer-friendly IP cameras with many useful and powerful features. Traditional IP cameras require too much configuration to get things going the way you need them to. The IPC cameras cloud feature allows for simple implementation, all you need to do is connect the camera to the network, run the installation CD to register the camera with your cloud account and you're done.
With traditional IP cameras the internet gateway (router) needs to be configured to allow the management and or video streaming ports through so you can access from the internet. Not only do you need to configure the internet gateway to allow this traffic but if you have multiple IP cameras you may need to change the port numbers so you can access all the cameras from the internet. If that was not hard enough you may also need to memorize your internet IP address if you have a dynamic internet connection with your ISP (Internet Service Provider) or open a dynamic DNS account to help streamline the IP remembering process.
For the consumer this process may be too hard or time consuming to accomplish. This is why Zyxel presents a truly consumer-friendly IP camera. Designed with cloud-based technology to eliminate the traditional difficulties inherent in network cameras, the IPC cameras provide superior functionality and accessibility for 24/7 peace of mind.
Supported Devices
IPC4605N
IPC3605N
IPC2605N
Accessing the WebUI
There are two ways to find the IP address on the IPC camera to be able to access the WebGUI. Simplest option is to use the easy setup wizard on the included installation CD. The second option which may be a bit harder to do is to login to your network router and check the DHCP client table to find out what IP address the router assigned to the camera.
eaZyWizard
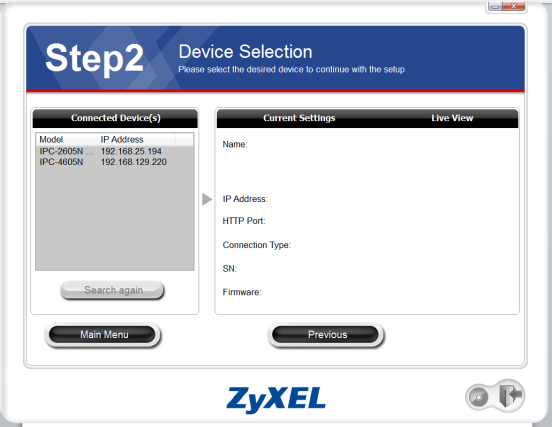
Run the setup wizard included in the CD to detect the device IP address. Step 2 of the wizard will provide a list of all IPC cameras it can detect on the network and also provide the IP address they are using. This is the simplest, fastest way to retrieve the IP address information for the network camera.

If you cannot run the setup CD because you are using an unsupported operating system (Linux, Mac OS, etc.), you will need to access your network router's WebUI to check the DHCP client table for the IP address assigned to the camera.
Once you have retrieved the IP address of the camera, open a web browser (Internet Explorer, Firefox, Chrome, etc.) and type the address on the address bar.


This will bring you to the cameras user login screen. The default username is 'admin', password is '1234'. Enter the credentials and click the "OK" button to access the administrative WebGUI.


Event Setup
This section will go over setup of motion detection, setting up event servers and triggers to have the camera take a snapshot, send a notification or capture video.
Event Server Setup
The IPC camera has the capability to save captures to FTP server, Email server, Image server, HTTP server and SMS server. This section will cover the setup process for FTP server, Email server and HTTP server.
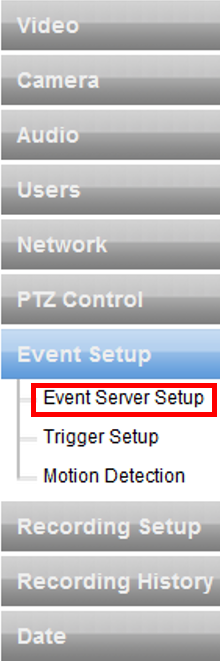
To configure the event server setting on the camera login to the IPC cameras LiveView interface and go to the "Setup" menu.


From the "Setup" menu click on, Event Setup → Event Server Setup. Here you will have the option to configure each one of the event setups listed above.

Email Server
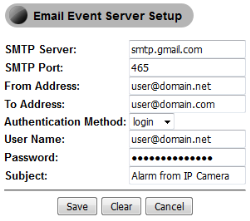
From the "Event Server Setup" menu click the "Email Server" option to setup your preferred mail server SMTP settings. For this example we will be using Gmail (Google Mail) for the Email Server setup.
- SMTP Server – Enter your mail server SMTP address (smtp.gmail.com)
- SMTP Port – Define the port used by your preferred SMTP server (port 465 for Gmail)
- From Address – Type in the email address for your account (user@gmail.com)
- To Address – Type in the email address for the recipient (user@domain.com)
- Authentication Method – Options are none, login or plain. Select NONE if the SMTP server does not require authentication. Select LOGIN if the SMTP server requires an encrypted authentication. Select PLAIN to send authentication to the SMTP server as clear text. (use LOGIN for Gmail)
- User Name – Enter the account user name
- Password – Enter the email account password or app specific password (if using 2FA)
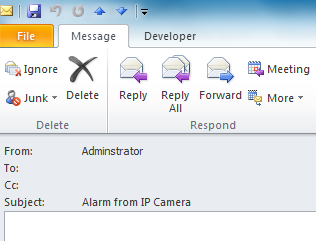
- Subject – Enter an email subject ("Alarm from IP Camera" is default message)
- Click the "Save" button to apply the configuration

If all email settings are correct the email recipient (To Address) will receive an email.

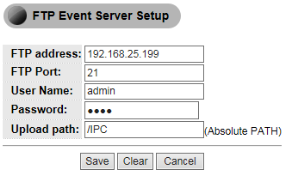
FTP Server
From the "Event Server Setup" menu click the "FTP Server" option to configure your FTP servers' settings. For this FTP Server example we will be using the FTP server capabilities on a NAS device. You can also install FTP Server software on a computer to use.
- FTP address – Type in the IP address, device hostname or domain name for the server
- FTP Port – Enter the port number the server is listening to, by default FTP listens on port 21, if the server port has been modified please provide the correct listening port
- User Name – FTP server account user
- Password – FTP server account password
- Upload path – enter the directory path on the FTP server you wish the IPC camera to upload snapshots to

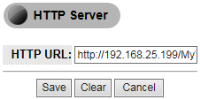
HTTP Server
From the "Event Server Setup" menu click the "HTTP Server" option to setup your web server access. This requires an http server with write capability, most servers act as a read only (display only). Please choose an appropriate server for this setup.

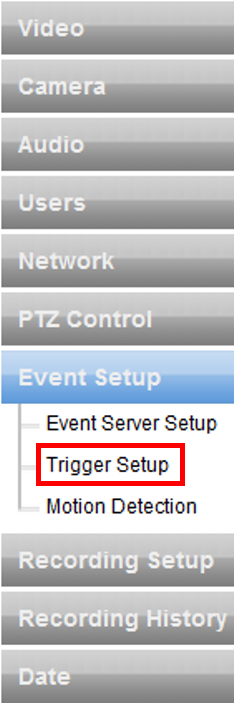
Trigger Setup
Once you have configured event servers a trigger can be configured to upload a snapshot to the FTP server, HTTP server or send an email with the snapshot (image). From the "Setup" menu click on, Event Setup → Trigger Setup.

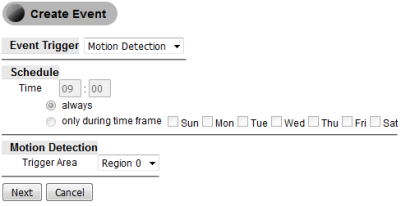
Two trigger profiles can be created, one based on motion detection and one based on schedule. To add a trigger event please click the "Create" button.
- Event Trigger – Select the type of trigger event you wish to create, "Motion Detection" or "Schedule"
- Schedule – if a "Schedule" event trigger is selected please specify the time (in 24 Hours) the trigger will take a snapshot and the day(s) of the week to do it on
- Motion Detection – Some cameras support multiple motion detection profiles (IPC2605N only supports 1 profile)
- Click "Next" to continue the trigger setup

- On the following screen select the event server(s) you wish to send the snapshot (image) to.
Note: List of servers depends on what is configured under Event Setup → Event Server Setup.

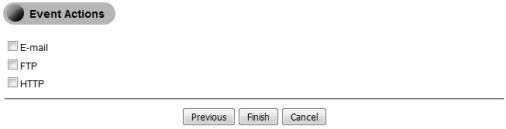
- Click "Finish" to complete the trigger rule setup.
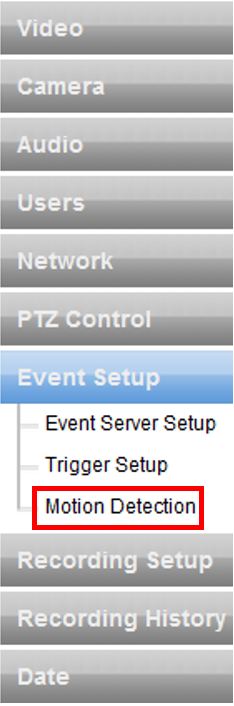
Motion Detection
The motion detection option allows you to setup detection regions and sensitivity level for motion in the specified region. From the "Setup" menu click on, Event Setup → Motion Detection.

To configure the motion detection:
- Click on a quadrant to enable motion detection on that section of the image (multiple sectors can be selected)
- Sensitivity – Select the sensitivity level for the motion detection for each of the selected sectors.


Recording Setup
IPC cameras have the ability to write video to a local NAS or NFS share
NAS Setup
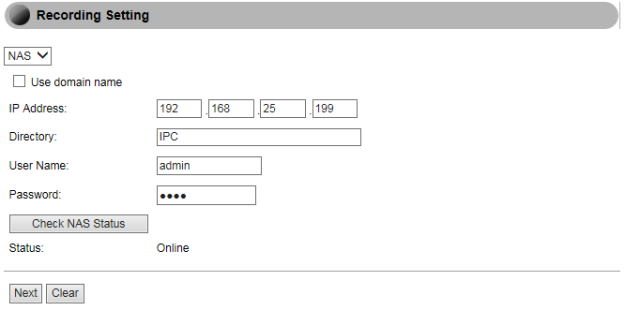
To have the IPC camera save a recording on a NAS device begin by selecting NAS from the dropdown box.
- Check the "Use domain name" box to use the network attached storage device domain name instead of an IP address
- IP Address – Type in the storage device IP address
- Directory – Provide the path to the directory the IPC cam should use to record video
- User Name – Provide the user name for the account with access to the specified share
- Password – Provide the user account password
- Click the "Check NAS Status" button to have the IPC cam test the connection to the NAS and directory, if all info is correct the "Status" will show Online
- Click the "Next" button to continue the setup (Step 2)

NFS Setup
To have the IPC camera save a recording on an NFS share select NFS from the dropdown box.
- IP Address – Type in the storage device IP address
- Directory – Provide the path to the directory the IPC cam should use to record video
- Once the Directory is entered the IPC cam will verify the path and show a "Status" of Online (all settings are correct) or Offline (something is wrong with the setup, possibly the directory path)
- Click "Next" to continue the setup (Step 2)


Step 2
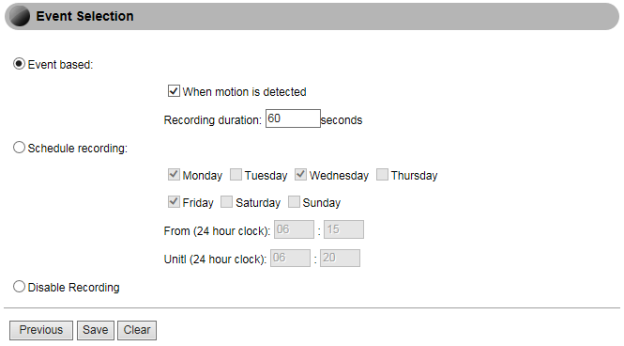
Once the recording setting has been configured using one of the two options (NAS/NFS), the event selection setup can be configured. This screen allows you to set the recording based on motion detection or schedule. It also provides the option to disable recording if you wish to stop recording to the NAS/NFS share in the future.

Time/Date Sync
To configure the time and date settings on the IPC cam click on the "Date" option under the "Setup" menu. Setting up the time settings correctly is important for schedule based tasks the camera may need to complete as well as tagging snapshots (images) when files are saved.
- You can configure the IPC camera to sync up with an NTP server to automatically obtain the time and date settings from the internet. Choose the correct time zone location to display the correct time.
- Select to sync the time settings with the current settings on your computer. This option will create a one-time communication with your computer to obtain the time and date settings. If the camera is rebooted for some reason or time changes because of daylight savings, you will need to manually run this process again.
- The ability to manually enter the time and date info is also available if other options fail.

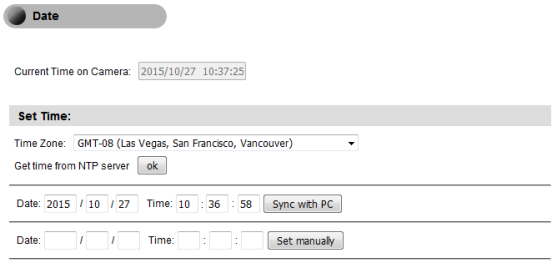
Note: To change the preferred NTP server setup please go to Setup → Network → Advanced to enter the preferred NTP server IP address/host name.
Troubleshooting
Cannot retrieve IPC camera IP address? Router DHCP client list is not showing device and/or Zyxel eaZyWizard program cannot detect the device?
- Make sure the camera is powered ON and connected to the network using an Ethernet cable.
- If the Zyxel eaZyWizard cannot detect the device, try disabling the computer's firewall to make sure it is not blocking the eaZyWizard scan.
- If the IPC camera is not showing up on the router DHCP client list please try rebooting the router.
- Press and hold down the RESET button on the IPC camera for 10-15 seconds to delete any configuration on the camera that may be causing the issue.
- Contact Zyxel Technical support for additional support. Support is available Monday through Friday from 8AM to 5PM PT @ 800-255-4101 option 5. You can also get email support by completing the "Support Request Form" here
Attempting to record video to NAS/NFS but file will not save?
- Verify the NAS/NFS status for the directory and make sure the connection has not Failed.
- If NAS/NFS status show the connection is Online, please check the directory permission. Make sure the directory has read/write permission.
- If the NAS/NFS server has a firewall enabled, please disable to make sure it is not the blocking/stopping the read/write traffic.
- Make sure firmware on the IPC camera us up to date
- Make sure NAS/NFS server is running the latest build (version)
- Possible compatibility issue between IPC and server, please try different server if possible
- Contact Zyxel Technical support for additional support. Support is available Monday through Friday from 8AM to 5PM PT @ 800-255-4101 option 5. You can also get email support by completing the "Support Request Form" here
Comments
0 comments
Please sign in to leave a comment.