

Initial setup walkthrough for NBG-419N router
This walkthrough describes the setup process for the NBG-419N router for internet and wireless access.
This guide will go over:
- ➢ Accessing the Web Configurator
- ➢ Wi-Fi Setup
- ➢ Firmware Upgrade
- ➢ Troubleshooting the Internet Connection
To begin connect an Ethernet cable to the Cable/DSL modem and run it to the WAN port (Blue Port) on the NBG router. Next run a second Ethernet cable from one of the LAN ports (Yellow Ports) on the NBG router to your computer.
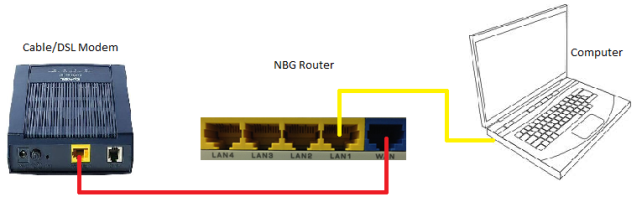
Plug the power cable to the NBG router to turn it ON. Allow 30 seconds for the router to boot-up.
Accessing the Web Configurator
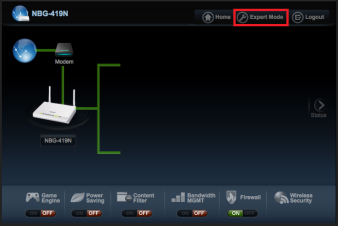
- Connect your modem, router and computer based on the diagram above.
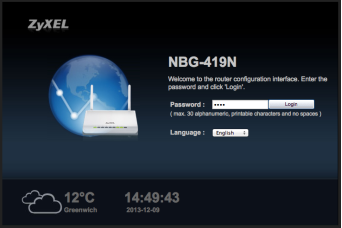
- Launch your web browser. (Internet Explorer, Firefox, Google Chrome, etc.)
- Type "http://192.168.1.1" on the address bar in your web browser. This is the default LAN IP address of the NBG router.
- Type 1234 for the password and click "Login".
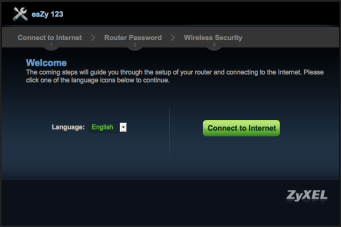
Note: The management session automatically times out when the time period set in the Administrator Inactivity Timer field expires (default five minutes). Simply log back into the NBG-419N router if this happens. - Once you have logged in for the first time you will be prompted to run the internet setup wizard. Click "Connect to Internet" to continue.
- The wizard will attempt to detect the internet connection type you are using.
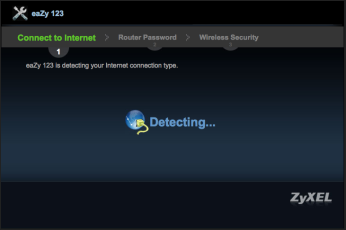
- Hit the "Exit" button to get out of the wizard and enter the advance setup. You will be prompted to login to the device again. Once you have logged back in you will see the HOME screen, click on the "Expert Mode" option on the top right.
- On the status page make sure you are running the latest firmware release for your router. To check if you are on the latest firmware or if any update is available please visit our FTP site (ftp://ftp.us.zyxel.com) scroll to find your model router directory and click to select. From the main directory click the "Firmware" sub-directory for a list of all the firmware releases. Please update the firmware incrementally. (for a walkthrough on updating the router firmware scroll down to FIRMWARE UPGRADE)

Wi-Fi Setup
- Make sure the WLAN switch on the back of the router is toggled to the "ON" position.
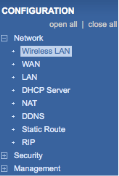
- On the router's Web Interface you will see four menu icons on the far left. If you hover the mouse over each one of these icons it will shows you what menu it is. Click on the "Configuration" menu option on the far left (
 ).
). - In the configuration menu click on the "Network" option and "Wireless LAN".
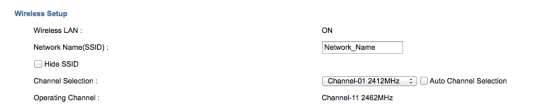
- Provide a name for your wireless network in the "Network Name(SSID)" field. Deselect the checkbox for the "Auto Channel Selection", this feature allows the router to automatically change channel between 1-11 to find the channel with the least interference on the 2.4GHz wireless spectrum. This option however will disrupt all your wireless clients while it selects a new channel to work on. To minimize wireless disconnections it is best to disable this feature.
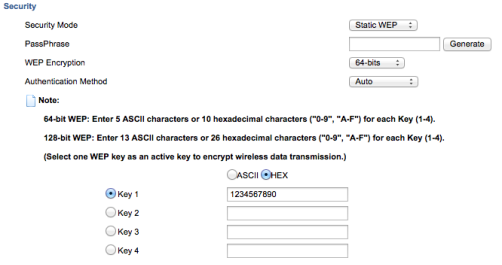
- To add a password for wireless connections click the "Security Mode" dropdown box and select a security method, Static WEP, WPA-PSK or WPA2-PSK. WPA2-PSK is the strongest encryption, we highly recommended using this encryption type.
-
➢ Static WEP Setup
- Once you have selected Static WEP you have the option to use a 64-bit encryption or 128-bit, the higher the encryption the longer the password.
-
➢ WPA-PSK (TKIP) Setup
- Once you have selected the WPA-PSK security mode please make sure the "Cipher Type" is set to "TKIP" and create a password under the "Pre-Shared Key" field. (Password is case sensitive and must be between 8 and 63 characters in length)

-
➢ WPA2-PSK (AES) Setup
- Once you have selected the WPA2-PSK security mode please make sure the "Cipher Type" is set to "AES" and create a password under the "Pre-Shared Key" field. (Password is case sensitive and must be between 8 and 63 characters in length)

- Click the "Apply" button at the bottom of the page to save your settings.
Firmware Upgrade
- To upgrade the firmware/software on the router you must have a direct Ethernet connection between your computer and one of the routers LAN ports (Yellow Ports). If your computer has wireless built-in make sure you disable or turn OFF the wireless card (check your computer manual for instructions on how to turn OFF the wireless card).
- Please visit our FTP site, ftp://ftp.us.zyxel.com, to download firmware for your router.
- On the FTP site scroll through the directories to find directory for your product model. (Ex: NBG-419N)
- On your products directory click on the "Firmware" sub-directory to find the list of all firmware revisions available for your device. It is recommended that you run the firmware updates incrementally for best results. (Ex: if your router is on firmware version 1.00(BFQ.3) you will need to update to firmware version 1.00(BFQ.4), 1.00(BFQ.5), etc.)
- Download all the firmware files you need to update and extract the BIN file(s) to your Desktop.
- Open your web browser and access the router's Web Interface. (Please do NOT use the "Safari" web browser to update the firmware on your router)
- On the router's Web Interface click on the "Maintenance" menu option on the far left (
 ). To the right of the icons on the far left you will see an option for maintenance with a "+" sign next to it. Click the "+" to see all the options. Click on the "Firmware Upgrade" menu option.

- Click the "Browse" button to search for the BIN file on the Desktop directory. Select the BIN upgrade file and open.
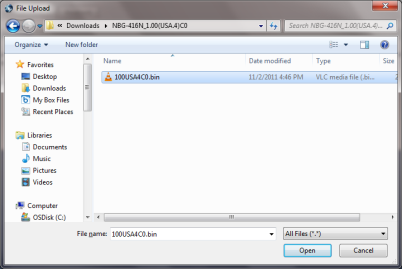
- You will see the file name next to the browse button once it's been open, click the "UPLOAD" button to start the upgrade. The firmware upgrade process takes about 2 minutes. Repeat steps 7-9 if you have to perform multiple firmware upgrades.

- Now that the firmware is up to date you can run the Wi-Fi Setup if you haven't yet configured the settings.
Troubleshooting the Internet Connection
Cable Modem(s)
- If you use a cable modem you will need to reset the modem cache so it allows the NBG router to establish the internet connection. To reset the cache you can:
- Press the RESET button on the modem and hold it down for 15 seconds. (If there is a reset button available)
- Call your ISP (Internet Service Provider) and have them reset your connection.
- Power down the modem completely (if the modem has a battery backup you will need to remove the battery first) for 5 minutes.
- If you have a modem/router combination please call your service provider and ask them to BRIDGE the device so it only functions as a modem.
xDSL Modem(s)
- Most xDSL modems are modem/router combination, it is highly recommended to contact the ISP (Internet Service Provider) and have them BRIDGE the device.
- Once the modem is bridge you will need to find out from your service provider if the connection is "PPPoE" or "Ethernet". If the connection is Ethernet all you need to do is make sure the modem and router are connected and power OFF the NBG router to 10 seconds and power back ON.
- If the connection type is PPPoE, obtain the username and password credentials for the PPPoE account.
- To configure the PPPoE credentials on the NBG router you must first access the Web Interface.
- Click on the Configuration () menu on the far left and go to Network > WAN.
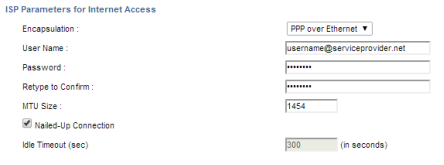
- Set the Encapsulation under the ISP Parameters to "PPP over Ethernet" (PPPoE) and enter the user credentials. Make sure the "Nailed-Up Connection" option is checked so that the router keeps the PPPoE connection active at all times with your ISP.
- The most commonly used IP address for xDSL modem/routers is 192.168.1.x, this is also the IP address used by the NBG routers LAN. This will create an IP conflict and internet traffic may not work. In this case it is a good idea to change the LAN IP of the NBG router to eliminate the conflict. To change the LAN IP of the NBG:
- Open a web browser and access the router's Web Interface.
- Click on the Configuration () menu on the far left and go to Network > LAN.
- Change the default IP (192.168.1.1) to something difference, such as 192.168.100.1.
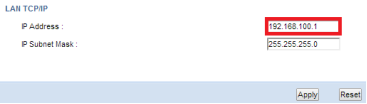
- Click the "Apply" button to save the settings.
Comments
0 comments
Please sign in to leave a comment.