Dear Customer,
your country is not supported by EMEA Region Support.
Please go to this page to get your Support.
Click Here
Please type here...
Please note that we can only offer callbacks in English language at the moment!
Continue with Technical Check
Model Name:
Warranty Expiration Date:
Invalid Serial Number
This serial number does not appear to be valid.
Our serial numbers start with “S” and typically contain 13–15 characters.
Without a valid serial number, some services may be unavailable.
Please check and correct the serial number, or remove it and continue without a serial number.
Dear Valued Customer,
Thank you for being a part of the Zyxel family.
Although your product warranty has ended, we are pleased to offer you a special 15%
discount for your next purchase on our Zyxel EU Store
Use the voucher code GEUO67B15 at checkout to enjoy this exclusive benefit.
If your warranty concerns persist, please initiate a Return Merchandise Authorization (RMA) case with a
copy of your invoice, and we'll gladly assist you further.
We're committed to your continued satisfaction with our products and services.
Best regards,
The Zyxel Team
New Feature Need help? Try our Zyxel Search AI feature
Try Now!
[Router] How to configure port forwarding (NAT) on the NBG-419N
Ron
Updated
To open ports on the NBG-419N router you first need to login to the Web Configurator. Open an internet browser and on the address bar type http://192.168.1.1
A prompt will appear asking for the administrator password. Type in the password and click "Login". The default password is 1234, if you have changed the administrator password enter the new one and click "Login".
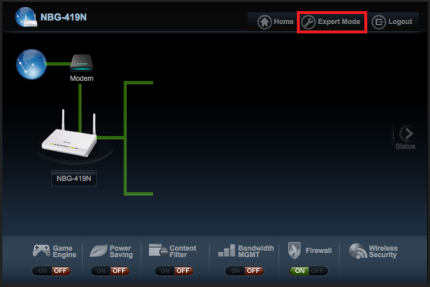
Once logged-in to the configuration menu you will see a diagram of the connection(s) , click on the "Expert Mode" option on the top right.
In the expert mode window click on the "Configuration" menu icon ().
Before we can start creating port forwarding rules you will need to assign your computer/device with a fixed IP address (Static IP) or setup a reservation on the NBG router so that your computer/device always gets assigned the same IP address by the NBG-419N.
➢ To manually assign your computer/device with a fixed IP address you will need to check your devices documentation on how this process is done or search the web/internet for instructions on how to accomplish this on your particular equipment.
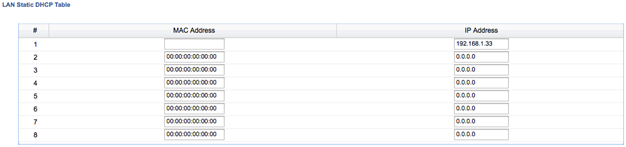
➢ To setup the reservation on the router go to the "DHCP Server" menu option under Network.
➢ In the DHCP Server click on the "Advanced" tab. Here you will see the "LAN Static DHCP Table", enter your devices MAC address and the IP Address you would like to reserve between 192.168.1.33~192.168.1.65 and "Apply" the settings.
➢ Now that you have the DHCP reservation or have a Fixed IP address configured we can setup the port forwarding.
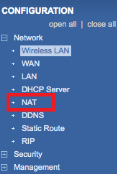
Under the Network menu click on "NAT".
Once in the NAT menu click on the "Applications" tab to enter your port forwarding rules. For this example we will create a rule to open port 80 (web traffic, http, www), port 5060 (SIP, VoIP) and ports 10000-20000 for SIP real time streaming protocol (RTSP).
➢ There are custom profiles already created for the ports commonly forwarded. From the drop down window on the right select the HTTP profile, it will fill in all of the entries except the Server IP Address, this is where you would time in the IP address of the computer/device you need to forward the port to.
➢ If the port/service you need to forward is not one of the predefined profiles on the drop down box, select the "User Defined" and enter a Service Name and the Port number you need to forward, as well as the IP address of the computer/device it needs to be forwarded to.
➢ If you need to open consecutive ports (10000, 10001, 10002, etc. all the way to 20000) you do not need to add a rule for each individual port. Just enter a dash (-) to specify a port range.
Once you have created all your port forwarding rules you can see them listed under "Application Rules Summary"
We and our partners use cookies on our site for delivering personalised content, ads and analyzing website traffic. This provides you with better browsing experience. By clicking ‘agree’ or navigating this site, you agree to the use of cookies described in our cookie policy. You can manage your cookie preferences at any time.

 ).
).


Comments
0 comments
Please sign in to leave a comment.