

This guide provides an example on creating an IPSec VPN rule to allow user access to local network resources.
Overview
A VPN (virtual private network) provides a secure communication between sites without the expense of leased lines. VPNs are used to transport traffic over the internet of any insecure network that uses TCP/IP communications. A remote access VPN (client-to-site) allows employees who are traveling or teleworkers, secure access to company network resources. There multiple types of VPN protocols/technologies, that can be used to establish a secure link to company network, L2TP, PPTP, SSL, OpenVPN, etc.. This guide will reference the IPSec protocol to establish a secure VPN tunnel between external hosts (users connected to the internet outside the company network structure) and the ZyWALL router. Third party IPSec software is required to establish the VPN connection as current operating systems lack a built-in IPSec client.

Supported Devices
ZyWALL 110
ZyWALL 310
ZyWALL 1100
USG40
USG40W
USG60
USG60W
USG110
USG210
USG310
USG1100
USG1900
USG20-VPN
USG20W-VPN
USG2200-VPN
Table of Content
Accessing the WebUI
Step A – User Account Setup
Step B – User Group Setup
VPN Gateway (Phase 1)
VPN Connection (Phase 2)
ZyWALL VPN Client Setup
Testing & Troubleshooting
Accessing the WebUI
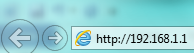
To access the ZyWALL web configuration page please open a web browser on your computer (Internet Explorer, Mozilla Firefox, Google Chrome, etc.). On the address bar type, http://192.168.1.1 and press ENTER/RETURN to access the WebGUI.
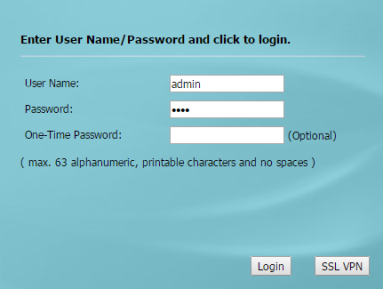
When prompted for user credentials, type in admin for the "User Name" and 1234 for the "Password". Click the LOGIN button to enter the WebGUI.
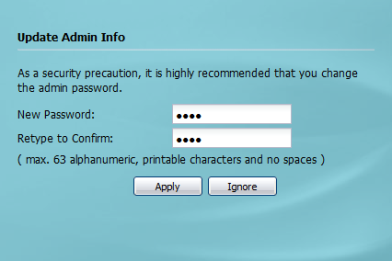
The following screen will prompt to update the administrator password. Enter a new administrative password and click the "Apply" button to save the change.
Click "Ignore" to keep the default password (1234) and continue with the setup.
Step A – User Account Setup:
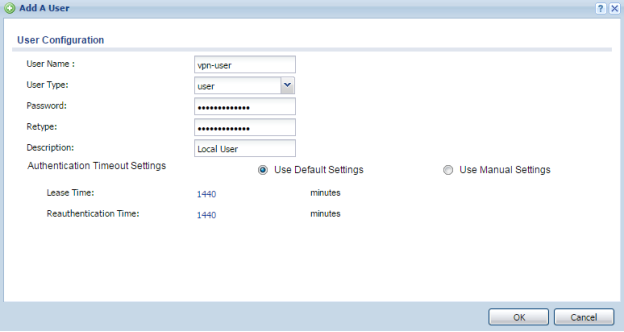
Once logged-in to the ZyWALL router go to menu, Configuration → Object → User/Group. Click the Add button to insert new "User" account(s) for VPN access.
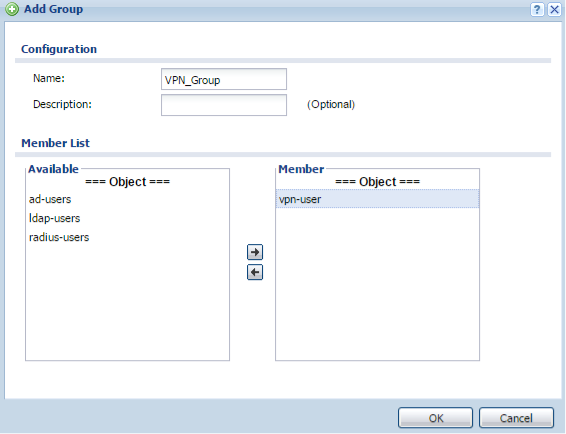
Step B – User Group Setup:
If you have created multiple "User" accounts you may want to group them together to keep the setup as simple as possible. To create a group for the VPN users click the "User Group" tab under Configuration → Object → User/Group menu. Click the Add button to create a group with all VPN users.
VPN Gateway (Phase 1):
To create the VPN rule (policy) go to menu Configuration → VPN → IPSec VPN. In the IPSec VPN menu click the "VPN Gateway" tab to add Phase 1 of the tunnel setup. Click the Add button to insert a new rule. On the top left of the window click the "Show Advance Settings" button to view all available setup options in the menu.
- Check the box to enable the VPN rule and provide a name
- Select IKEv1 (this is the only IKE version compatible with "User Based PSK" authentication)
- Select the WAN interface you wish to use to connect the VPN under the My Address dropdown field or select "Domain Name/IPv4" to manually type in the public IP address or domain/DDNS hostname.
- Make sure the Peer Gateway Address is set to "Dynamic Address"
- Select "User Based PSK" under Authentication and click the dropdown window to select the user or group for the PSK.
- Under the Phase 1 Settings be sure to have the Negotiation Mode set to "Aggressive" mode (User Based PSK only works with Aggressive negotiation mode)
- Set the "Encryption" and "Authentication" proposal you wish to use (Encryption options are DES, 3DES, AES128, AES192, AES256) (Authentication options are MD5, SHA1, SHA256, SHA512)
- Select the Diffie-Hellman key group (options are DH1, DH2, DH5)
- Click the OK button to save/apply the settings

Note: The caution symbol to the right will appear on areas where input is required or if there is a mistake with the entry, such as illegal/unsupported characters. 
VPN Connection (Phase 2):
Now that the VPN Gateway (Phase1) rule has been created click on the "VPN Connection" tab to insert the Phase 2 rule for the VPN tunnel. Click the Add button to insert a new rule entry. On the top left of the window click the "Show Advance Settings" button to view all available setup options in the menu.
- Check the box to enable the rule and give it a name
- Set the VPN Gateway application scenario to use "Remote Access (Server Role)"
- On the application scenario set the VPN Gateway dropdown to use the Phase 1 policy that was created on the previous step. (RoadWarrior for this example)
- Scroll down to the Policy option and set the Local Policy to use the "LAN1_SUBNET" address object, this will give the VPN user access over all devices connected to LAN1
- Active Protocol under the Phase 2 Setting should be set to "ESP"
- The Encapsulation is "Tunnel"
- Set the "Encryption" and "Authentication" proposal you wish to use (Encryption options are DES, 3DES, AES128, AES192, AES256) (Authentication options are MD5, SHA1, SHA256, SHA512)
- Perfect Forward Secrecy (PFS) is an added level of encryption, it is not necessary to enable it, but, if you wish to use the added encryption level the options are None, DH1, DH2 and/or DH5
- Under Related Settings make sure the Zone is set for "IPSec_VPN"
- Click the OK button to save/apply the settings
Note: The caution symbol to the right will appear on areas where input is required or if there is a mistake with the entry, such as illegal/unsupported characters. 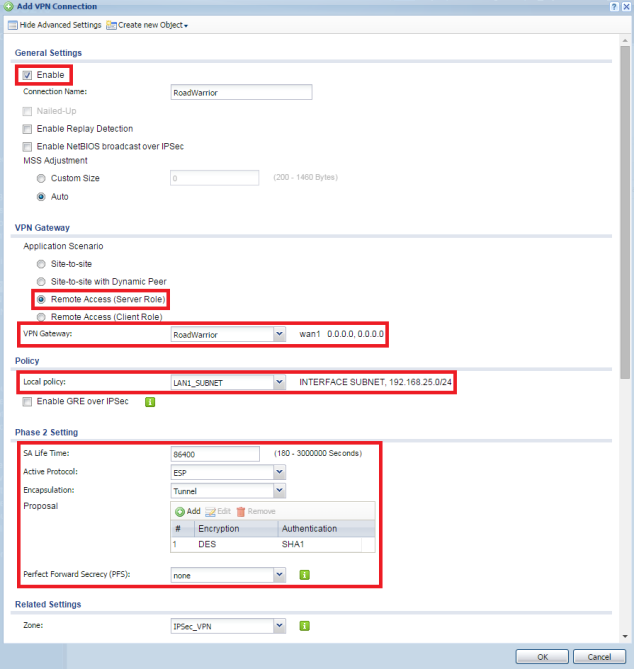
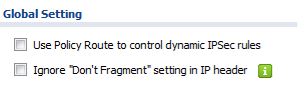
Now that Phase 1 and Phase 2 of the VPN rule have been completed, uncheck the box to "Use Policy Route to control dynamic IPSec rules". Unchecking this option will allow the ZyWALL to automatically create routes for connected VPN users. Click the Apply button at the bottom of the window to save the changes.
ZyWALL VPN Client Setup
To configure the ZyWALL IPSec VPN client open the client software configuration panel.
- Right-Click the "VPN Configuration" option and select "New Phase 1" or (on your keyboard) press Ctrl+N
- For "Remote Gateway" type in the public IP address or Domain/DDNS hostname
- For "Authentication" type in the password for the users account (password for vpn-user account for this example)
- Set the phase 1 setting algorithms selected for the VPN Gateway rule on the ZyWALL router

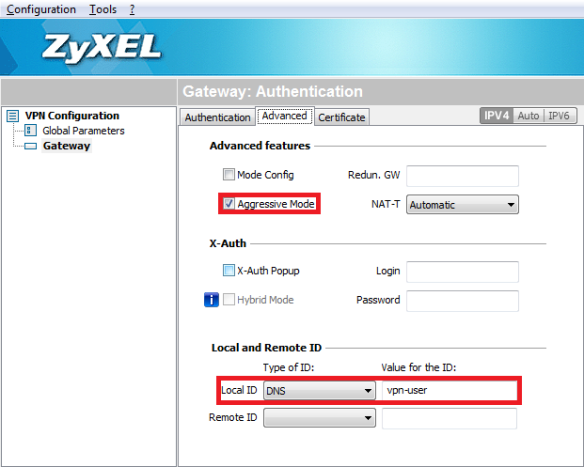
- Click the "Advanced" tab
- Check the box to use "Aggressive Mode" for the connection
- Under Local and Remote ID click the dropdown for "Local ID" and select "DNS", type the username for the user account under "Value for the ID" field (vpn-user for this example)
- Right-Click the phase 1 configuration (Gateway) option on the left pane and select "New Phase 2" or (on your keyboard) press Ctrl+N
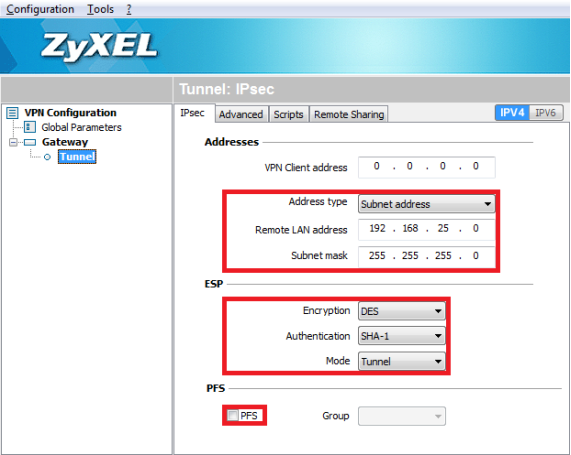
- On the tunnel (Phase 2) rule "Subnet Address" from the Address Type dropdown and type in the ZyWALL's LAN1_SUBNET (based on what was selected for the Local Policy dropdown on the VPN Connection rule back on the ZyWALL router)
- Set the phase 2 setting algorithms selected for the VPN Connection rule on the ZyWALL router
- Check/Uncheck the PFS (Perfect Forward Secrecy) option and select the appropriate group based on the VPN Connection rule on the ZyWALL router.
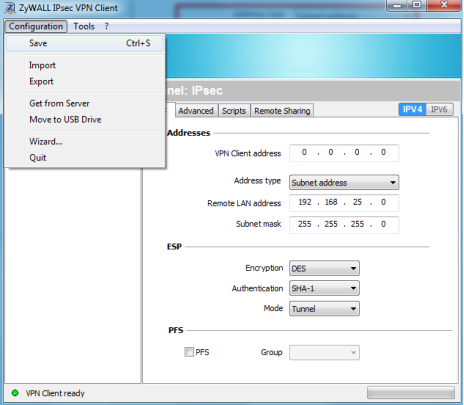
- Click the "Configure" menu option and Save the settings or (on your keyboard) press Ctrl+S
- To dial the VPN tunnel right-click the "Tunnel" rule option on the left pane and select "Open Tunnel" or (on your keyboard) press Ctrl+O
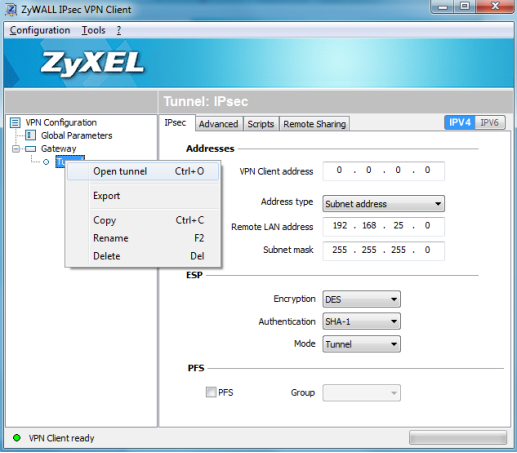
- A small window will open on the bottom right corner showing the dial-up process

Testing & Troubleshooting
Attempt to establish a VPN connection to the router, once the connection is established try pinging or accessing any resources from the remote network.
- If you cannot get traffic through the VPN tunnel:
- Disable the firewall on the remote host to make sure it is not blocking the request.
- Attempting to access resources using computer hostname, try using the IP address assigned to the computer instead. Using a computer hostname requires the NetBIOS broadcast protocol to resolve the computers IP address, broadcasts are not supported by the IPSec standard. Because broadcasts are not supported by the IPSec VPN standard we cannot guarantee that using hostnames instead of IP's will work. A work around for this limitation of the IPSec standard would be to use a WINS server.
- Disable the ZyWALL routers firewall.
- Make sure there are no IP conflicts, if the ZyWALL network is configured to use the 192.168.1.0/24 IP scheme and the remote user is also using the same IP scheme, traffic will not route through the VPN tunnel properly.
- Check the host network gateway, if the local router (not the ZyWALL) does not have VPN pass-through enabled or opening the necessary ports, the VPN may not function properly.
- Contact tech support for further assistance.
- VPN tunnel will not establish/connect:
- Make sure your network router is allowing the IPSec ports through (UDP:500 and UDP:4500) or be sure to enable VPN pass-through if the router supports this option. Bypass the router is possible to make sure it is not causing the problem.
- Make sure your ISP is not blocking VPN ports, some providers will block the VPN ports on their end.
- Verify that your computer firewall is allowing communications from the VPN client.
- Update your NIC cards drivers (Ethernet and/or Wi-Fi).
- Check the VPN settings on the ZyWALL and make sure they match the software client configuration.
- Contact tech support for further assistance.
Comments
0 comments
Please sign in to leave a comment.