
This guide is designed to help you enable and setup the internal captive portal page for guest access. This method is utilized in a hospitality scenario to limit users who will have access to wireless network and internet. The purpose of the captive portal is to redirect users connected to the guest network attempting to access the internet to a login page so they can provide credentials for internet access. This guide is broken down into 4 parts:
- Enabling the captive portal feature to redirect users to login page for internet access. (Captive Portal Setup)
- Configuring the UAG with billing profiles, if you will be charging for internet access. (Billing Profile Setup)
- Setting up the ticket printer. (Thermal Printer Setup)
- Setting up a guest Wi-Fi SSID broadcast. (Wi-Fi Profile Setup)
Billing Profile Setup
Thermal Printer Setup
Wi-Fi Profile Setup
Supported Devices
UAG2100 – Firmware version 4.00(AATD.0) and higherUAG4100 – Firmware version 4.00(AAIZ.0) and higher
UAG5100 – Firmware version 4.00(AAPN.0) and higher
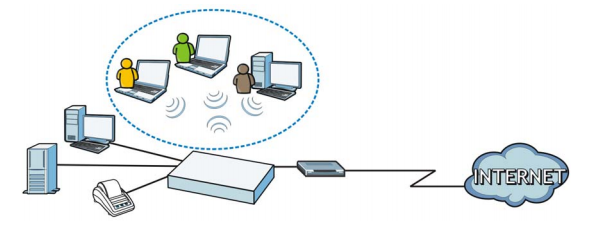
Overview
The UAG is a comprehensive service gateway. If you have a statement printer, such as the SP350E, you can connect it to the UAG allowing you to easily print subscriber statements. The UAG is ideal for offices, coffee shops, libraries, hotels and other scenarios that cater to subscribers seeking internet access. With separate zones the UAG can keep guest traffic (LAN2) separate from your private network (LAN1).
Captive Portal Setup
To access the hospitality gateways Web GUI connect your computer into port 1 or 2. Open a web browser (Mozilla Firefox, Internet Explorer, Google Chrome, etc.) and clear the address bar. On the address bar type in http://172.16.0.1 to access the UAG’s administrative login screen. Type in admin for the user name and 1234 for the password.
Once you have successfully logged in to the web configurator (Web GUI) go to menu Configuration→Web Authentication. Set the “Web Authentication Type” to Web Portal, Internal Web Portal is selected by default. This will allow you to force guest users to the login screen to provide user credentials before being able to access the internet.
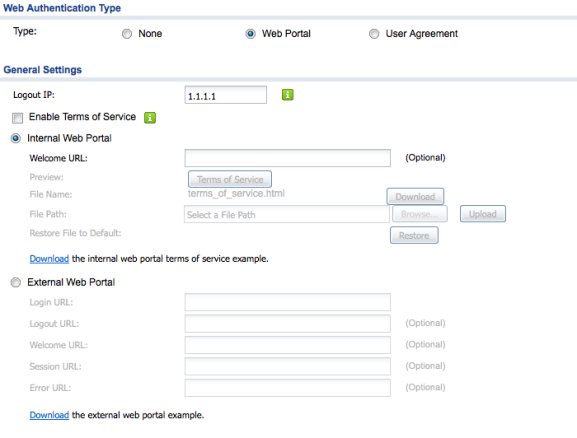
The UAG model hospitality gateways have two built-in interfaces, LAN1 and LAN2. LAN1’s main purpose is for internal use, so you can have work devices connected to the network and internet isolated from guest network and devices. LAN2 is for guest use, this network is isolated so that each user connected only has access to the internet and they cannot access other computers on the network. The LAN2 network is set to be forced to provide credentials before being able to access the internet. At the bottom of the Web Authentication menu you will find the “Web Authentication Policy Summary” where you can see the rule forcing LAN2 to authenticate.

Testing and troubleshooting the Captive Portal
Billing Profile Setup
To setup a billing profile on the UAG, go to menu Configuration→Billing. From this screen you can specify the character length for the usernames and password printouts. You can also state how many devices will be allowed to connect with the same user/password credentials from 1-10 devices, by default the UAG is set to allow only one device per user account.

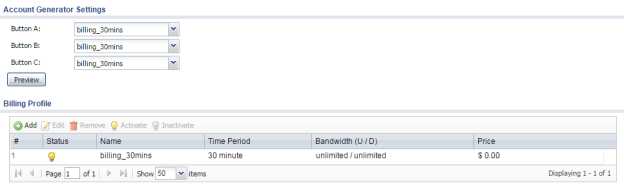
If you will be using the 3-button thermal printer click on the Billing Profile under the Configuration→Billing menu to create time profiles and program the buttons on the printer to use specific time profiles. By default there is a profile created for 30 minutes. All three buttons on the printer are programmed to use this 30 minute profile.
Testing and Troubleshooting Billing Profile Statements
Thermal Printer Setup
By default, the SP350E Thermal printer available for the UAG hospitality gateways has a manually assigned IP of 172.16.0.101, if you have changed the IP scheme of you UAG gateway you will first need to change the printer IP address before connecting to the UAG network. To configure the printers IP address you will first need to connect the printer, using an Ethernet cable, directly to your computer. Once this is done you will need to manually assign your computer with an IP address, 172.16.0.5/255.255.0.0 for example.
- Windows Vista to Windows 10
- On Windows OS open the RUN box by pressing the START menu key and the letter R keys on the keyboard simultaneously
- Type: ncpa.cpl and click OK
- Right-click the “Local Area Connection” and select properties
- Edit the “Internet Protocol Version 4” properties
- Fill in the information and click OK to save
- macOS 10.5 to macOS 10.12
- ➢ On macOS open “System Preferences”
- ➢ Click on the Network feature
- ➢ Select the Ethernet adapter/connection
- ➢ Set the “Configure IPv4” dropdown to Manual
- ➢ Fill in the information and click Apply to save
- Set your computer IP address settings back to default settings (DHCP) when finished
Open your internet browser and type in the printers IP on the address bar, http://172.16.0.101, this will get you into the login screen. To login type admin for the user name and 1234 for the password, once in the printers Web GUI you can manually configure the IP address the printer will use on the UAG network or set it for DHCP so it obtains an IP address automatically from the DHCP server.

To allow the UAG to communicate with the 3-button thermal printer you will need to setup the printer manager to allow communication. To do this, go to menu Configuration→Printer Manager and check the box to “Enable Printer Manager”. After enabling the printer manager add your thermal printers IP address to the “Printer List” to allow communication between UAG and thermal printer.

Wi-Fi Profile Setup
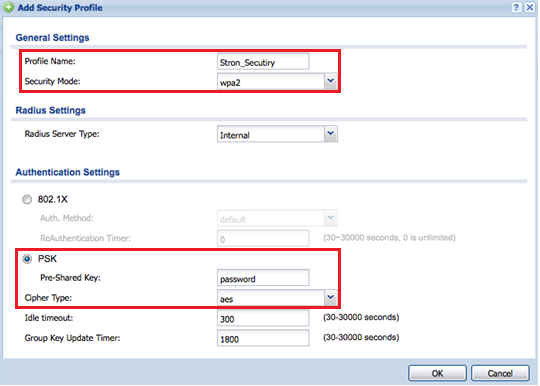
To configure wireless profiles to apply to the Wi-Fi radio go to Configuration→Object→AP Profiles. There is a tab for Radio and a tab for SSID on the AP Profile menu, click on the SSID tab. More options/tabs will appear for SSID List, Security List and MAC Filter List. Click on the ”Security List” tab if you wish to add wireless encryption to your wireless network. On the security list tab press the Add button to enter a security profile with the encryption method you wish to use, for this example we will set the encryption to WPA2 (AES).
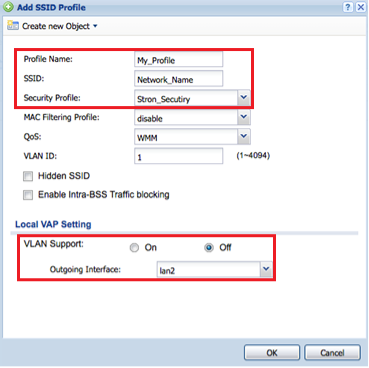
Now that the security profile has been created click on the SSID List tab to add an SSID broadcast profile for your network. When creating the SSID broadcast profile you can select the security profile to use. Under the Local VAP Setting you can select whether to bridge the SSID profile to the LAN1, LAN2 or to a VLAN.
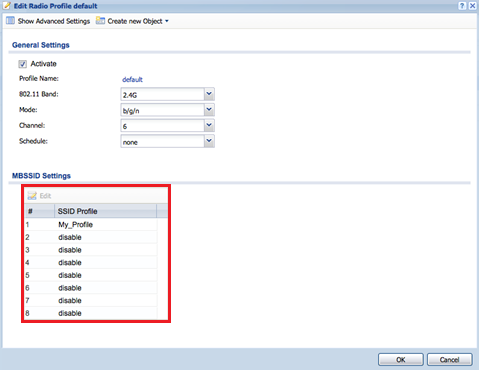
Now that the security, and SSID profiles have been created we can apply them to the Wi-Fi radio to be broadcasted. Click on the ”Radio” tab on the top left and edit the radio profile. There are two profile options, one for 2.4GHz Wi-Fi and one for 5GHz, depending on the UAG or NWA access point you purchase the device may only have one Wi-Fi radio so there is no need to configure both radio profiles unless the AP you purchased is dual band. Edit the radio profile and the channel you wish to use to broadcast the signal on and mode. Under the ”MBSSID Settings” click on one of the SSID profile entry options, doing this will give you a drop down box where you will be able to select the SSID Profile you want the radio to use (each radio can broadcast up to 8 SSID’s).
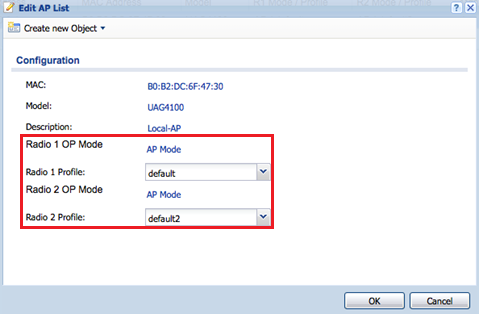
Now that the wireless is configured we can apply the Radio Profiles to the managed AP’s. If you are using the default Radio Profiles the managed AP’s will automatically start using your wireless settings, if you have created your own user configured radio profiles you can set the AP’s to use these profiles by going to the Configuration → Wireless → AP Management. Double click on the access point you want to edit the settings to and select the radio profile you want the AP to use and broadcast.
Testing and Troubleshooting
Captive Portal
Once you have setup the captive portal, connect a computer to LAN2 and attempt to access the internet. Attempting to access the internet on your browser should redirect you to a login screen like the one below.

If you are not getting the login screen:
- ➢ Make sure the UAG has internet access. If the UAG does not have an active internet connection it will not redirect users to the captive portal page.
- ➢ Check your devices IP address to confirm that is getting an IP address from the LAN2 network. Check the RJ-45 port roles on the UAG to verify your computer is connected to a LAN2 port, if device is connected via Ethernet. Check the SSID profile under the AP Profile menu to make sure the SSID is part of the LAN2 network (Local VAP Setting) if connecting wirelessly.
- ➢ Verify that the ”Web Authentication Policy Summary” is configured to force LAN2 devices to authenticate, under Configuration→Web Authentication.

- ➢ Contact ZyXEL Tech Support for further assistance @ 800-255-4101. Support is available Monday to Friday from 8AM-5PM Pacific Time. You can also reach us via email by submitting a support request form here.
Billing Profile Statement
This requires the SP350E printer connected to the UAG and configured.
Does a receipt/statement with user credential print out when you press any of the three buttons on the printer?
- ➢ If nothing prints make sure the ”Printer Manager” option is enabled and that the correct SP350E printer IP address is on the printer list.
- ➢ Make sure the receipt paper is thermal and loaded correctly (shiny/glossy side facing out).
- ➢ Make sure the Billing Profile(s) are active under Configuration→Billing→Billing Profile.
- ➢ Contact ZyXEL Tech Support for further assistance @ 800-255-4101. Support is available Monday to Friday from 8AM-5PM Pacific Time. You can also reach us via email by submitting a support request form here.
Comments
0 comments
Please sign in to leave a comment.