
Overview
The PLA4231 plugs into an ordinary power outlet to easily extend an existing network to any other electrical outlet in any room of a house, all without the need for any new cabling.

Supported Devices
PLA4231
Initial Setup
Connect the PLA4231 appliance to a power source, wait about 30 seconds for the boot process to complete. Once the PLA appliance is fully booted connect your computer directly to one of the available Ethernet connections to set up the device for the first time.
An IP address will need to manually be configured on the connected computer to access the PLA's WebUI. The computer should be configured with an IP address in the range of 192.168.1.3~192.168.1.254, with a subnet mask of 255.255.255.0. 192.168.1.2 should not be used as this is the IP address manually configured on the PLA4231 by default. Please reference your computer manufacturer if you need assistance in configuring a manual IP address on your computer. Step by step instructions on this procedure can be obtained from Microsoft (for Windows OS) support website or Apple (for macOS) support page.
Accessing the WebUI
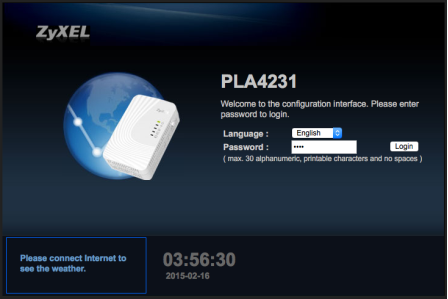
With the computer connected via Ethernet to the PLA appliance, and configured with a 192.168.1.X IP address, open an internet browser (Firefox, Safari, Chrome, IE, etc.) and on the address bar type in http://192.168.1.2, this will provide access to the PLA's configuration screen.
On the password prompt type, 1234 to login as the device administrator.
Wizard Setup
Depending on the firmware revision currently installed on the appliance a setup wizard may appear. In this case please follow the prompts to configure the wireless settings.
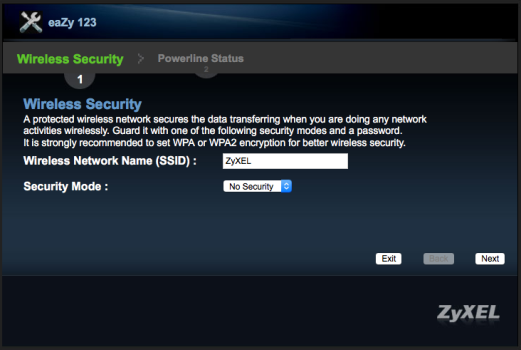
Once you have gone through the wizard setup, click the "Finish" button to apply the settings.
Manual Setup
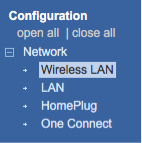
If the firmware/software currently running on the device is an older revision the device will need to be configured manually rather than going through the easy setup wizard. For this setup once successfully logged in you will be displayed a status page. On the far left of the WebUI window there are four (4) icons for the different menus. If the mouse is placed over each icon it will display the menu name. Click on the "Configuration" menu button.

From the configuration menu click on the "Wireless LAN" option under the Network sub-menu.
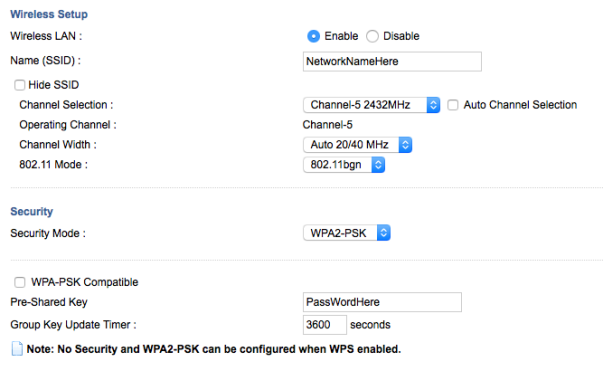
In the wireless menu you can change the name of the wireless signal and setup or change the wireless password.
- Name (SSID) – Type in what you would like to call the wireless signal
- Uncheck the "Auto Channel Selection" feature. This feature allows the appliance to scan the area for wireless interference and change wireless channel if needed to one that is less impacted by interference. This option can cause random unnecessary wireless disconnects while the appliance changes to a new channel. Disabling the feature will minimize random drops due to the feature.
- Security Mode – Set the desired wireless security mode/level and create a password for the wireless network.
- Click the "Apply" button at the bottom of the screen to save the changes.
Once this setting is applied click on the "WPS" tab to disable the feature. WPS or Wi-Fi Protected Setup allows clients with this feature to automatically establish a secure connection without the need of scanning for wireless signals, selecting the correct wireless signal and entering long passphrases. This feature allows the user to press the WPS button on the PLA appliance, then press the WPS button on the client (computer, tablet, smartphone, etc.) and they will find each other to establish the connection. Although this is a much simpler process WPS can impede legacy wireless devices from establishing a connection to the wireless network. If your network currently consists of older wireless devices, 2006 and older it is a good idea to disable the feature. If your network consists of newer wireless appliances the feature can be left enabled.
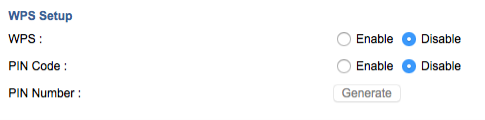
If the feature is disabled please be sure to click the "Apply" button at the bottom of the screen to save the changes.
Appliance IP Address
By default the PLA is configured with an IP address of 192.168.1.2, while this is the most commonly used IP scheme used by router manufacturers there are a few reasons why you may want to change this address:
- Installing more than one PLA4231 in the same network
- 192.168.1.2 is already in use by a different device on the network
- The network uses a different IP scheme
To change the IP address of the PLA4231 click on the "LAN" option under the Network sub-menu. From this screen you can choose to enter in a new manually assigned IP address to match the desired network scheme or set the PLA to "Obtain an IP Address Automatically" which will allow the PLA to ask your network routers DHCP server for an IP address.
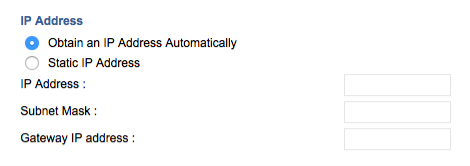
Click the "Apply" button at the bottom of the screen to save the changes.
Upgrade Firmware/Software
It is always a good idea to use the latest firmware/software patch for your device. This will make sure your device has the latest drivers, features or security patches it needs to give you the best performance available.
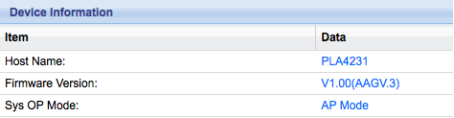
You can find out what firmware/software version the PLA is currently running from the status page.
For newer versions of the firmware/software you can visit Zyxel's FTP site at ftp://ftp.zyxel.com to check for any updates to the firmware revision.
Note: Any firmware patch downloaded from the FTP site is compressed in either a ZIP or RAR format. Inside the compressed file is a BIN file this is the firmware/software patch that will need to be uncompressed in order to upload to the PLA appliance.
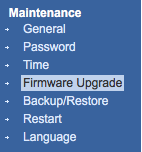
To upgrade the firmware on the device click on the "Maintenance" menu option of the far left.

From the Maintenance menu click on the "Firmware Upgrade" option.
Click the "Browse" button to select the BIN file to upgrade the device with.

Click the "Upload" button to start the firmware upgrade.
Comments
0 comments
Please sign in to leave a comment.