

This walkthrough describes how to setup the WAP3205/WAP3205 v2 in wireless AP Mode.
Overview
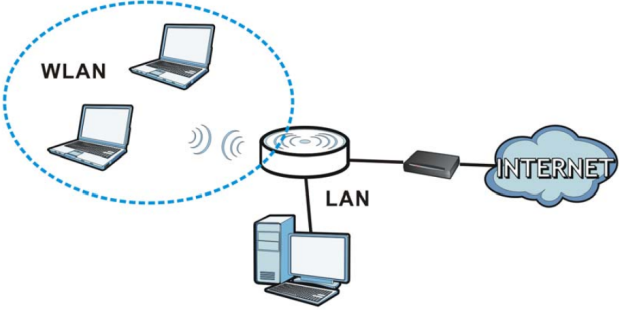
The WAP3205 is set to access point mode by default. In this mode the device bridges a wired network (LAN) and wireless LAN (WLAN) in the same subnet.
Supported Devices
WAP3205
WAP3205 v2
Table of Content
Initial Setup
Manually Set IP on Windows OS
Manually Set IP on macOS
AP Wizard Setup
AP Manual Setup
Advanced Configuration Options
Initial Setup
Start by connecting the power cord to the WAP access point and power the device ON, make sure the toggle switch on the side is set on the wireless mode you wish to use [AP | UR | CL]. Use the provided Ethernet cable to connect a computer directly to the WAP for the initial configuration.
By default the WAP access point has a static IP address configured of 192.168.1.2. In order to access the Web Configurator and configure the settings on the access point the computer needs to be configured with a manual IP address within the range of 192.168.1.3~192.168.1.254.
Click the link below for your computer operating system for instructions on how to manually configure an IP address:
Manually Set IP on Windows OS
Manually Set IP on macOS
AP Wizard Setup
- On the back of the WAP3205/WAP3205 v2 press and hold down the reset button for 15 seconds to undo any previous configuration. If you have the WAP3205 v2 make sure the switch is toggled on the "AP" mode before continuing.
- Open your internet browser and on the address bar type http://192.168.1.2 to open the WAP3205/WAP3205 v2 login screen.
- Default login password is 1234.
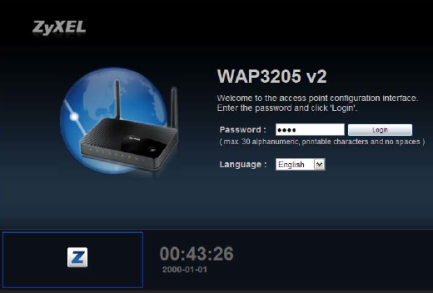
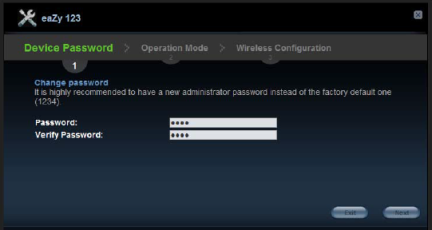
- Once logged into the WAP it will run through the configuration wizard. First screen will ask you to change the default password from 1234 to something else. Type in a new password and hit the Next button or ignore changing the password by just hitting the Next button.
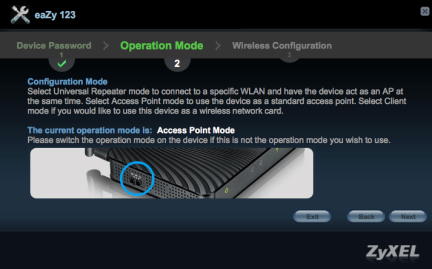
- In the operation mode screen select Access Point Mode if you have the WAP3205. If you have the WAP3205 v2 the toggle should already be set in "AP" from step 1. Hit the Next button.
WAP3205

- WAP3205v2
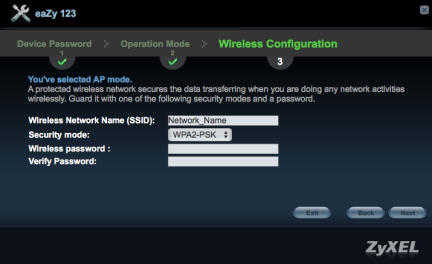
- Use the following screen to specify the Wireless Network Name (SSID) and Security Mode you wish to set/use. Click Next to finish the wizard.
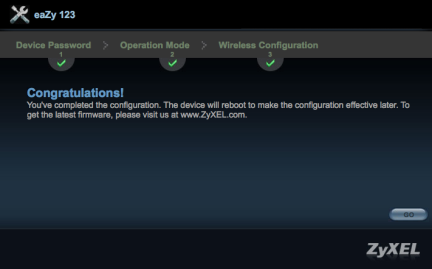
- The last screen is a wizard setup complete screen, click GO to apply the changes and reboot the device.
AP Manual Setup
- On the back of the WAP3205/WAP3205 v2 press and hold down the reset button for 15 seconds to undo any previous configuration. If you have the WAP3205 v2 make sure the switch is toggled on the "AP" mode before continuing.
- Open your internet browser and on the address bar type http://192.168.1.2 to open the WAP3205/WAP3205 v2 login screen.
- Default login password is 1234.
- Exit the Setup Wizard if it appears by selecting the Exit button. This will prompt you to login to the device again but this time it will open the advanced setup screen rather than the setup wizard. There are four menu icons located on the left side of the screen, mouse over each icon to display the name of the menu. Click on the configuration menu icon to manually set the Wi-Fi settings.
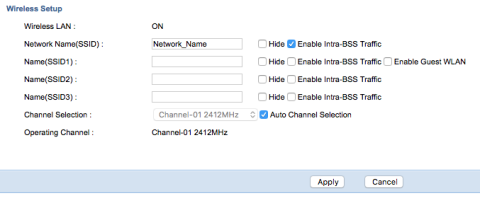
- There are multiple tabs available in the wireless network menu (General, Security, MAC Filter, etc.). Click the General tab to make the following changes.
- Wireless Network Name (SSID) – Create a unique name for the wireless network.
- Hide – This option should be unchecked. There are better ways to secure the wireless network than hiding the name from the broadcast. This type of setup adds extra steps when attempting to connect to the Wi-Fi.
- Enable Intra-BSS Traffic – This option should be checked. Disabling this feature will isolate all wireless devices from communicating with each other.
- Channel Selection – This depends on the networks environment. Settings this option to "Auto Channel Selection" allows the WAP to automatically change the channel to one with less interference. The downside to this option is that wireless clients will be disconnected during this process and will need to re-establish connection to the new channel. This can happen often in urban areas where there are many Wi-Fi signals close together. Manually selecting the channel will ensure no wireless drops due to channel changes.
- Click Apply to save the settings.
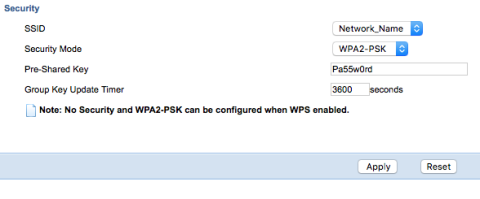
- Click the Security tab to enable encryption for the wireless network.
- SSID – Select the wireless network broadcast you wish to setup encryption for.
- Security Mode – Select WPA2-PSK from the dropdown, this is the strongest encryption type. Encryption options include: No Security, Static WEP, WPA-PSK, WPA (for enterprise use, requires RADIUS server), WPA2-PSK and WPA2 (for enterprise use, requires RADIUS server).
- Pre-Shared Key – Type in the desired wireless password (8-63 character length).
- Click Apply to save the settings.
Advanced Configuration Options
The following are advances setting option to help stabilize the device performance.
Disable Legacy 802.11 technology
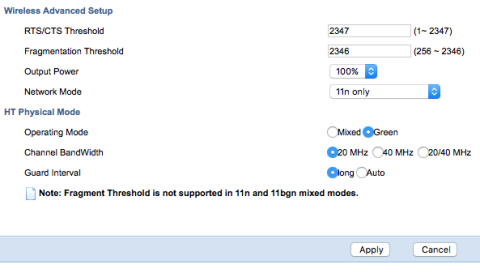
If your wireless devices support 802.11n or better (802.11ac), it is highly recommended that older 802.11 technologies be disabled (802.11a/b/g). To use only newer 802.11n wireless, click on the Advanced tab and change the "Network Mode" to use 11n only.
If you still have older devices using 802.11a/b/g which require a wireless connection, please do not change these settings.
Wireless Channel Selection
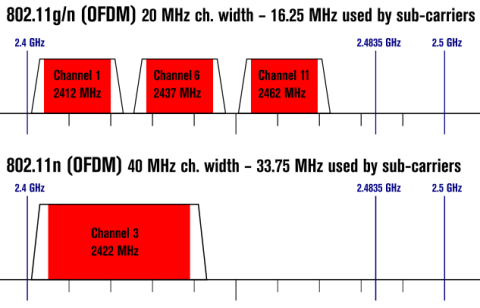
The wireless channel used to broadcast the signal can impact performance. There are high numbers of devices that create interference for the Wi-Fi signal and that number is growing. In urban areas wireless interference will be higher than rural areas. Other Wi-Fi networks, Bluetooth devices, some cordless phones, microwave ovens and other sources can cause interference with your wireless signal. This interference may impact performance (speed/throughput) and signal coverage (distance). This problem is more noticeable on the 2.4Ghz spectrum. The 2.4Ghz wireless spectrum uses 11 possible channels in the US, mostly overlapping channels.
If is recommended that a site survey be executed in your environment to determine what the best channel to use will be. There are two ways to run a survey: hardware appliance or software on computer.
Hardware Appliance – Most hardware devices used for wireless site surveys can detect signals from Wi-Fi, Bluetooth and other sources. This is the best way to gather information on what signals are interfering in the environment. This is also pricey, hardware may start in the low hundred dollars and reach thousands.
Software Survey – This is a cheaper option as some companies offer free Wi-Fi site survey software. The only downside to this method is that only Wi-Fi signals cab be detected.
Channel Bandwidth (bonding)
Bonding channels will increase the throughput performance of your wireless connection. Bonding channels, however, can also increase wireless interference. Example: Using a 40MHz channel bandwidth on the 2.4GHz spectrum, if the main broadcast channel is 11 and the route uses channel 7 for the bonding, the signal broadcast will receive interference from other devices using channels 3 and higher. Because of the low amount of possible non-overlapping channels on the 2.4GHz spectrum, it is recommended that channel bonding not be used, 20MHz bandwidth only.
WPA2-PSK for Wireless Security
To maximize performance and security it is recommended that WPA2 encryption be used on the wireless network. WPA2-PSK can use a password up to 63 characters in length; please keep in mind that the longer the password the more time it takes to encrypt/decrypt the packets over the wireless which may decrease performance. 802.11n/ac wireless standards require WPA2 encryption to reach HT (High Throughput) and/or VHT (Very High Throughput) data rates. Using a lower security method, WEP or WPA, will lower the 802.11 mode to use 802.11a/b/g.
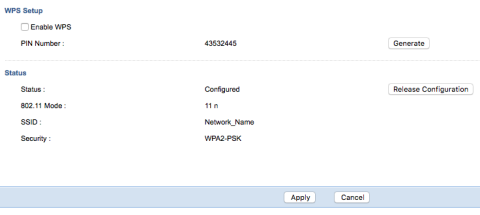
Disable WPS (Wi-Fi Protected Setup)
Developed in 2006 by the Wi-Fi Alliance to allow home users with little experience or knowledge about wireless security to add devices to the wireless network with encryption. There are four available methods to deploy WPS: WPS push button, PIN number, NFC (Near Field Communication) or USB flash drive.
It is recommended that the WPS feature be disabled due to design vulnerabilities. WPS requires an 8 digit PIN to authenticate client devices, this key may be cracked in about four hours or less.
Comments
0 comments
Please sign in to leave a comment.