This document covers the options and steps for setting up a wireless encryption on your X150N wireless router.
Step1: Router Login
Connect your computer to the wireless router using an Ethernet cable. Make sure to plug into one of the four LAN ports on the back of the router. Then on your computer, open either Internet Explorer or Mozilla Firefox. Clear out the address bar at the top of the screen and type in 192.168.1.1.

After typing the IP address of your router and hitting Enter, you should get the X150N login window. For the default username and password, use Username: admin, Password: 1234. Click on the login button once you have entered the username and password.
Step 2: Setting up Your Wireless Network Name (SSID)
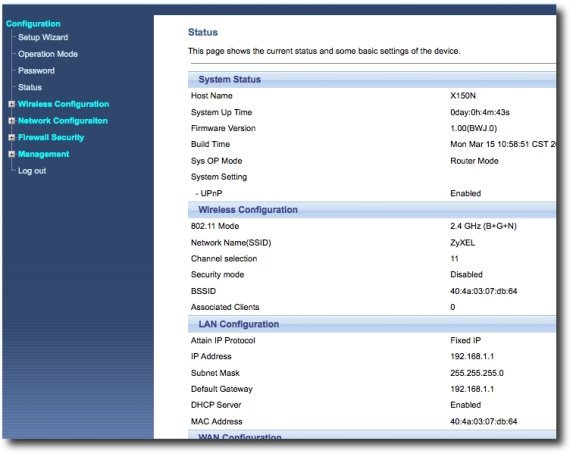
Once logged into the X150N you will see the Status page. On the left side of the screen you will see the different settings options. Click on Wireless Configuration.

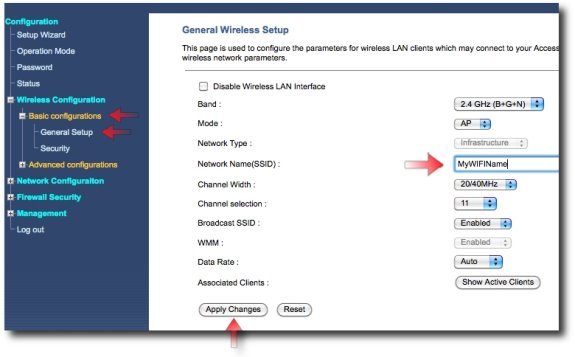
Under Wireless Configuration, click on Basic Configurations and then General Setup. On this screen, the only setting you will be concerned about is the Network Name(SSID). The default is ZyXEL. You can change the network name to say what ever you want. Name your network something identifiable by you, but do not use personal information as this network name can be seen by anyone within range of your wireless network.

Once you have entered the network name you want, click Apply Changes. You will be asked if you wish to restart the router now. Click the Reboot Now button to save activate your settings change. Or click Reboot Later if you have further settings to change.

Step 3: Setting up Your Wireless Security
Once your wireless network name has been set up you will want to protect your network with a password. Setting a password or “encryption” on your network keeps unwanted people from connecting to the network and from seeing your traffic will you connect to the internet. Setting up security is highly recommended.
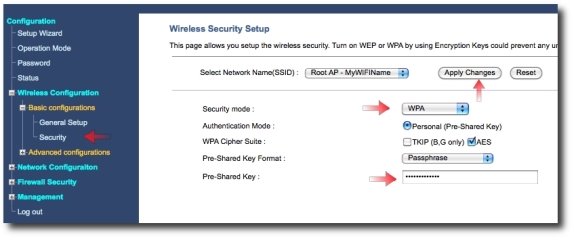
Under Wireless Configuration and Basic Configurations, click on Security. On this page, you will have a couple of different options for your security setup. You will want to choose either WPA or WPA2. If you are connecting the X150N to all 802.11n devices, you will want to use WPA2 because this encryption allows you to get the fastest speeds when connecting with all 802.11n devices. With either WPA or WPA2 you will need to enter a Pre-Shared Key. This key must be eight or more characters long, can contain any numbers or letters, and is case sensitive.

Once you have entered your Pre-Shared Key, click on Apply Changes. When you are prompted to reboot the router, click Reboot Now. The router will take 30 seconds to reboot and apply your settings.

Once it brings you back to the screen you were on the reboot has finished. You can now connect to the X150 with the new Wireless Network Name (SSID) and wireless password which you configured.
Comments
0 comments
Please sign in to leave a comment.